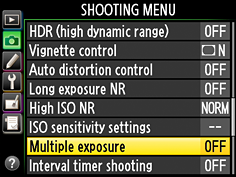
Record from 2 to 10 exposures in a single photo.
Select Multiple exposure in the shooting menu.
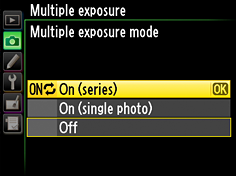
Highlight Multiple exposure mode and press ![]() , then highlight one of the following and press
, then highlight one of the following and press ![]() to select the highlighted option and return to the multiple exposure menu.
to select the highlighted option and return to the multiple exposure menu.
* ![]() : Shoot a series of multiple exposures. Multiple exposure shooting will continue until you select Off.
: Shoot a series of multiple exposures. Multiple exposure shooting will continue until you select Off.
* ![]() : Take a single multiple exposure. Normal shooting resumes when the multiple exposure has been recorded.
: Take a single multiple exposure. Normal shooting resumes when the multiple exposure has been recorded.
Highlight Number of shots and press ![]() . Press
. Press ![]() or
or ![]() to choose the number of exposures and press
to choose the number of exposures and press ![]() to return to the multiple exposure menu.
to return to the multiple exposure menu.

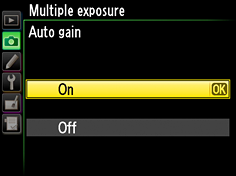
Select Auto gain and choose from the following options.
On: Gain is adjusted according to number of exposures actually recorded*.
*gain for each exposure is set to ½ for 2 exposures, 1/3 for 3 exposures, etc.
Off: Gain is not adjusted when a multiple exposure is recorded.
Recommended if background is dark.
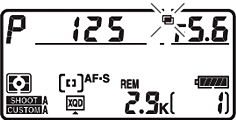
The multiple exposure icon ( ![]() ) will flash while multiple exposure shooting is in progress. If
) will flash while multiple exposure shooting is in progress. If ![]() (single photo) is selected for multiple exposure mode, normal shooting will resume when a multiple exposure is completed; otherwise, multiple exposure mode will end only when
(single photo) is selected for multiple exposure mode, normal shooting will resume when a multiple exposure is completed; otherwise, multiple exposure mode will end only when ![]() is selected. The
is selected. The ![]() icon clears from the display when multiple exposure shooting ends.
icon clears from the display when multiple exposure shooting ends.
To interrupt a multiple exposure before the specified number of exposures have been taken, select ![]() for multiple exposure mode. If shooting ends before the specified number of exposures have been taken, a multiple exposure will be created from the exposures that have been recorded to that point.
for multiple exposure mode. If shooting ends before the specified number of exposures have been taken, a multiple exposure will be created from the exposures that have been recorded to that point.
If ![]() is on, gain will be adjusted to reflect the number of exposures actually recorded.
is on, gain will be adjusted to reflect the number of exposures actually recorded.
NOTE
Shooting will end automatically if:
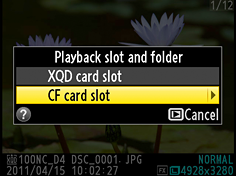
When two cards are inserted, you can choose the card from which pictures are played back by pressing ![]() and
and ![]() during playback, or by displaying 72 images in thumbnail view and pressing
during playback, or by displaying 72 images in thumbnail view and pressing ![]() .
.
A card selection menu will be displayed; highlight the desired slot and press ![]() , then highlight a folder and press
, then highlight a folder and press ![]() .
.
When two memory cards are inserted, you can use the options in the playback Copy image(s) menu to copy pictures between the two cards.
Images will not be copied if there is not enough space on the destination card or if Enable is selected for Network > Network connection in the setup menu.
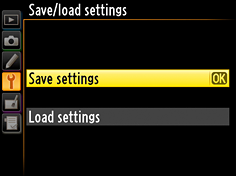
The Save/Load settings option in the set up menu can be used to share settings among D4 cameras.
Select Save settings to save settings to a memory card*, Load settings to load saved settings from a memory card.
*An error will be displayed if the card is full.
NOTE
Save/load settings is only available when a memory card is inserted in the camera, and that Load settings is only available if the card contains saved settings.
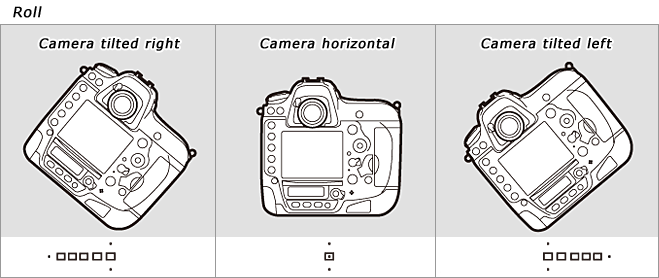
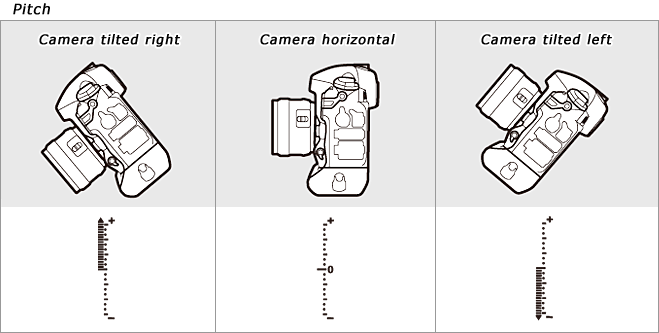
Roll and pitch data from the camera tilt sensor can be displayed for assistance in leveling the camera on a tripod and in other similar situations.
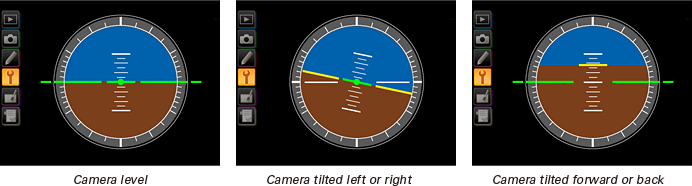
The Monitor
The Virtual horizon option in the set up menu is used to display a virtual horizon in the monitor. The roll reference line turns green if the camera is tilted neither left nor right, while the pitch reference line turns green and a dot appears in the center of the display if the camera is tilted neither forward nor back. Each division is equivalent to 5°.
In live view, you can display a virtual horizon over the view in the monitor by pressing the ![]() button.
button.
Tilt
The displays may not be accurate when the camera is tilted at a sharp angle forward or backward. Tilt will not be displayed if the camera is unable to measure it.
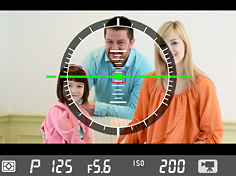
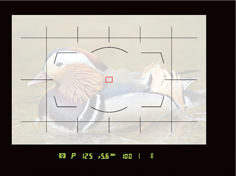
When the Viewfinder virtual horizon is selected for Custom Setting f3 (Assign Fn button) or f4 (Assign preview button) > Press, pressing the button displays pitch and roll indicators in the viewfinder.
The role of the indicators are reversed when the camera is rotated to take pictures in "tall" (portrait) orientation.
For help composing photographs, select On for Custom Setting d6 (Viewfinder grid display) to display a framing grid in the viewfinder.
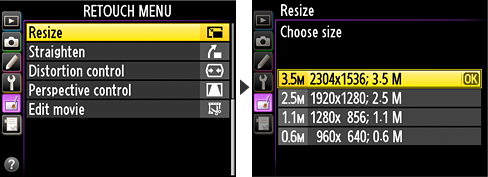
Use the Resize option in the retouch menu to create small copies of selected photographs.
Resized Copies
Playback zoom may not be available when resized copies are displayed.
Copies created from NEF(RAW), NEF(RAW)+JPEG, or TIFF(RGB) photos have an image quality of JPEG fine; copies created from JPEG photos have the same image quality as the original.
Photos taken at an image area of 5: 4 (30 x 24) can not be resized.
Digitutor is a Nikon website featuring various information that includes basic knowledge, useful techniques, and tips on taking good photos with Nikon Digital Cameras.