Follow the steps below to create silent time-lapse movies from photos taken automatically at selected intervals.
The resulting movie is recorded at the settings currently selected for Movie settings in the shooting menu.
We recommend that you connect the camera to an AC power supply using an optional EH-6b AC adapter and EP-6 power connector to ensure that shooting is not interrupted.
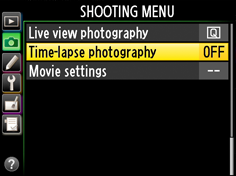
Select Time-lapse photography in the shooting menu.
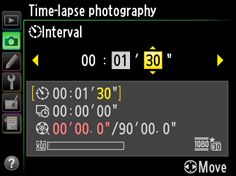
The dialog at right will be displayed. Choose an interval of from 1 s to 10 minutes* and press ![]() to proceed to the next step.
to proceed to the next step.
*The selected setting is shown in the bottom section of the dialog.
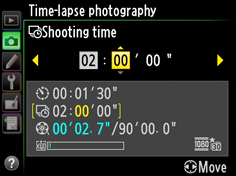
Enter a shooting time of from 1 minute to 7 hours 59 minutes* and press ![]() to proceed.
to proceed.
*The selected setting is shown in the bottom section of the dialog.
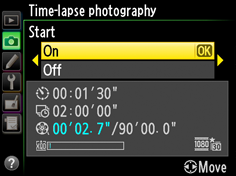
The length of the movie that will be recorded at current settings and the space available on the memory card are shown at the bottom of the time-lapse photography dialog.
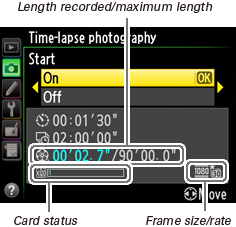
Highlight On and press ![]() *. Shooting will begin after 3 s.
*. Shooting will begin after 3 s.
*To return to the shooting menu without starting time-lapse photography, select Off.
Time-lapse photography will end automatically if the battery is exhausted. The following will also end time-lapse photography:
A movie will be created from the frames shot to the point where time-lapse photography ended. Normal photography can be resumed once time-lapse photography ends.
Note
Time-lapse photography will end and no movie will be recorded if the power source is removed or disconnected or the destination memory card is ejected.
Time-Lapse Photography
Time-lapse photography is not available in live view, at a shutter speed of ![]() or when bracketing, High Dynamic Range (HDR), multiple exposure, or interval timer photography is active.
or when bracketing, High Dynamic Range (HDR), multiple exposure, or interval timer photography is active.
To record changes in brightness, use manual exposure; for consistent framing, colors and focus, turn vibration reduction off, choose a white balance setting other than auto, and use manual focus.
When time-lapse photographs are recorded with a "1,920 x 1,080 crop" option selected for movie frame size, the area used for metering exposure, flash level, and auto white balance is not the same as the area in the final photographs, with the result that optimal results may not be achieved.
Take test shots and check the results in the monitor.
Digitutor is a Nikon website featuring various information that includes basic knowledge, useful techniques, and tips on taking good photos with Nikon Digital Cameras.