The camera can be connected to HDMI devices for high-definition movie playback and recording.
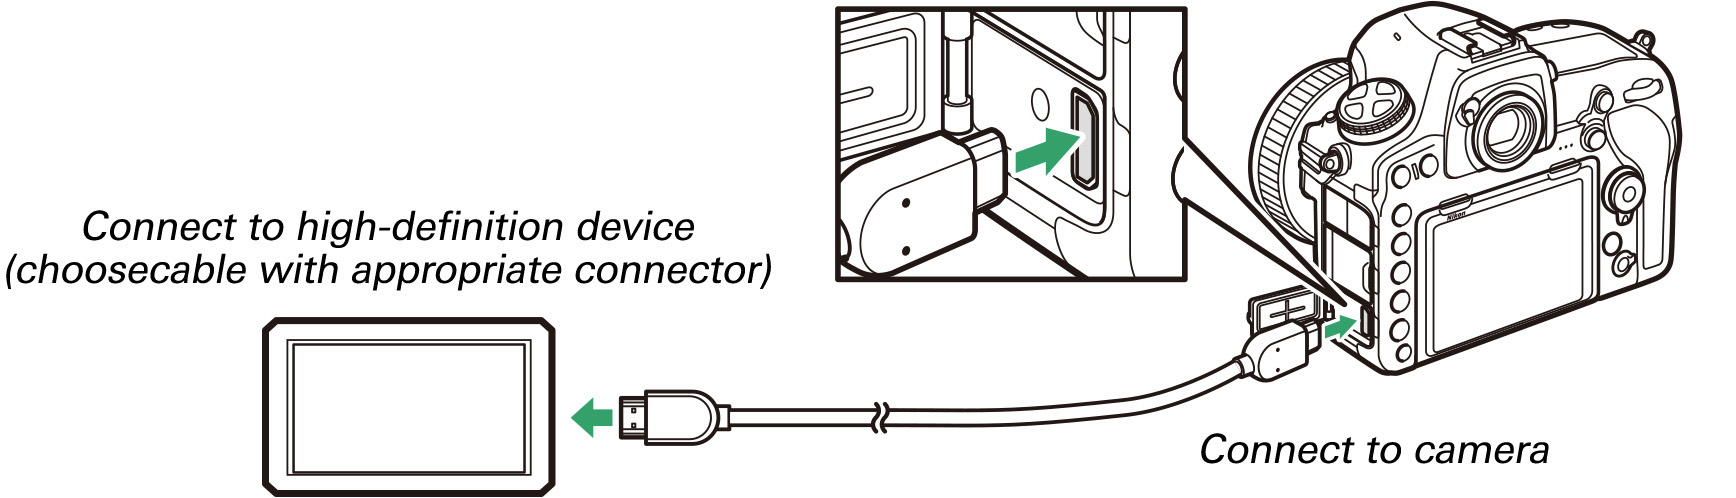
The camera can be connected to high-definition video devices using an optional High-Definition Multimedia Interface (HDMI) cable available from Nikon or a third-party type C HDMI cable. Always turn the camera off before connecting or disconnecting the cable.
The HDMI option in the setup menu controls output resolution and offers a variety of advanced HDMI options.
Choose the format for images output to the HDMI device. If Auto is selected, the camera will automatically select the appropriate format.
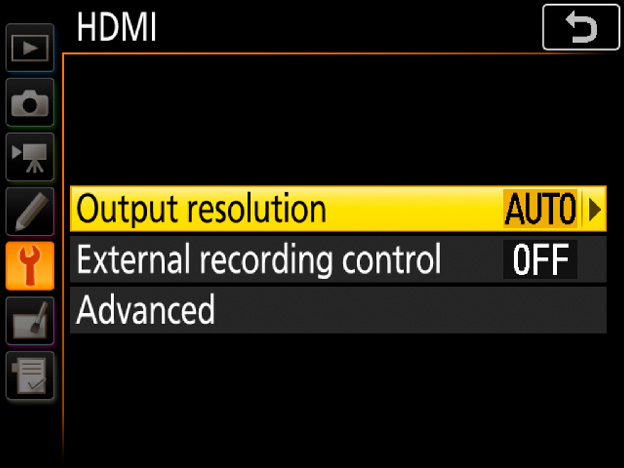
Enabling external recording control allows camera controls to be used to start and stop recording when the camera is connected via HDMI to a third-party recorder that supports the Atomos Open Protocol (the Atomos SHOGUN, SHOGUN STUDIO, SHOGUN FLAME, SHOGUN INFERNO, NINJA BLADE, NINJA FLAME, NINJA INFERNO, and SUMO). An icon will be displayed in the camera monitor: is displayed in live view, while is displayed during movie recording (note that camera controls cannot be used for movie recording when 3840 × 2160 or 1920 × 1080 slow-mo is selected for frame size; use the controls on the recorder).
During recording, check the recorder and recorder display to ensure that footage is being saved to the device. The camera will end output to the device if the monitor turns off automatically after recording has started; to ensure that recording is not interrupted, select an option for Custom Setting c4 (Monitor off delay) > Live view that is longer than the intended recording time. If a memory card is inserted in the camera, movies will be recorded both to the memory card and to external device, but note that recording will not begin in the event of a card error or if the card is write-protected and will end when the memory card is full or if recording stops automatically for any reason. Note that depending on the recorder, you may need to adjust recorder settings; for more information, see the manual provided with the recorder.
Selecting Advanced displays the following options:
| Output range | Auto is recommended in most situations. If the camera is unable to determine the correct RGB video signal output range for the HDMI device, you can choose from the following options:
|
|---|---|
| Output display size | Choose horizontal and vertical frame coverage for HDMI output from 95% or 100%. |
| Live view onscreen display | If Off is selected when the camera is connected to an HDMI device, shooting information will not be displayed in the monitor during live view photography. Note that regardless of the option selected, shooting information is not displayed at movie frame sizes of 1920 × 1080 (slow-mo) or 3840 × 2160. |
| Dual monitor | Choose On to mirror the HDMI display on the camera monitor, Off to turn the camera monitor off to save power (note that regardless of the option selected, the camera monitor remains on at movie frame sizes of 1920 × 1080 slow-mo or 3840 × 2160). Dual monitor turns on automatically when Live view on-screen display is Off. |
To prevent accidental disconnection, attach the supplied clip to HDMI cables or to the supplied USB cable as shown (the illustration shows an HDMI cable; note that the clip may not fit all third-party HDMI cables). Keep the monitor in the storage position when using the cable clip.
