“Focus stacking” combines photos shot at different focus positions into a single image with increased depth of field. The D850's new focus shift feature, which automatically varies focus over a series of shots, is used to take photos that will later be combined using focus stacking.
When shooting is complete, you can copy the photos to a computer and use third-party focus-stacking software to combine the areas that are in focus into a single image.
The following applications support focus stacking. Note that Nikon neither endorses this software nor guarantees its operation.
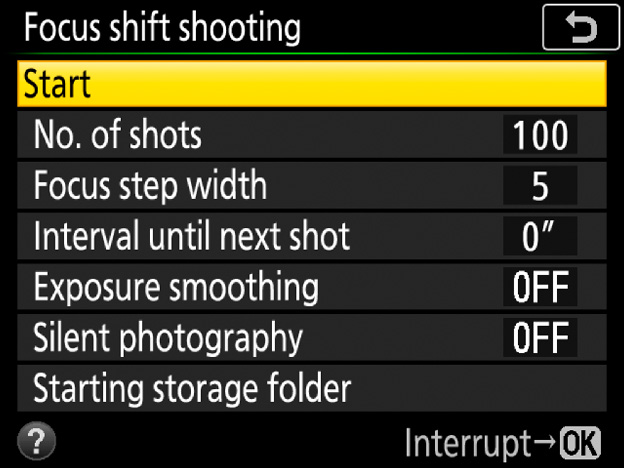
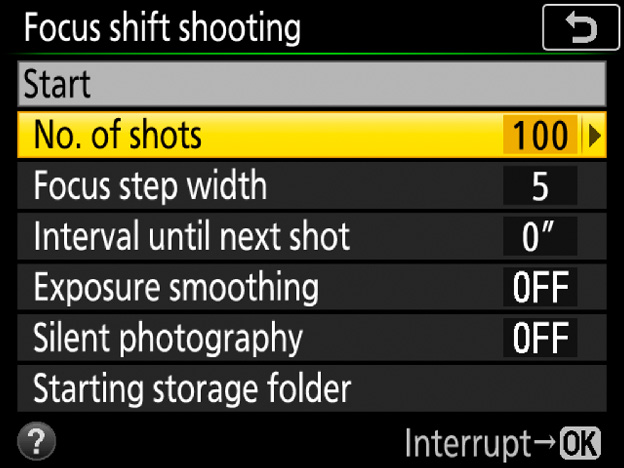
The Focus shift shooting item in the photo shooting menu is used to adjust settings for focus shift photography. The following options are available:
Start: Start shooting. The camera will change the focus distance by the selected amount with each shot.
No. of shots: Choose the number of shots (up to 300) that you will need when performing focus stacking.
Focus step width: Choose the amount the focus distance changes with each shot. The options available range from 1 to 10: choose lower values for smaller steps, higher values for larger steps.
Interval until next shot: The time between shots, in seconds. Select 00 to take photos at approximately 5 fps (release modes S, CL, CH, and MUP) or 3 fps (release modes Q and QC).
Exposure smoothing: If On is selected, the camera will adjust the exposure for each new shot to match the immediately preceding shot.
Silent photography: Select On to silence the shutter during shooting.
Starting storage folder: Highlight options and press to select or deselect. Choose New folder to create a new folder for each new focus shift sequence, Reset file numbering to reset file numbering to 0001 when a new folder is created.

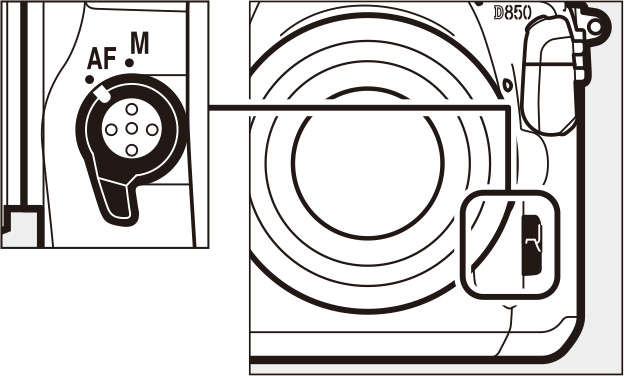
Use an AF-S or AF-P lens. After mounting the appropriate lens, choose an exposure mode of A or M so that aperture does not change during shooting (recommended). Once settings have been adjusted to your satisfaction, close the viewfinder eyepiece shutter to prevent light entering via the viewfinder interfering with photographs and exposure.
Before shooting begins, mount the camera on a tripod, disable lens vibration reduction (VR), and select a release mode other than . To ensure that shooting is not interrupted, be sure the camera battery is fully charged. If in doubt, charge the battery before use or use an AC adapter and power connector (available separately).
Focus shift is available at all image quality settings. Note that focus shift is unavailable in some situations, including when multiple exposure or HDR shooting is in progress, the camera clock is not set, an incompatible lens is attached, or no memory card is inserted.
Follow the steps below to take photographs using focus shift.
1 Rotate the focus-mode selector to AF.
Focus shift is not available with manual focus lenses.
2 Focus.
The camera takes a series of shots starting from a selected focus position and continuing toward infinity. The starting focus position should be slightly in front of the closest point on the subject. Do not move the camera after focusing.
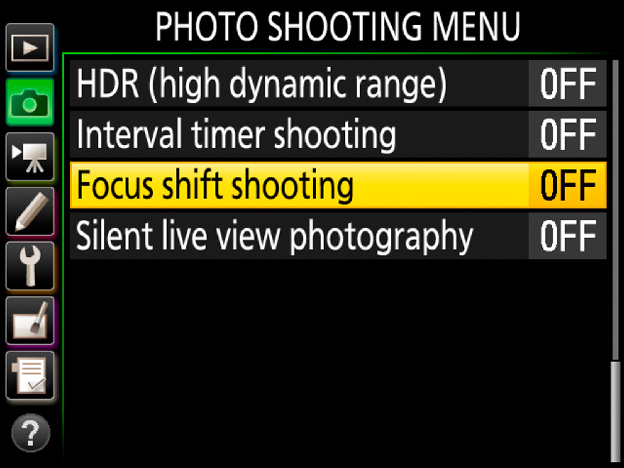
3 Select Focus shift shooting.
In the photo shooting menu, highlight Focus shift shooting and press to display focus shift options.
4 Adjust settings.
Adjust settings as described on “Focus Shift Shooting” (see this section). For more information, see “Suggested Settings” (see this section).
5 Start shooting.
Highlight Start and press . Shooting starts after about 3 s. The camera takes photographs at the selected interval, beginning at the focus distance selected at the start of shooting and progressing out toward infinity by the selected focus step distance with each shot. Shooting ends when the selected number of shots has been taken or focus reaches infinity. To end shooting before all shots have been taken, select Off for Focus shift shooting in the photo shooting menu or wait until the camera is between shots and then press or press the shutterrelease button halfway.

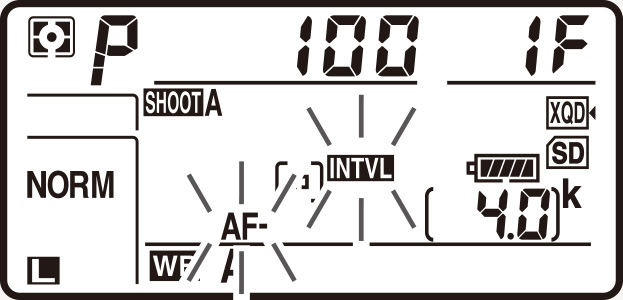
During focus shift photography, the icon will flash in the control panel. Immediately before the next shot, the shutter speed display will show the number of shots remaining.
For focus shift photography, we recommend that settings be adjusted as described below.
For improved contrast out to the edges of the frame, we generally recommend an aperture 2 to 3 stops from the maximum for the lens.
We recommend that you select Off for ISO sensitivity settings > Auto ISO sensitivity control and do not change ISO sensitivity while shooting is in progress.
No. of shots: You may need over a 100 shots for a close-up or an insect or other small object, while only a few are required when photographing a landscape from front to back with a wide-angle lens. We recommend taking more shots than you think you'll need and winnowing them down during focus stacking. See “Choosing the Number of Shots” (see this section).
Focus step width: A value of 5 or less is recommended, as higher settings increase the risk that some areas will be out of focus when the photos are stacked (see this section). Try experimenting with different settings before shooting.
Interval until next shot: 00 is recommended unless you are using a flash, in which case the interval needs to be long enough for the flash to charge.
Exposure smoothing: Off is recommended if lighting and other conditions will not change during shooting, On when photographing landscapes and the like under variable lighting.
Silent photography: Choosing On (recommended) limits camera shake and reduces power consumption and wear on the shutter. Choose Off to prevent flicker when shooting under fluorescent or mercury-vapor lighting (if flicker persists, enable Flicker reduction in the photo shooting menu or choose a shutter speed adapted to the frequency of the local power supply: 1/125 s, 1/60 s, or 1/30 s for 60 Hz; 1/100 s, 1/50 s, or 1/25 s for 50 Hz).
Starting storage folder: We recommend that you select both New folder and Reset file numbering. Each sequence of photos will be numbered from 0001 and stored in its own folder, which you may find helpful when copying the images to a computer.
The recommended number of shots varies with the lens, aperture, subject size, focus step width, and the distance to the subject, measured from the closest point on the subject to the focal plane mark () on the camera body. The figures given on pages 19 to 20 assume that the camera and subject are positioned as shown below.
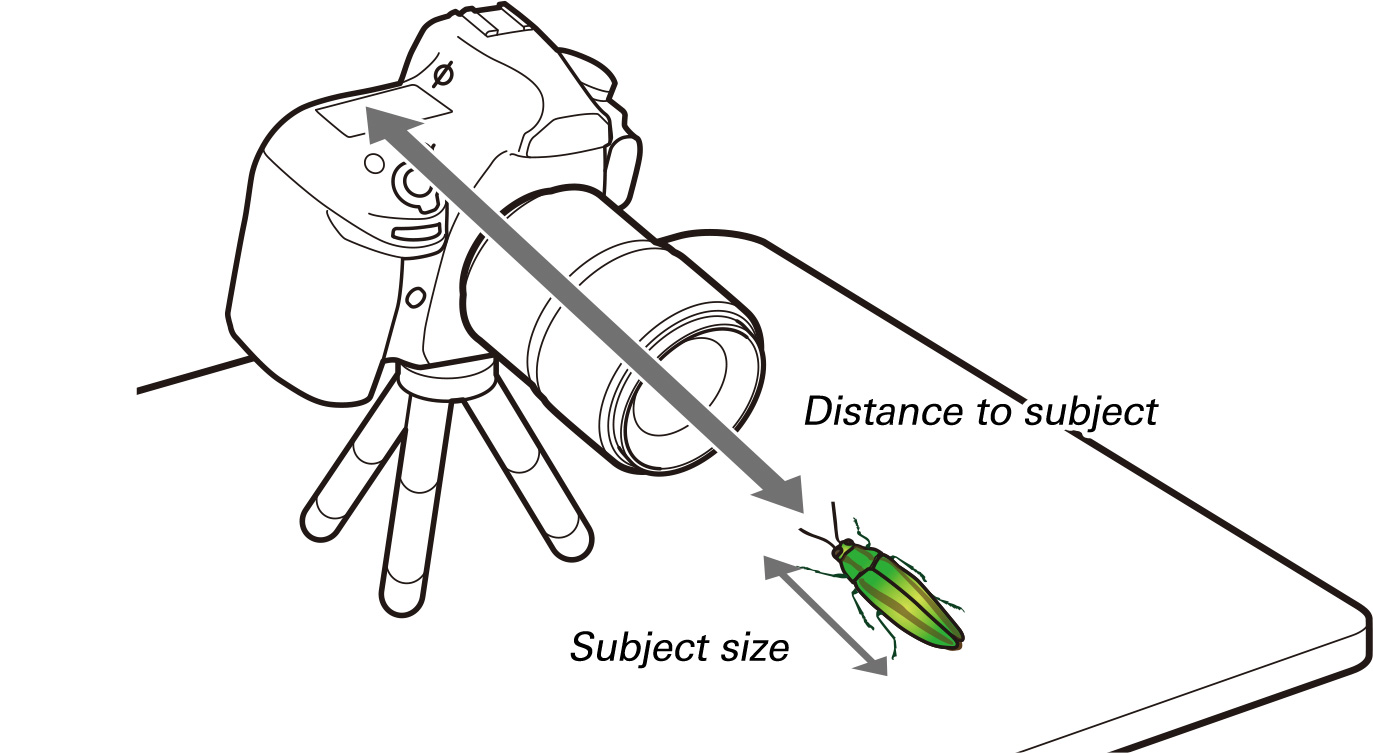
Table 1: AF-S Micro NIKKOR 60 mm f/2.8G ED, aperture f/5.6,distance 20 cm (7.9 in.)
| Focus step width | |||||||||||
|---|---|---|---|---|---|---|---|---|---|---|---|
| 1 | 2 | 3 | 4 | 5 | 6 | 7 | 8 | 9 | 10 | ||
| Subject size (in.) | 1 | 110 | 110 | 90 | 80 | 50 | 45 | 40 | 30 | 25 | 20 |
| 5 | — | — | 240 | 200 | 135 | 110 | 90 | 65 | 55 | 45 | |
| 10 | — | — | 300 | 250 | 170 | 140 | 115 | 85 | 65 | 55 | |
| 15 | — | — | — | 275 | 185 | 155 | 125 | 90 | 75 | 60 | |
Click here for the image optimized for small screens. (JPG 66.7KB).
For example, around 135 shots would be needed to photograph a 5-inch subject at a focus step width of 5.
Table 2: AF-S Micro NIKKOR 60 mm f/2.8G ED, aperture f/8, distance 20 cm (7.9 in.)
| Focus step width | |||||||||||
|---|---|---|---|---|---|---|---|---|---|---|---|
| 1 | 2 | 3 | 4 | 5 | 6 | 7 | 8 | 9 | 10 | ||
| Subject size (in.) | 1 | 120 | 80 | 70 | 60 | 40 | 35 | 30 | 20 | 15 | 15 |
| 5 | — | 200 | 165 | 140 | 90 | 75 | 65 | 45 | 40 | 35 | |
| 10 | — | 250 | 210 | 175 | 115 | 95 | 80 | 60 | 45 | 40 | |
| 15 | — | 275 | 230 | 190 | 125 | 105 | 90 | 65 | 50 | 45 | |
Click here for the image optimized for small screens. (JPG 68KB).
Table 3: AF-S VR Micro-Nikkor 105 mm f/2.8G IF-ED, aperture f/5.6, distance 35 cm (13.8 in.)
| Focus step width | |||||||||||
|---|---|---|---|---|---|---|---|---|---|---|---|
| 1 | 2 | 3 | 4 | 5 | 6 | 7 | 8 | 9 | 10 | ||
| Subject size (in.) | 1 | 130 | 80 | 70 | 65 | 60 | 55 | 40 | 30 | 25 | 25 |
| 5 | — | 220 | 200 | 185 | 150 | 130 | 100 | 85 | 70 | 60 | |
| 10 | — | 300 | 270 | 255 | 200 | 175 | 135 | 110 | 90 | 80 | |
| 15 | — | — | — | 290 | 225 | 195 | 155 | 125 | 100 | 90 | |
Click here for the image optimized for small screens. (JPG 68.7KB).
Table 4: AF-S VR Micro-Nikkor 105 mm f/2.8G IF-ED, aperture f/8, distance 35 cm (13.8 in.)
| Focus step width | |||||||||||
|---|---|---|---|---|---|---|---|---|---|---|---|
| 1 | 2 | 3 | 4 | 5 | 6 | 7 | 8 | 9 | 10 | ||
| Subject size (in.) | 1 | 95 | 70 | 60 | 55 | 45 | 35 | 30 | 25 | 20 | 20 |
| 5 | 250 | 175 | 155 | 140 | 105 | 90 | 75 | 60 | 55 | 45 | |
| 10 | — | 230 | 205 | 185 | 140 | 120 | 100 | 80 | 70 | 60 | |
| 15 | — | 260 | 230 | 210 | 160 | 135 | 115 | 90 | 80 | 70 | |
Click here for the image optimized for small screens. (JPG 69.2KB).
Although you can reduce the number of shots by increasing the step width, if the step width is greater than the depth of field, you may notice a mix of in- and out-of-focus areas when the photos are stacked.
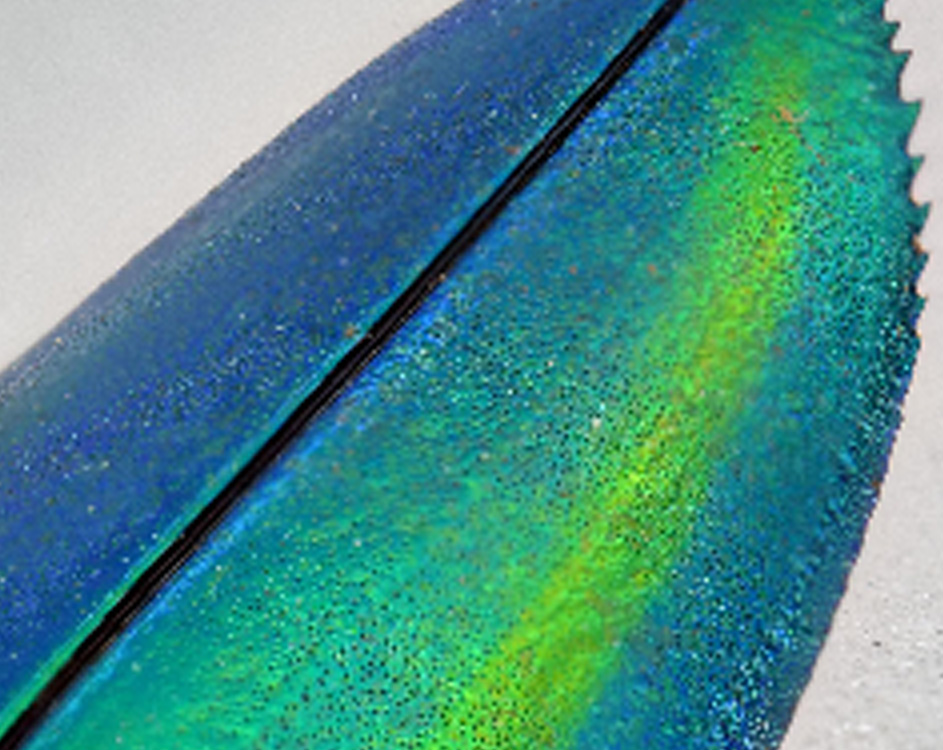
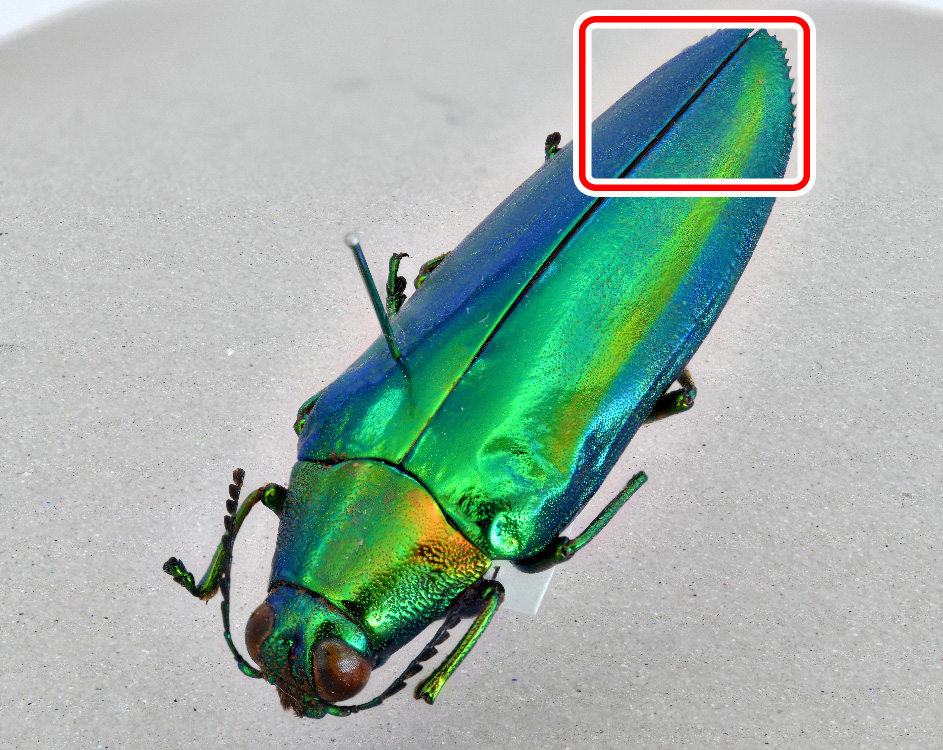
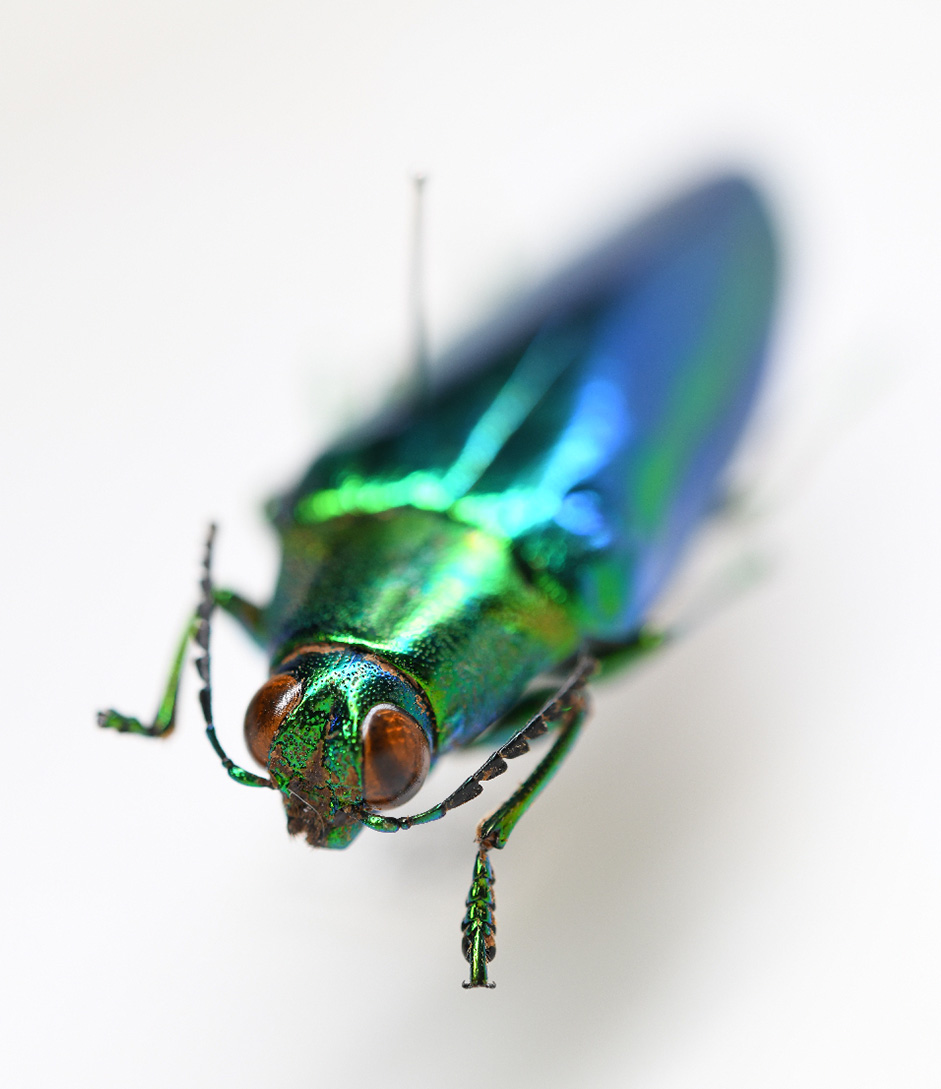
The photos for this stack were shot with a focus step width of 10. A mix of in- and out-of-focus areas is visible on the wings.
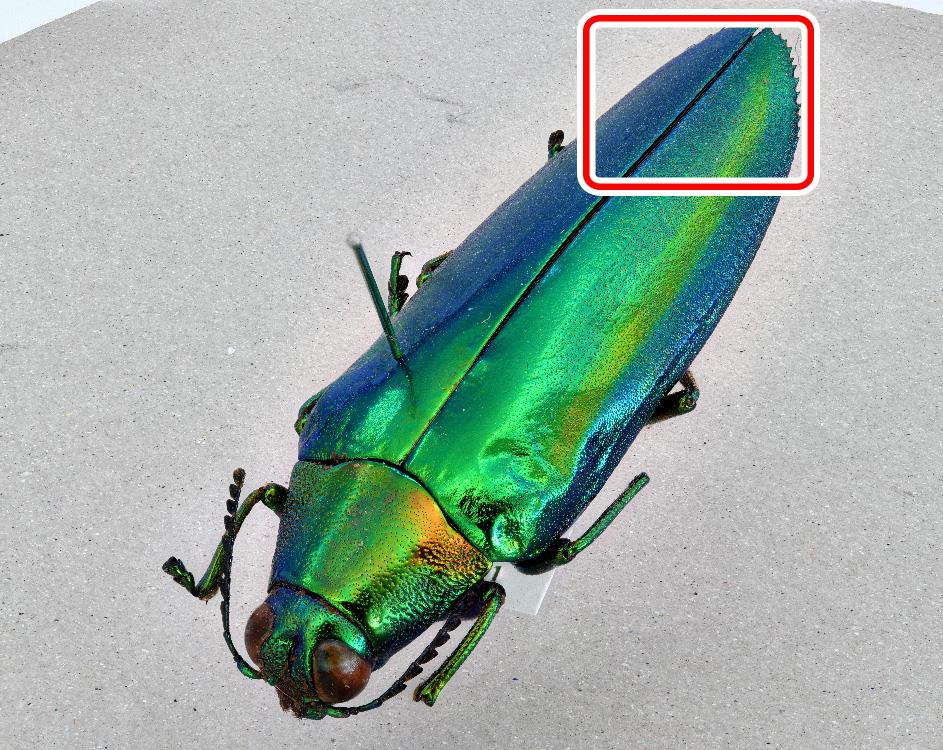
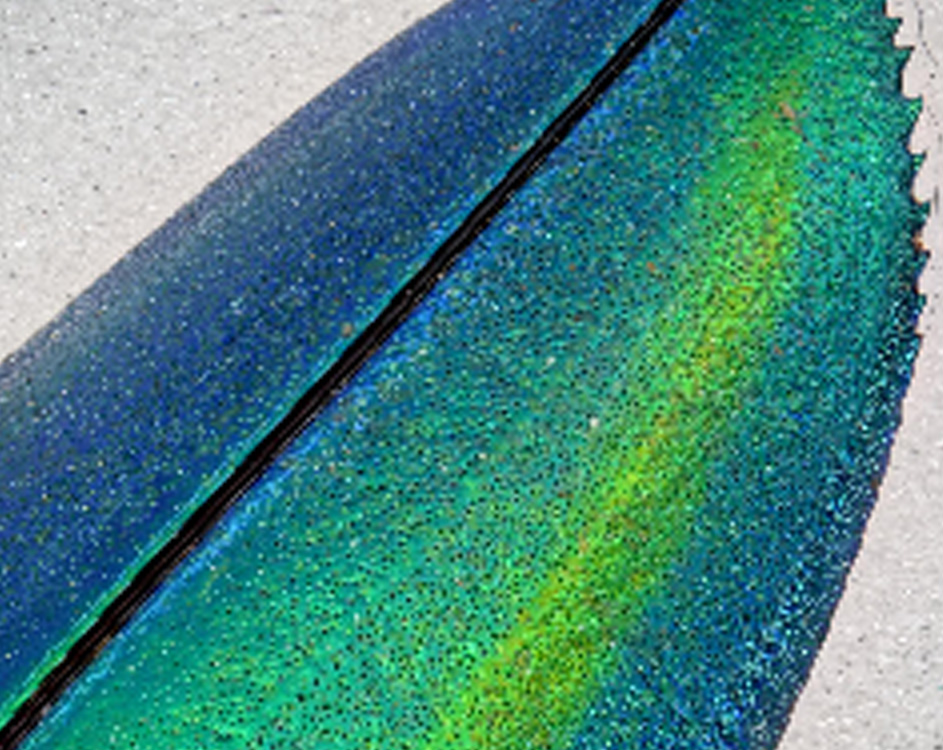
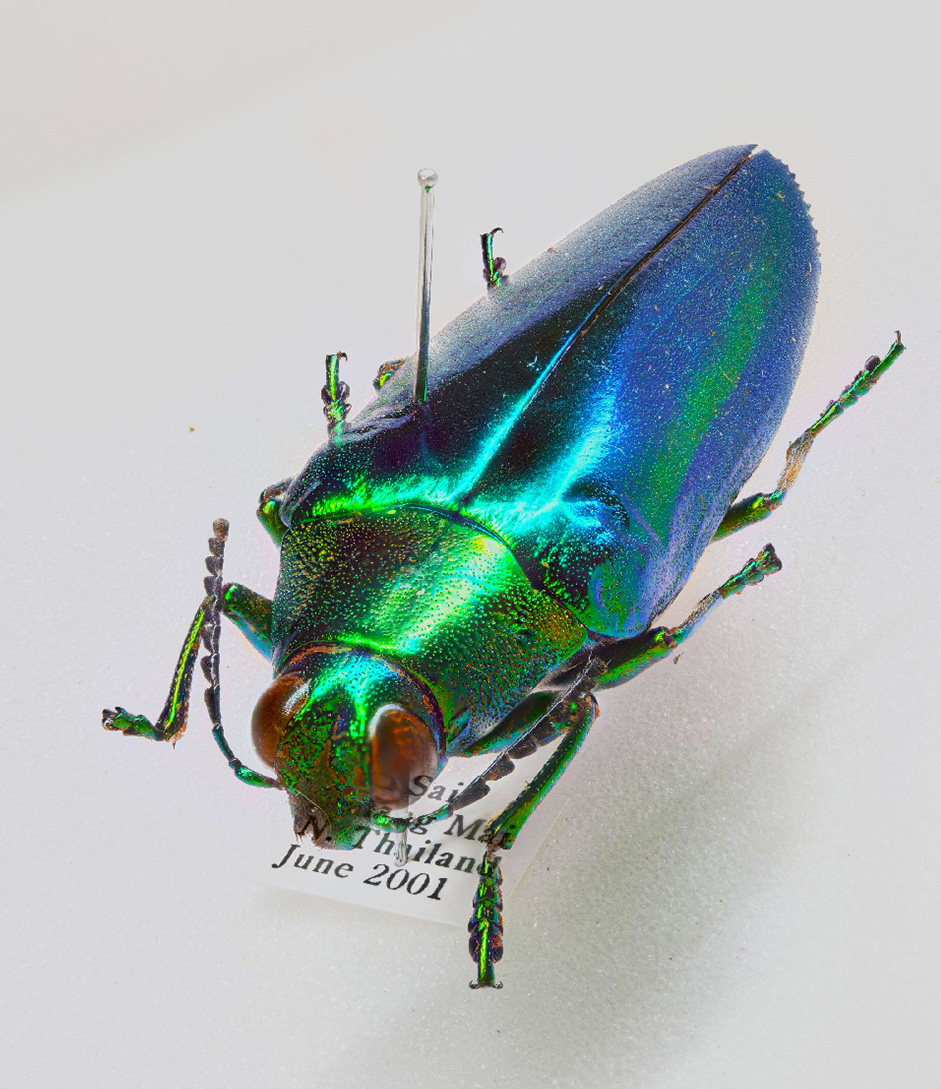
Setting the focus step width to 3 produces a smooth stack with no outof-focus areas.
Out-of-focus areas will be less obvious at lower resolutions. Check for out-of-focus areas after scaling the image to the desired size.
If the subject moves during shooting (for example, because you are shooting outdoors), focus stacking may not produce the desired results.
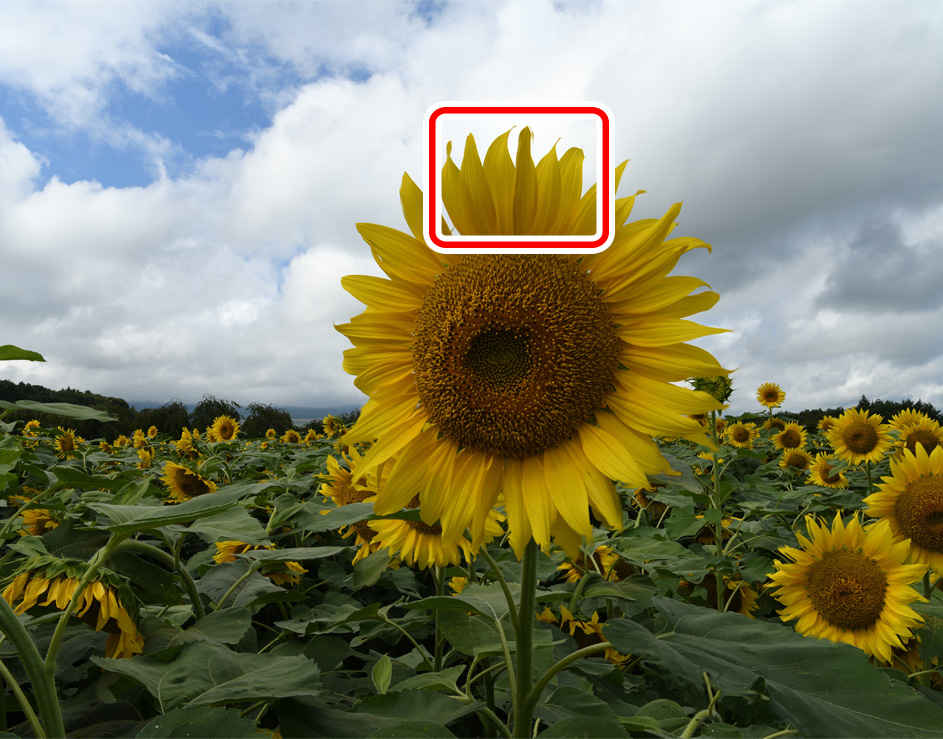
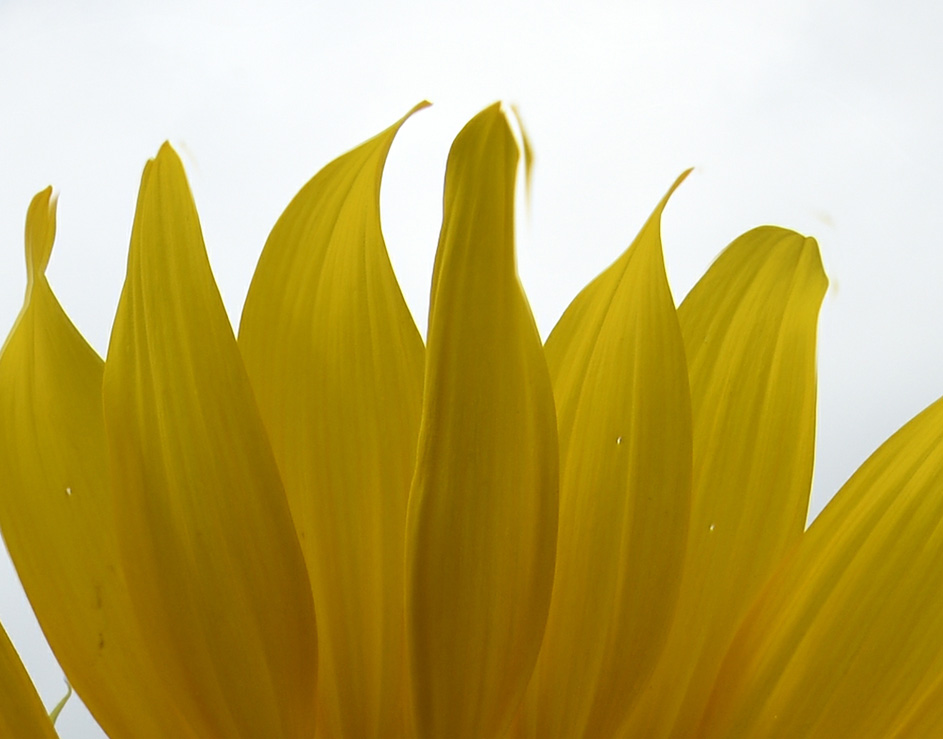
Zooming in on the petals reveals that they have been stacked in overlapping positions, giving the effect of a multiple exposure.
Delete any photos not in the desired focus range before stacking.
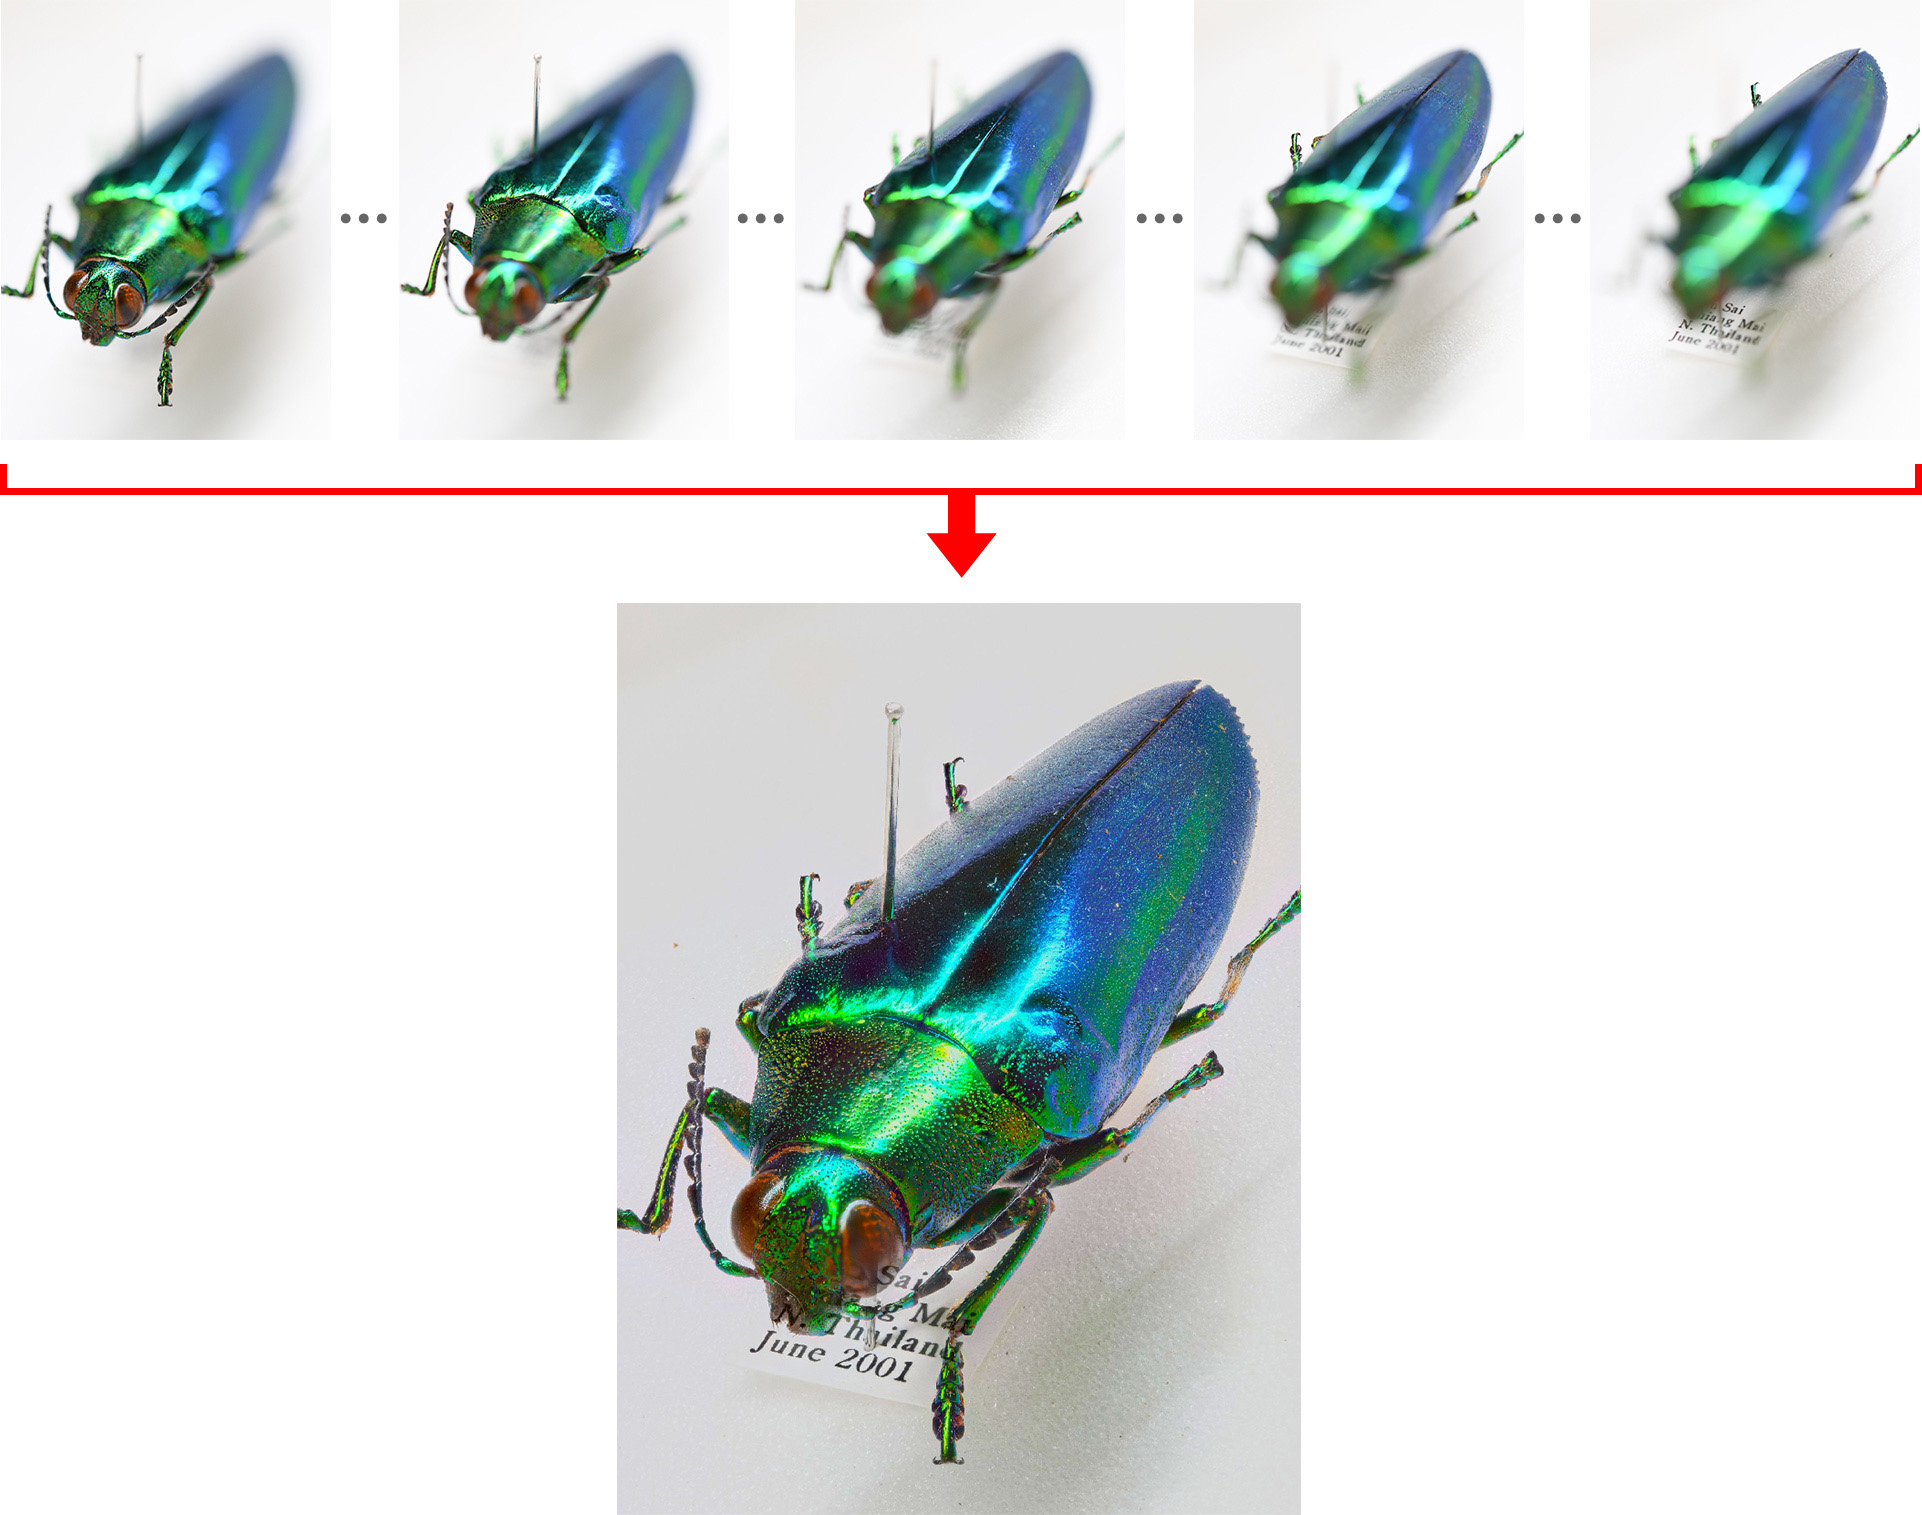
Here are some sample images, together with the gear and settings used to create them.
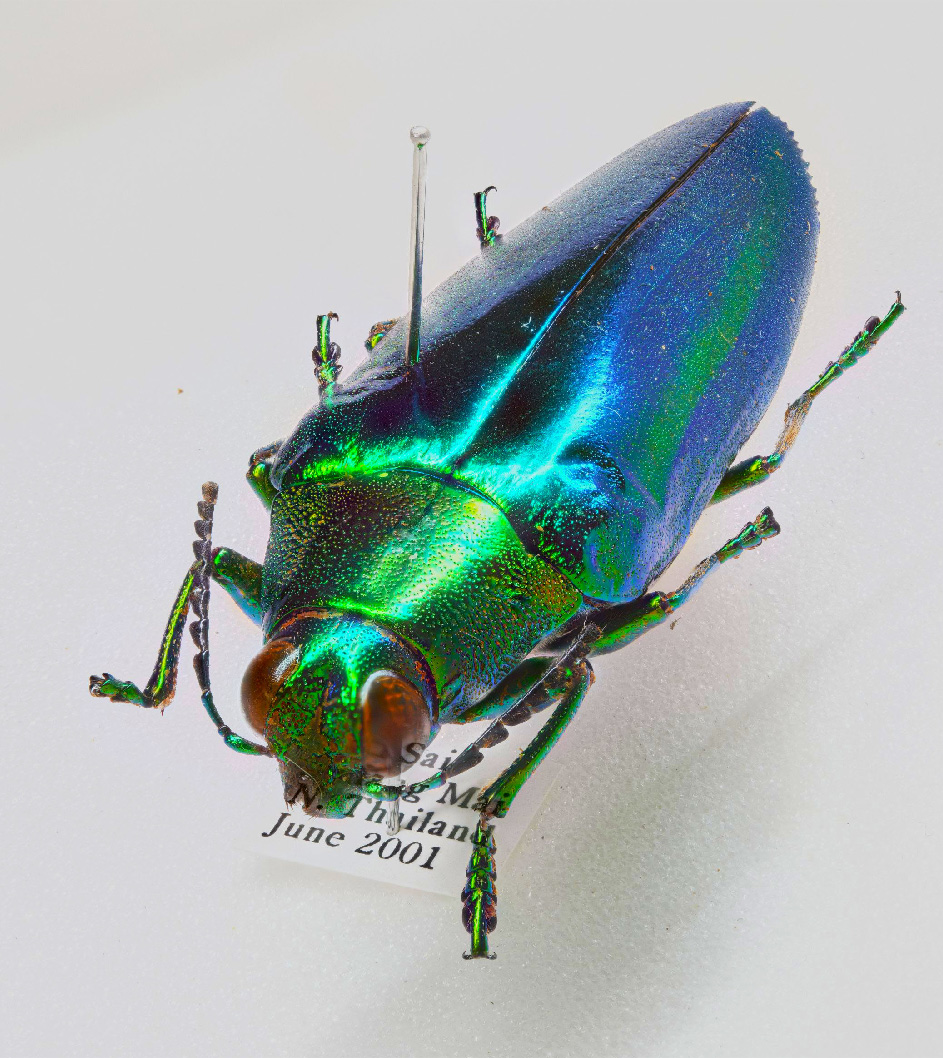
| Lens | AF-S Micro NIKKOR 60 mm f/2.8G ED |
|---|---|
| Distance to subject | 20 cm/8 in. |
| Subject size | 5cm/2 in. |
| Aperture | f/5.6 |
| Shots taken/used* | 160/150 |
| Focus step width | 3 |
| Interval until next shot | 0 |
| Exposure smoothing | On |
| Silent photography | On |
* The total number of shots taken/the number of shots actually used for focus stacking.
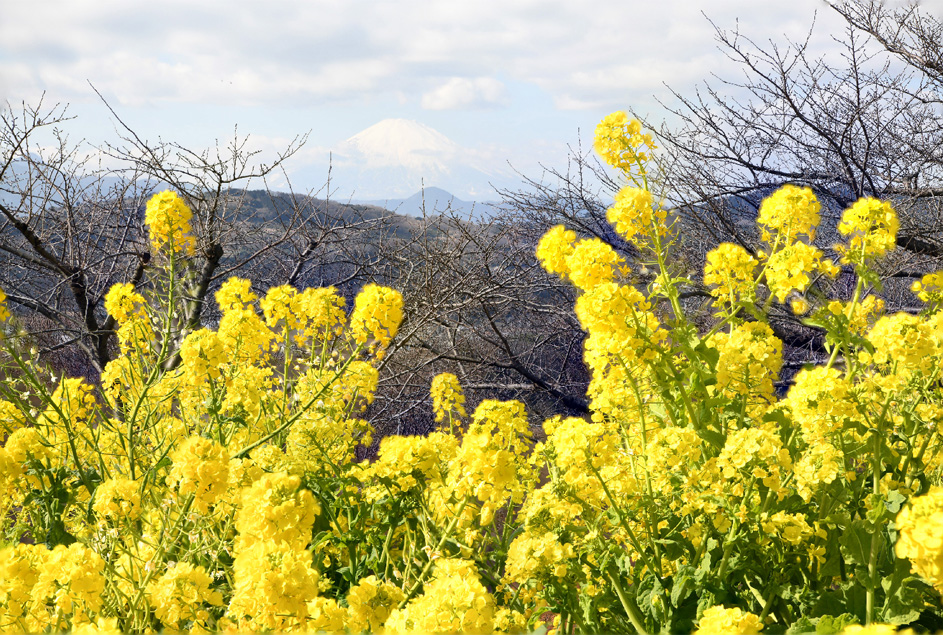
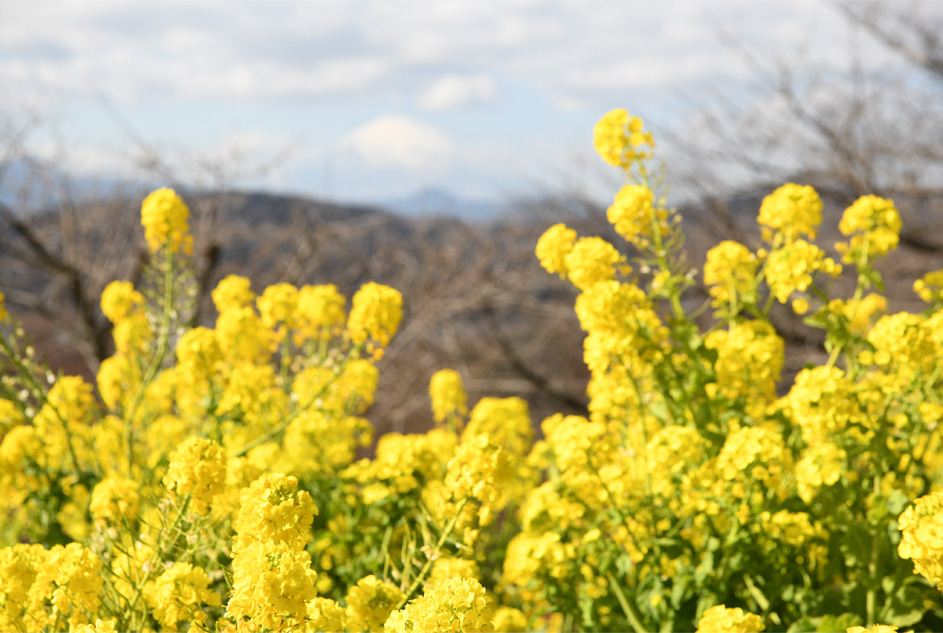
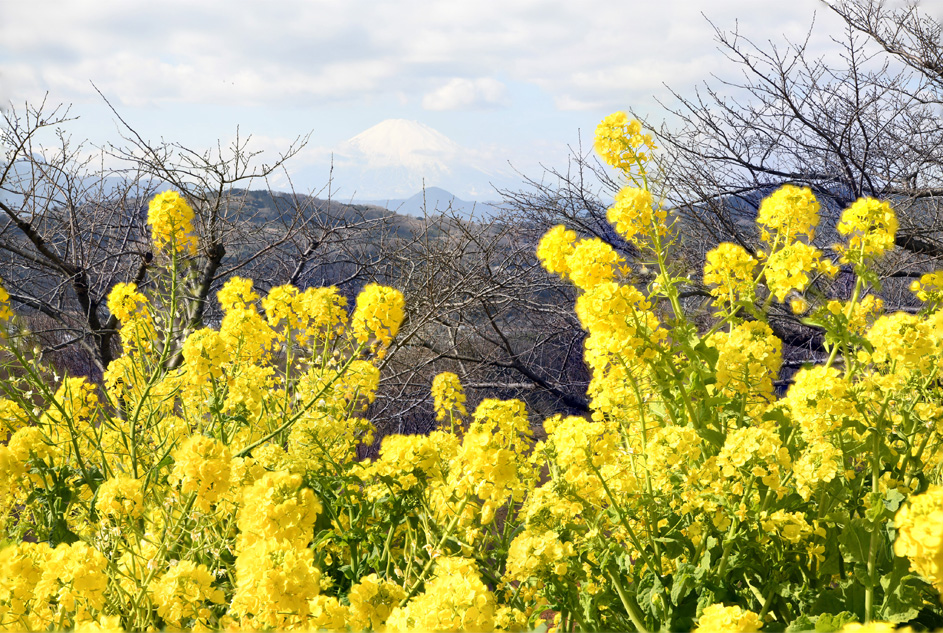
| Lens | AF-S NIKKOR 24-70 mm f/2.8E ED VR |
|---|---|
| Focal length | 70 mm |
| Distance to subject | Approx. 1.5 m/4.9 ft |
| Subject size | — |
| Aperture | f/8 |
| Shots taken/used | 15/10 |
| Focus step width | 5 |
| Interval until next shot | 0 |
| Exposure smoothing | On |
| Silent photography | On |

| Lens | AF-S Micro NIKKOR 60 mm f/2.8G ED |
|---|---|
| Distance to subject | 30 cm/12 in. |
| Subject size | 15cm/6 in. |
| Aperture | f/5.6 |
| Shots taken/used | 250/190 |
| Focus step width | 3 |
| Interval until next shot | 0 |
| Exposure smoothing | On |
| Silent photography | On |