This section focuses on [Interval timer shooting]. The settings for [Time-lapse movie] are essentially the same.
Ready memory cards with sufficient capacity after picking an image size, image quality (JPEG, NEF/RAW, or JPEG + NEF/RAW), total shooting time, and interval and taking a test shot to help you get an idea of the file size.
Check that the camera clock is set correctly before proceeding.
Use a tripod for time-lapse recording. Be sure to choose one that won't tip or blow over.
Choose a location, position the tripod, and secure the camera. Check that the camera is steady, the power cable unobstructed, and the power source within reach.
Assigning [Choose image area] to the Fn1 or Fn2 button using Custom Setting f2 [Custom controls] lets you quickly switch image areas by holding the button and rotating a command dial.
We recommend using a third-party lens heater in settings where condensation is likely.
We recommend the following [Interval timer shooting] settings when taking photos for time-lapse movies.
| Interval | Varies by subject (see this section) |
|---|---|
| Intervals×shots/interval | |
| Exposure smoothing | On |
| Silent photography | On |
| Interval priority | On |
| Focus before each shot | Off |
| Options | Time-lapse movie |
| Starting storage folder | New folder: ✔ Reset file numbering: ✔ |
The recommended value varies by subject. See "Recommended Settings by Scene" for more information.
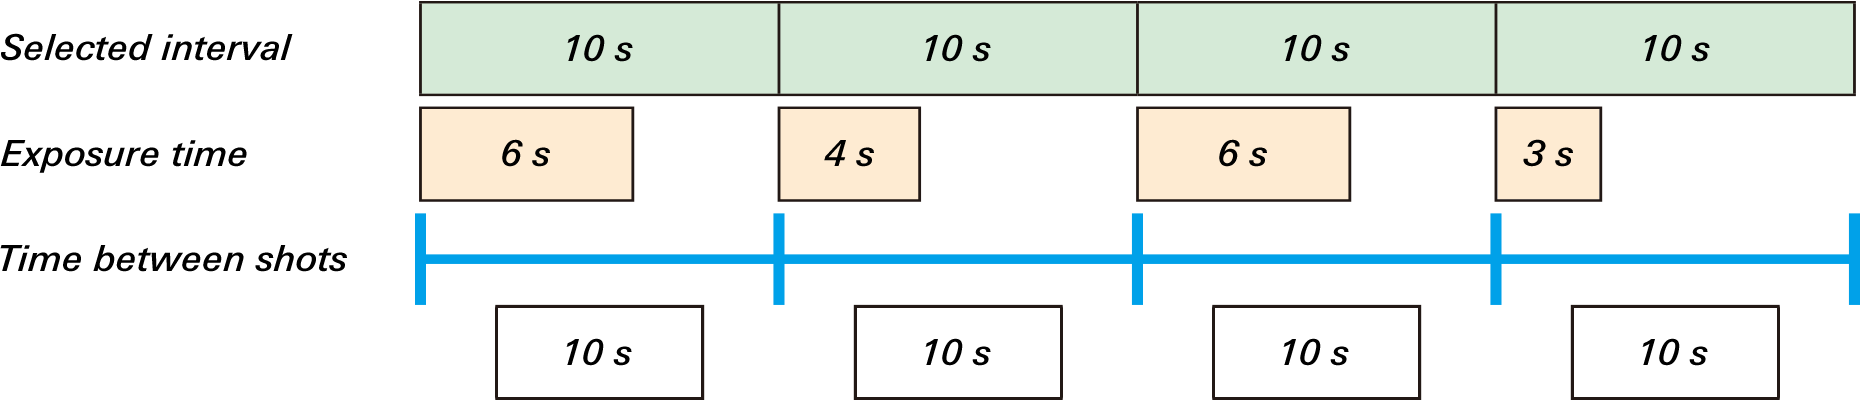
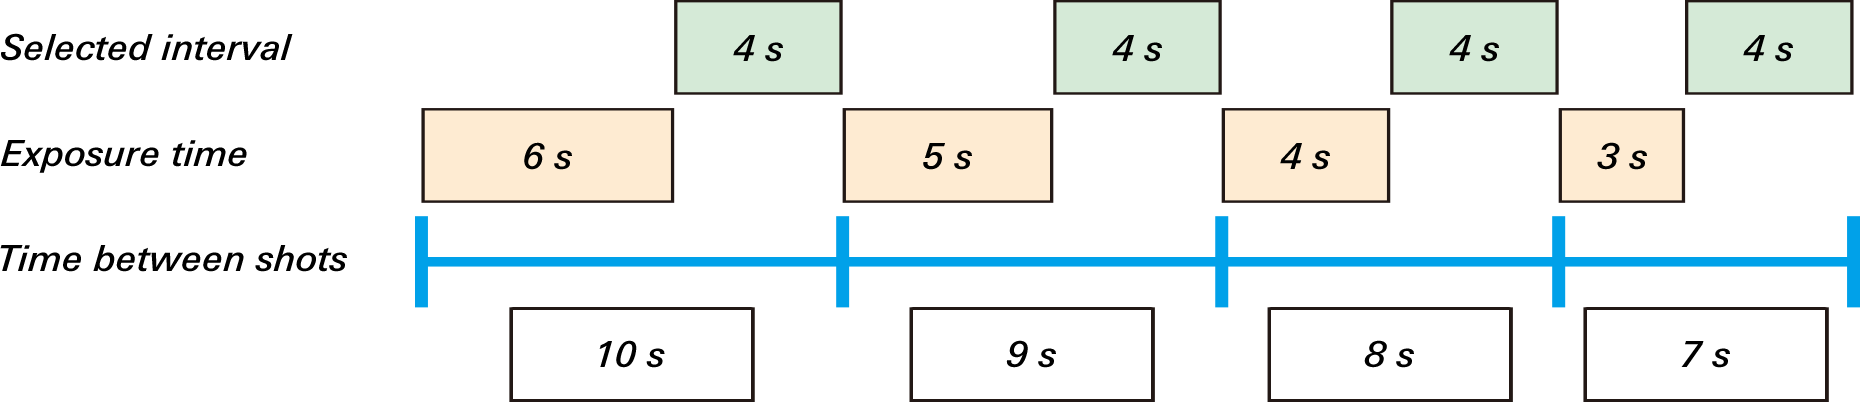
Some cameras from other manufacturers define interval length as the time between the end of one exposure and the beginning of the next. The result is that the time between one shot and the next varies according to exposure time. Nikon cameras, in contrast, define the interval length as the time from the start of one shot to the beginning of the next, ensuring that photos are taken at regular intervals.
Nikon Cameras
Other Cameras
The recommended value varies by subject. See "Recommended Settings by Scene" for more information.
If [On] is selected, exposure will automatically be adjusted to minimize variations in brightness between one shot and the next.
Select [On] to take pictures without sound or vibration from the shutter.
Selecting [Off] for [Interval priority] assigns priority to ensuring that each shot is correctly exposed, even if this means that intervals must sometimes be skipped.
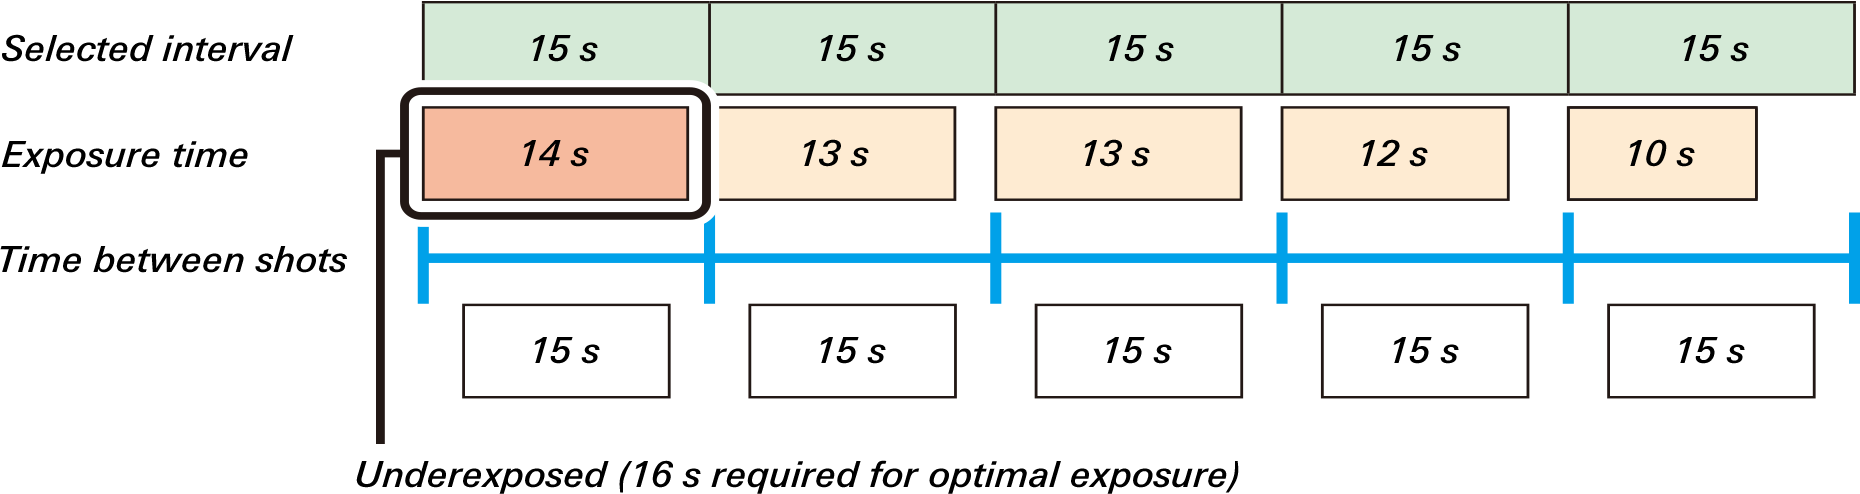
If [On] is selected, the camera will automatically adjust shutter speed as needed to ensure that each exposure is completed in the time available and no intervals are skipped. This option takes effect only in modes P and A. Pictures may be underexposed if time required for optimal exposure is longer than the interval.

Selecting [Off] prevents unexpected changes in focus while still ensuring you won't have to focus manually.
If [Time-lapse movie] is selected, the photos will be used to create a time-lapse movie with an aspect ratio of 16:9. This lets you view the results on the camera immediately after shooting so that you can retake the time-lapse movie if required.
To perform exposure bracketing during shooting, enable [AE bracketing]. [Intervals×shots/interval] will automatically be adjusted to reflect the number of shots in the bracketing sequence. This feature can be helpful where brightness varies unpredictably. Shots taken at different exposures can also be combined in third-party software for use in HDR movies.
Select [New folder] to save each sequence of photos to a new folder created automatically when shooting starts. Each sequence of photos is saved to its own folder, making file management easier.
| Photo shooting menu | |
|---|---|
| Image quality* | NEF (RAW) or JPEG fine★ |
| Image size | Large |
| ISO sensitivity settings | Varies by subject (see this section) |
| White balance | |
| Set Picture Control | |
| Metering | Matrix metering |
| Vibration reduction | Off |
* [NEF (RAW)] gives you greater freedom to adjust settings to your liking while editing movies. The large size of the resulting files however makes [JPEG fine★] the preferred choice when such adjustments are not required.
If [On] is selected for [Image review] in the playback menu, each picture will automatically be displayed in the monitor or viewfinder immediately after it is taken. This helps you monitor exposure and focus. Note, however, that: