The settings discussed in this section affect movie controls and displays.
Enabling this option allows aperture to be adjusted using the multi selector, helping prevent the clicking sounds made by the command dials being recorded with the movie. Press to widen the aperture, to narrow the aperture. The adjustment is smooth and continuous, as are the resulting changes to depth of field and the like during filming.
1 Select Multi-selector power aperture in the -button menu.
With the camera in movie mode, press the i button to display the -button menu. Press or to highlight Multi-selector power aperture and press to view options.
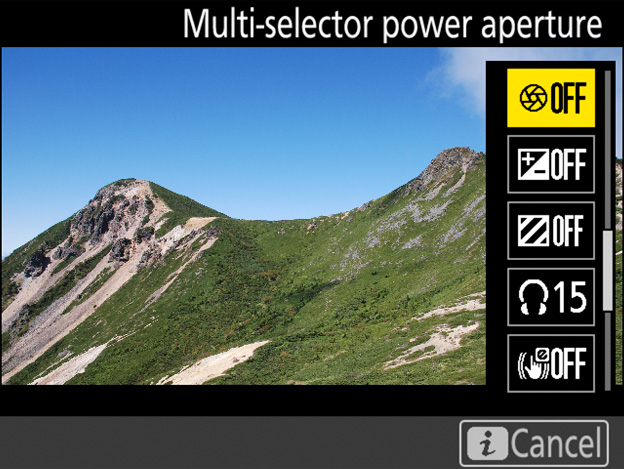
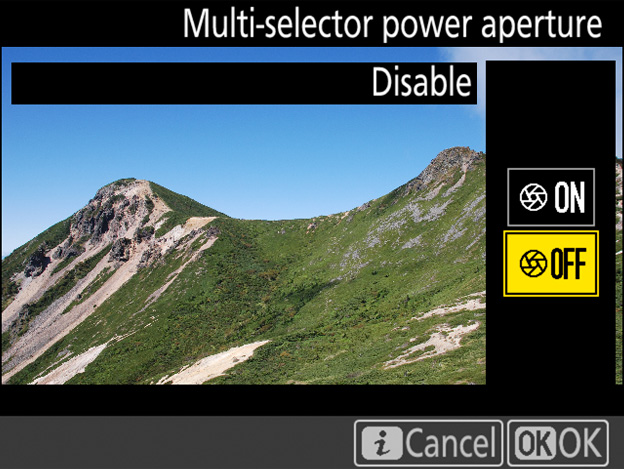
2 Select the desired option.
Press or to highlight the desired option and press to select. Press the button to exit to the shooting display when settings are complete.
Power aperture can also be assigned to custom controls using Custom Setting g1 (Custom control assignment, see this section). Power aperture is available only in exposure modes A and M and cannot be used while photo shooting info is displayed (a icon indicates that power aperture can not be used). The display may flicker while aperture is adjusted.
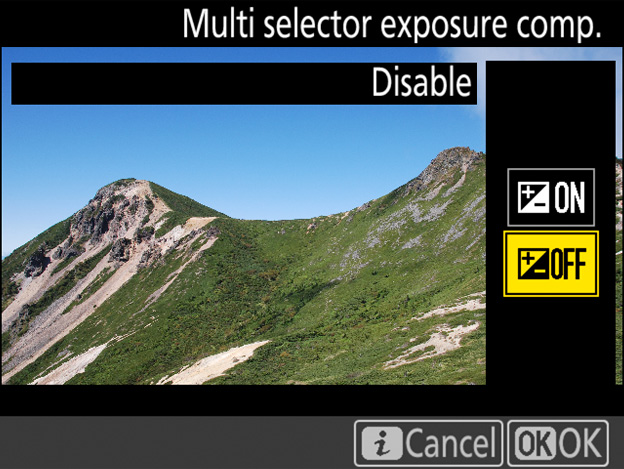
Enabling this option allows exposure compensation to be adjusted by pressing or , helping prevent the clicking sounds made by the command dials being recorded with the movie.
1 Select Multi selector exposure comp. in the -button menu.
With the camera in movie mode, press the button to display the -button menu. Press or to highlight Multi selector exposure comp. and press to view options.
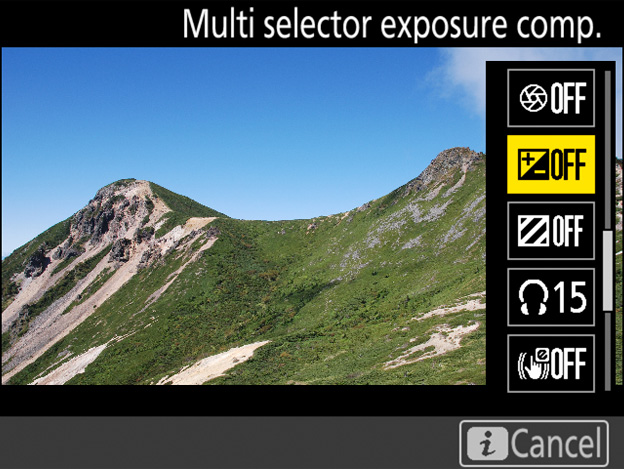
2 Select the desired option.
Press or to choose the desired option and press to select. Press the button to exit to the shooting display when settings are complete.
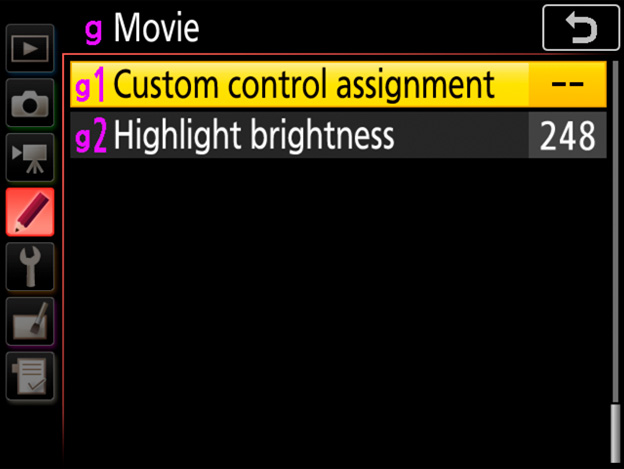
Use Custom Setting g1 (Custom control assignment) to choose the roles played by camera controls during movie recording.
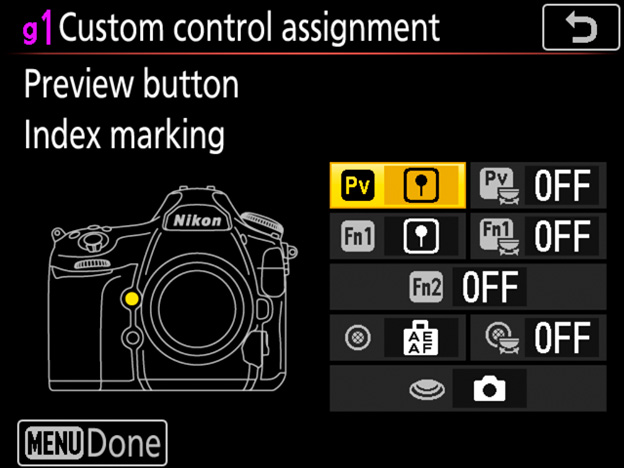
1 Select Custom Setting g1 (Custom control assignment).
In the Custom Settings menu, highlight Custom Setting g1 (Custom control assignment) and press . You will be prompted to choose a control.
2 Select a control.
Highlight a control using the multi selector and press . Options marked with icons are used to choose the function performed by pressing the control and rotating a command dial, while the other options are used to choose the function performed when the control is pressed without rotating a command dial.
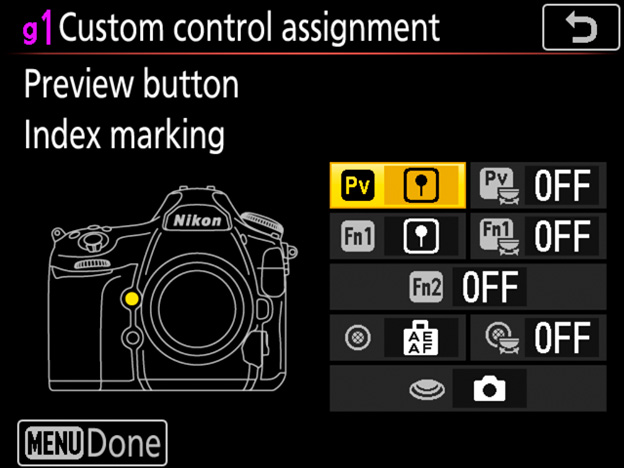
3 Choose the function assigned to the selected control.
Press or to highlight the desired function and press to select.
The options listed at right are used to choose the function performed by pressing the control.
| Pv button | |
| Fn1 button | |
| Fn2 button | |
| Center of sub-selector | |
| Shutter-release button |
The functions that can be assigned to these controls are:
| Power aperture (open) | ━ | ━ | ━ | ━ | ||
|---|---|---|---|---|---|---|
| Power aperture (close) | ━ | ━ | ━ | ━ | ||
| Exposure compensation + | ━ | ━ | ━ | ━ | ||
| Exposure compensation - | ━ | ━ | ━ | ━ | ||
| Index marking | ━ | |||||
| View photo shooting info | ━ | |||||
| AE/AF lock | ━ | ━ | ━ | ━ | ||
| AE lock only | ━ | ━ | ━ | ━ | ||
| AE lock (Hold) | ━ | ━ | ━ | ━ | ||
| AF lock only | ━ | ━ | ━ | ━ | ||
| Take photos | ━ | ━ | ━ | ━ | ||
| Record movies | ━ | ━ | ━ | ━ | ||
| None | ━ | |||||
Click here for the image optimized for small screens. (JPG 119KB).
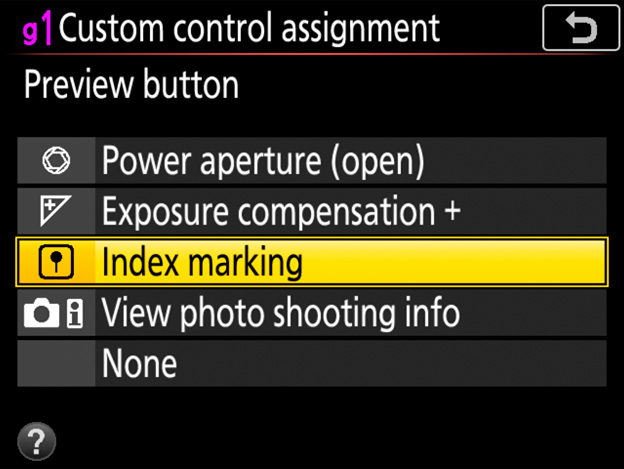
Each of these functions are described in turn below.
|
Power aperture (open) |
Aperture widens while the Pv button is pressed. Use in combination with Custom Setting g1 (Custom control assignment) > Fn1 button > Power aperture (close) for button-controlled aperture adjustment. |
|---|---|
|
Power aperture (close) |
Aperture narrows while the Fn1 button is pressed. Use in combination with Custom Setting g1 (Custom control assignment) > Preview button > Power aperture (open) for button-controlled aperture adjustment. |
|
Exposure |
Exposure compensation increases while the Pv button is pressed. Use in combination with Custom Setting g1 (Custom control assignment) > Fn1 button > Exposure compensation - for button-controlled exposure compensation. |
|
Exposure |
Exposure compensation decreases while the Fn1 button is pressed. Use in combination with Custom Setting g1 (Custom control assignment) > Preview button > Exposure compensation + for button-controlled exposure compensation. |
|
Index marking |
Press the control during movie recording to add an index at the current position. Indices can be used when viewing and editing movies. |
|
View photo |
Press the control to display photo shooting data in place of movie recording information. Press again to return to the movie recording display. |
|
AE/AF lock |
Focus and exposure lock while the control is pressed. |
|
AE lock only |
Exposure locks while the control is pressed. |
|
AE lock (Hold) |
Exposure locks when the control is pressed, and remains locked until the control is pressed a second time or the standby timer expires. |
|
AF lock only |
Focus locks while the control is pressed. |
|
Take photos |
Press the shutter-release button all the way down to end movie recording and take a photograph with an aspect ratio of 16:9. |
|
Record movies |
Press the shutter-release button halfway to start live view. You can then press the shutter-release button halfway to focus (autofocus mode only) and press it all the way down to start or end recording. The shutter-release button cannot be used for other purposes while the live view selector is rotated to . To end live view, press the button. The shutter-release button on an optional wireless remote controller or remote cord functions in the same way as the camera shutter-release button. |
|
None |
Pressing the control has no effect. |
Power aperture is available only in exposure modes A and M and cannot be used while photo shooting info is displayed (a icon indicates that power aperture cannot be used). The display may flicker while aperture is adjusted.
Interval timer photography is not available when Record movies is selected for Shutter-release button.
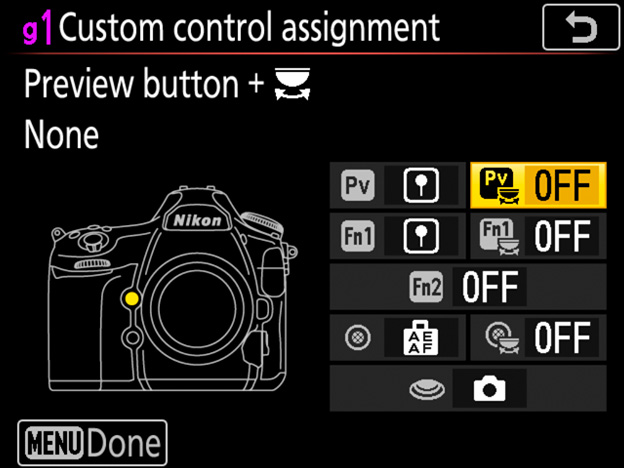
Options marked with icons are used to choose the function performed by pressing the control and rotating a command dial. The following options are available:
| Pv button + | |
| Fn1 button + | |
| Center of sub-selector + |
|
Choose |
Press the control and rotate a command dial to select the image area. The image area cannot be changed during shooting. |
|---|---|
|
None |
No operation is performed when the command dials are rotated while the control is pressed. |
Certain roles cannot be assigned simultaneously to both the “press” and “press + ” functions for some controls. Assigning such a role to “press” when it is already assigned to “press + ” sets the “press + ” option None, while assigning such a role to “press + ” when it is already assigned to “press” sets the “press” option None.
When highlight display is enabled in the i-button menu, highlights (bright areas of the frame) are indicated by shading when the camera is in movie mode.
1 Select Highlight display in the -button menu.
With the camera in movie mode, press the button to display the -button menu. Press or to highlight Highlight display and press to view options.
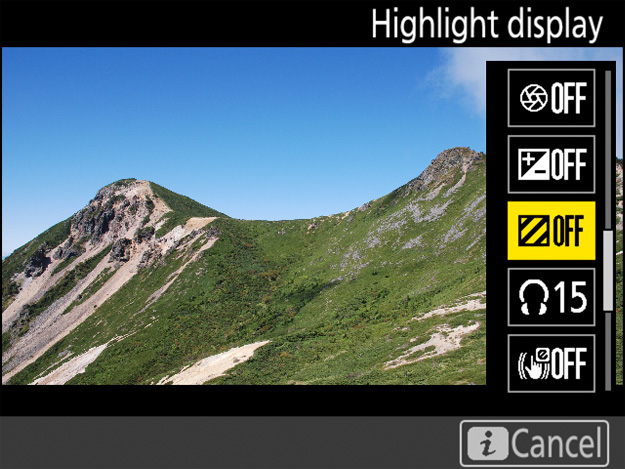
2 Select the desired setting.
Press or to highlight Pattern 1 or Pattern 2 and press to select. Press the button to exit to the shooting display when settings are complete.

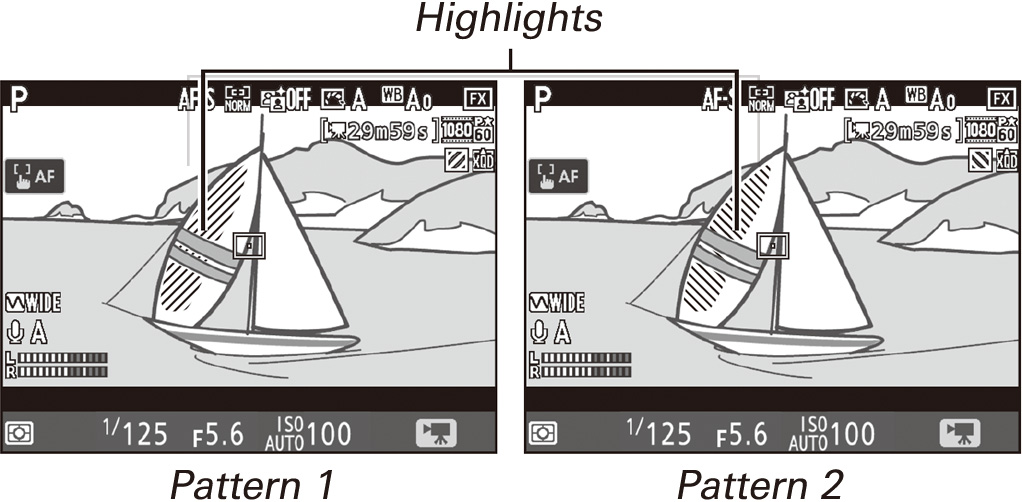
Enabling highlight display disables focus peaking (see this section). The level of brightness needed to trigger the highlight display can be selected using Custom Setting g2 (Highlight brightness). Choose from settings between 180 and 255; the lower the value, the greater the range of brightnesses that will be shown as highlights. If 255 is selected, the highlight display will show only areas that are potentially overexposed.
Follow the steps below to adjust monitor brightness when the camera is in movie mode.
1 Select Monitor brightness in the -button menu.
With the camera in movie mode, press the button to display the -button menu. Press or to highlight Monitor brightness and press to view options.
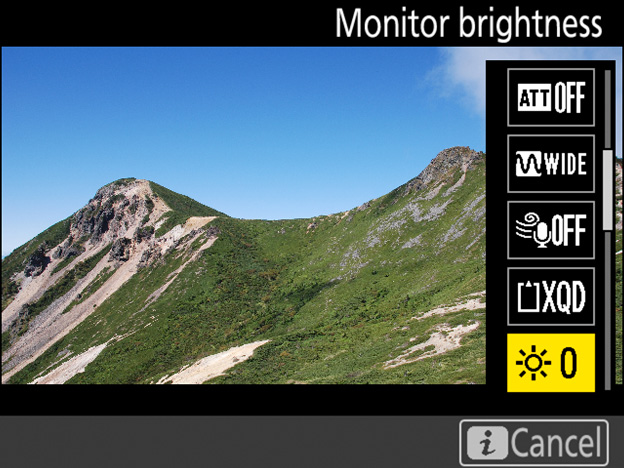
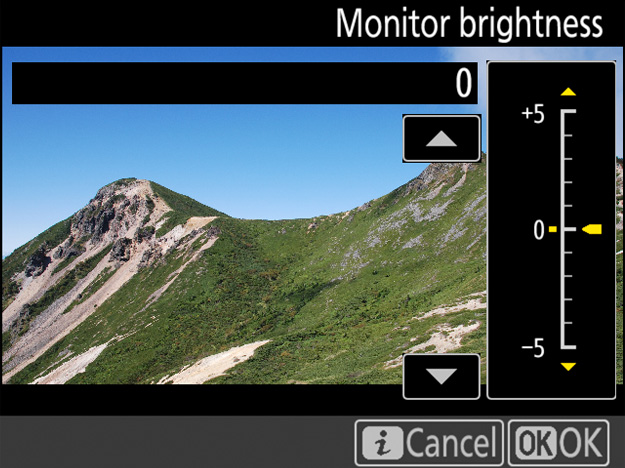
2 Adjust brightness.
Press or to choose the desired brightness and press to select (note that this affects live view only and has no effect on photographs or movies or on the brightness of the monitor for menus or playback). Press the button to exit to the shooting display when settings are complete.
The brightness of the monitor for menus and playback can be adjusted using the Monitor brightness option in the setup menu.
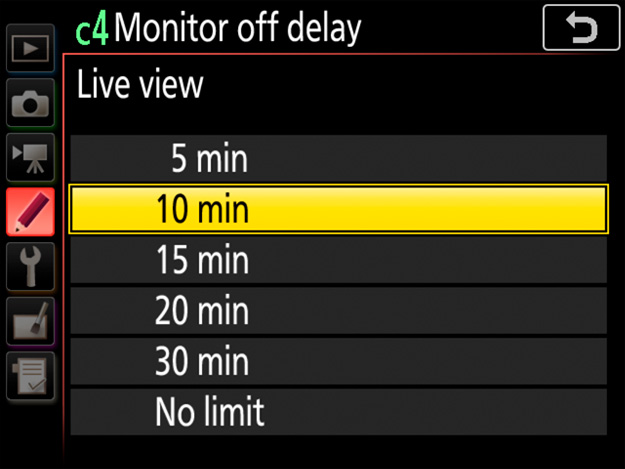
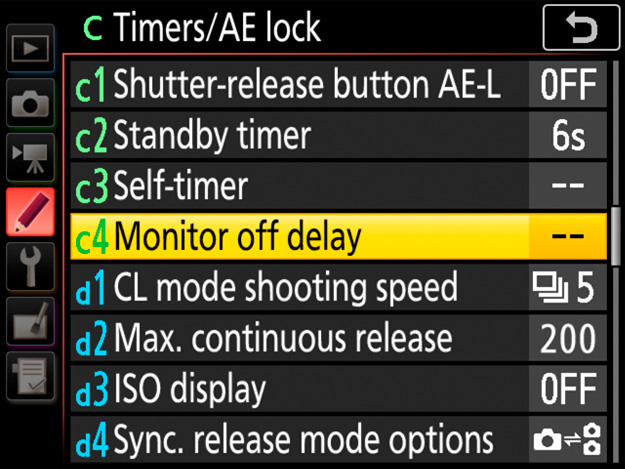
Custom Setting c4 (Monitor off delay) determines how long the monitor remains on when no operations are performed. To prevent the monitor turning off during live view photography and movie recording, select No limit for Custom Setting c4 (Monitor off delay) > Live view.
1 Select Custom Setting c4 (Monitor off delay).
In the Custom Settings menu, highlight Custom Setting c4 (Monitor off delay) and press .
2 Choose an item.
Press or to highlight the item for which you wish to set the monitor off delay and press to select. You can choose different delays for playback, menus, the information display, image review, and live view.
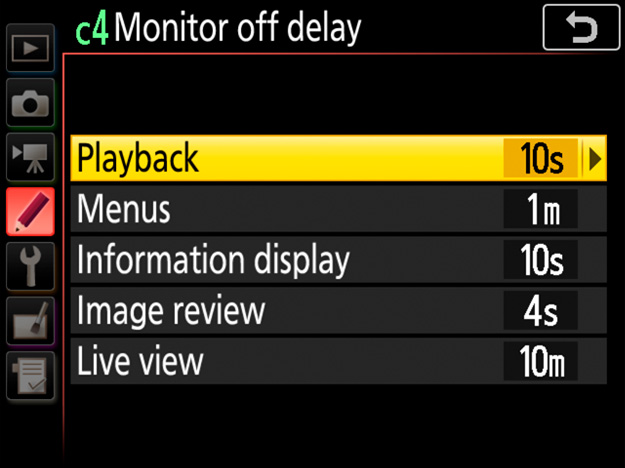
3 Select a monitor off delay.
Press or to highlight the desired monitor off delay and press to select. Choose shorter monitor-off delays for longer battery life.