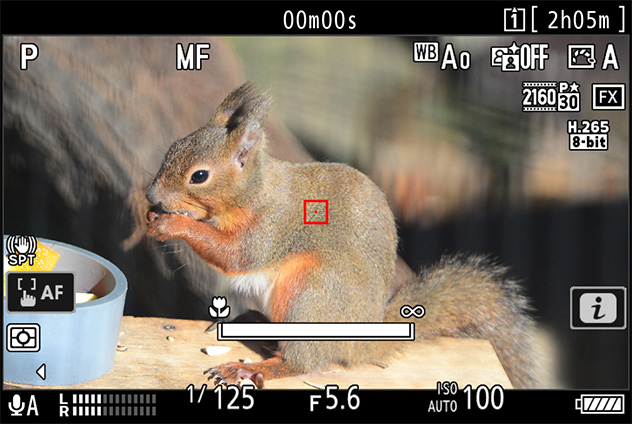
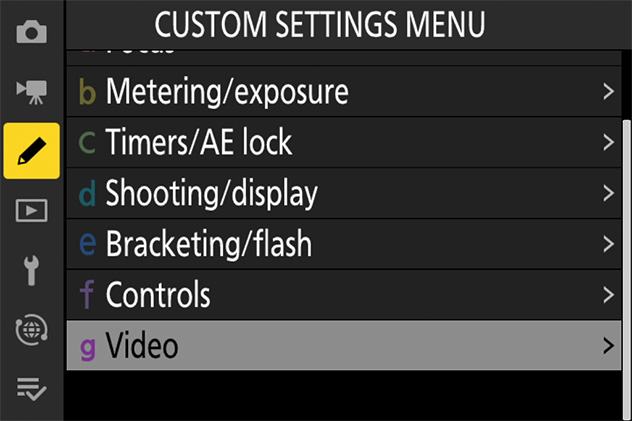
The settings discussed in this section affect video controls and displays.
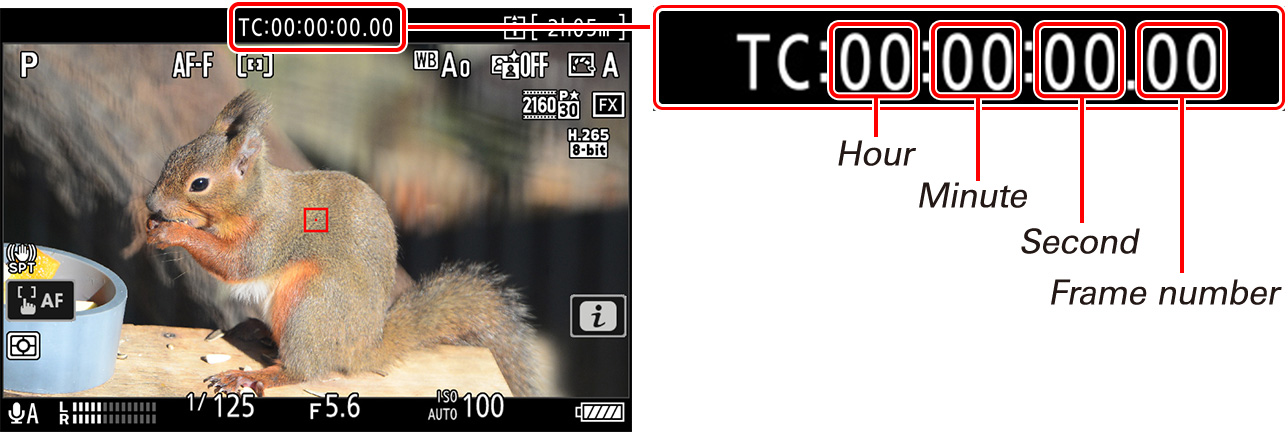
To record time codes giving the hour, minute, second, and frame number for each frame when shooting videos, select [On] or [On (with HDMI output)] for [Timecode] > [Record timecodes] in the video recording menu. Time codes help you keep track of the current playback and edit position when editing video.
| [Record timecodes] |
|
|---|---|
| [Count-up method] |
|
| [Timecode origin] |
|
| [Drop frame] | Select [ON] to compensate for discrepancies between the frame count and the actual recording time at frame rates of 30 and 60 fps. |
Click here for the image optimized for small screens. (JPG 136KB).
Time codes are not included in videos shot with [H.264 8-bit (MP4)] selected for [Video file type] in the video recording menu.
The values for frame number vary with the currently-selected frame rate:
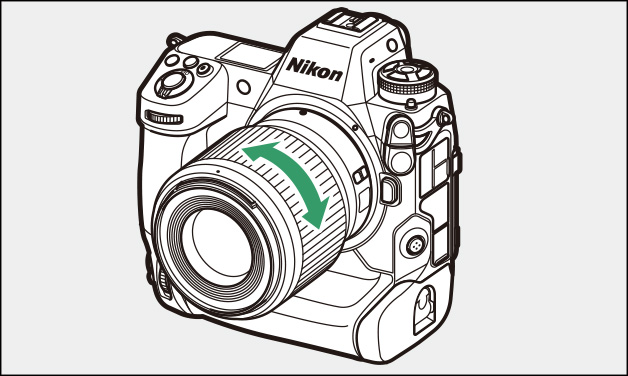
Choose whether to reverse the direction of rotation for lens focus or control rings during manual focus.
Settings can be adjusted using Custom Setting f8 [Reverse ring for focus]. Select [ON] to reverse the ring rotation direction for manual focus.

Choose how far lens focus or control rings must be rotated to go all the way from the minimum focus distance to infinity.
Settings can be adjusted using Custom Setting f9 [Focus ring rotation range].
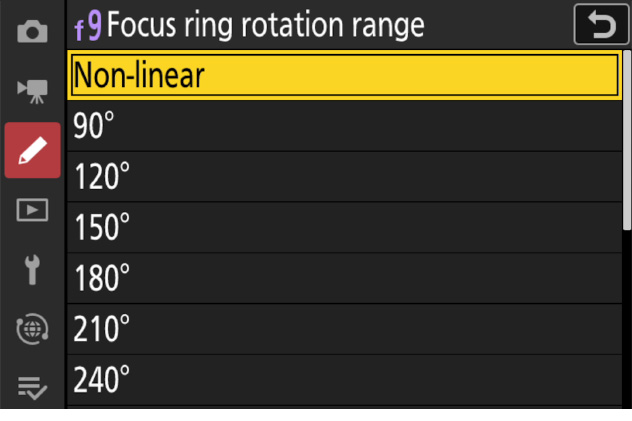
| [Non-linear] | The focus distance changes by a large amount when the ring is rotated rapidly and by a small amount when the ring is rotated slowly, without regard to how far the ring is rotated. |
|---|---|
| [90°]–[720°] | Choose how far the ring must be rotated to go all the way from the minimum focus distance to infinity. |
| [Max.] | Taking focus from the minimum focus distance to infinity requires rotating the ring the maximum distance permitted at current lens settings. |
Toward minimum
Toward infinity
Choose how responsive the lens control ring is when assigned the [Aperture], [Power aperture], [Exposure compensation], or [ISO sensitivity].
Settings can be adjusted using Custom Setting f10 [Control ring response]; choose from [High] and [Low].

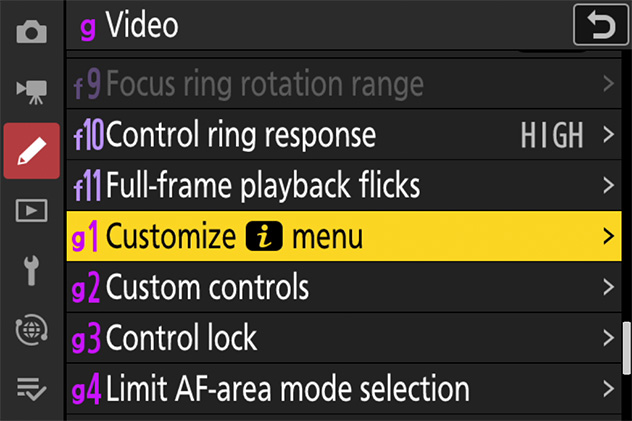
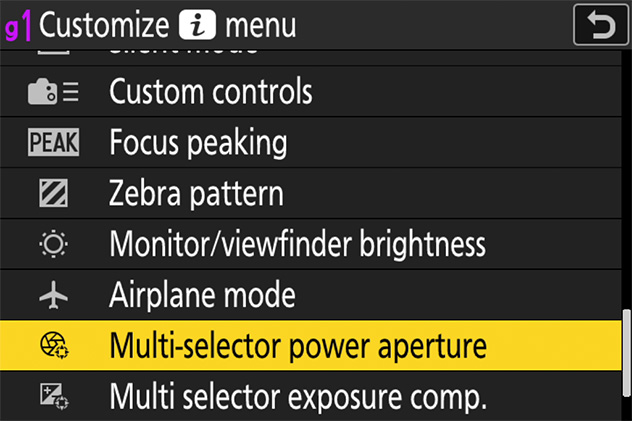
Choose the items listed in the menu displayed when the button is pressed in video mode.
1 Highlight Custom Setting g1 [Customize menu] and press .
2 Highlight the position you want to change and press .
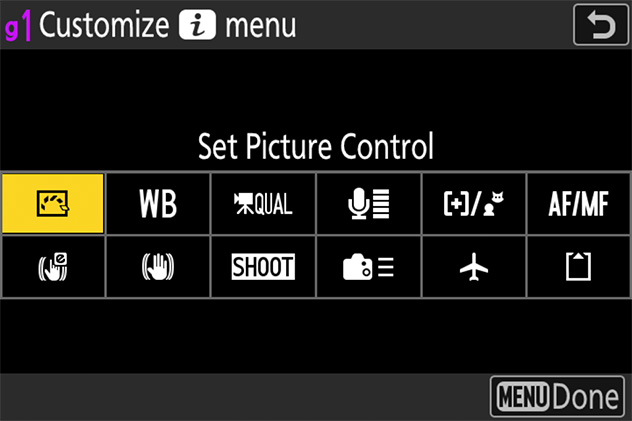
3 Highlight the desired item and press .
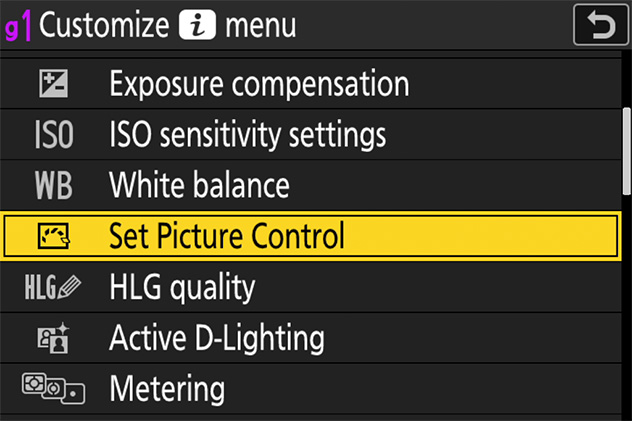
4 Press the MENU button..
Changes will be saved and the Custom Settings menu will be displayed.
The items displayed in the photo-mode menu can be chosen using Custom Setting f1 [Customize menu].
The following items can be assigned to the menu for video mode.
| [Shooting menu bank] | |
| [Select custom settings bank] | |
| [Choose image area] | |
| [Choose image area] | |
| [Destination] | |
| [Exposure compensation] | |
| [ISO sensitivity settings] | |
| [White balance] | |
| [Set Picture Control] | |
| [HLG quality] | |
| [Active D-Lighting] | |
| [Metering] | |
| [Focus mode] | |
| [AF-area mode/subj. detection] | |
| [Vibration reduction] | |
| [Electronic VR] |
| [Microphone sensitivity] | |
| [Attenuator] | |
| [Frequency response] | |
| [Wind noise reduction] | |
| [Headphone volume] | |
| [Silent mode] | |
| [Custom controls] | |
| [Focus peaking] | |
| [Zebra pattern] | |
| [Monitor/viewfinder brightness] | |
| [Airplane mode] | |
| [Multi-selector power aperture] | |
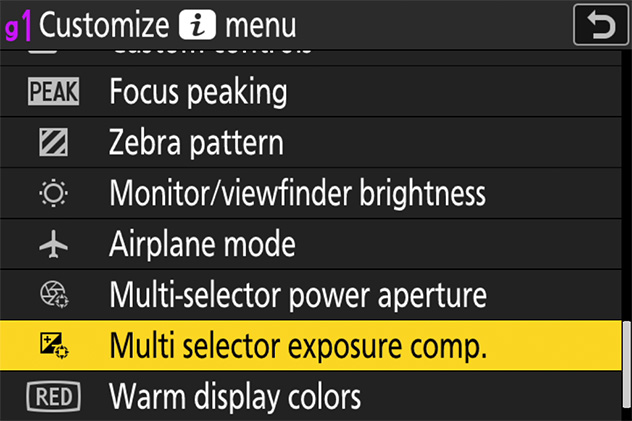
| [Multi selector exposure comp.] | |
| [Warm display colors] | |
| [View video info] |
Choose whether the multi selector can be used for power aperture. Enabling this option allows aperture to be adjusted using the multi selector, helping prevent the clicking sounds made by the command dials being recorded with videos. The adjustment is smooth and continuous, as are the resulting changes to depth of field and the like during filming.
1 Assign [Multi-selector power aperture] to the desired position using Custom Setting g1 [Customize menu].
2 With the camera in video mode, press the button and then highlight [Multi-selector power aperture] and press .
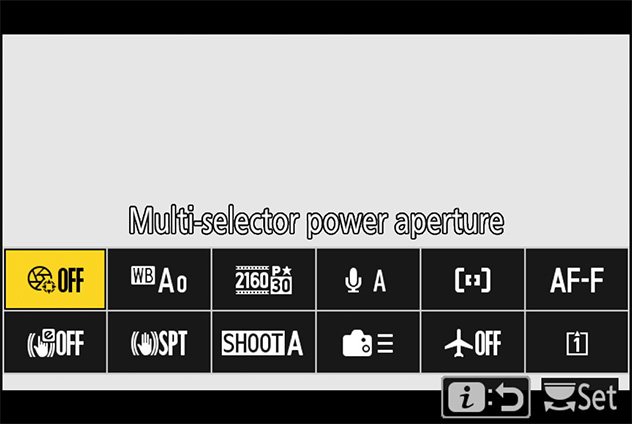
3 Press or to highlight the desired option and press to select.
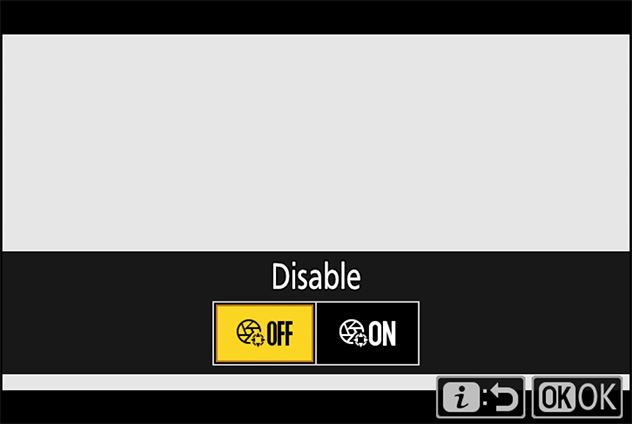
Choose whether the multi selector can be used to adjust exposure compensation. Enabling this option allows exposure compensation to be adjusted using the multi selector, helping prevent the clicking sounds made by the command dials being recorded with videos.
1 Assign [Multi selector exposure comp.] to the desired position using Custom Setting g1 [Customize menu].
2 With the camera in video mode, press the button and then highlight [Multi selector exposure comp.] and press .

3 Press or to highlight the desired option and press to select.

Exposure compensation can also be assigned to a control using Custom Setting g2 [Custom controls] (see this section).
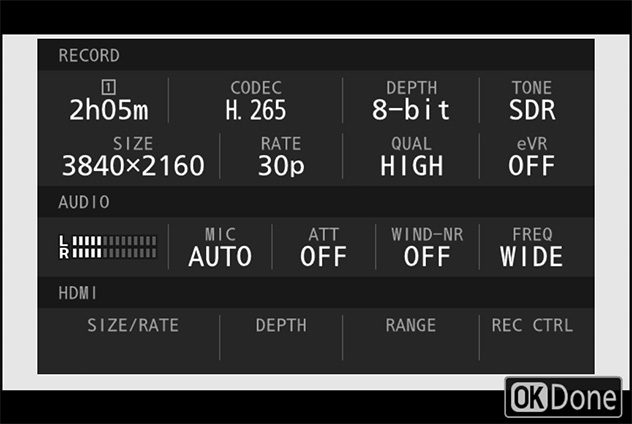
View video recording settings. This option can be used to view but not to change the option selected.
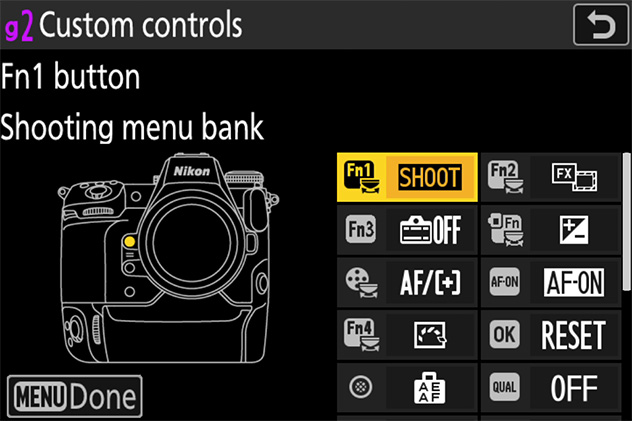
Use Custom Setting g2 [Custom controls] to choose the roles played by camera controls during filming.
1 Highlight Custom Setting g2 [Custom controls] and press .
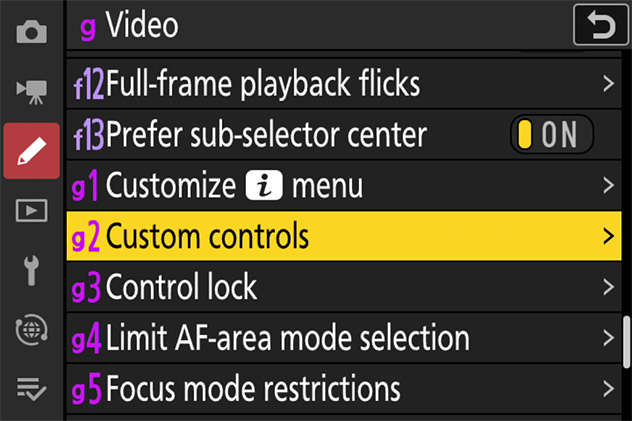
2 Highlight a control and press .

3 Highlight the desired function and press .

You can choose the roles played by the following controls:
| [Fn1 button] | |
| [Fn2 button] | |
| [Fn3 button] | |
| [Fn button for vertical shooting] | |
| [Focus mode button] | |
| [AF-ON button] | |
| [Protect/Fn4 button] | |
| [OK button] | |
| [Sub-selector center] | |
| [QUAL button] | |
| [Audio button] |
| [AF-ON button for vertical shooting] | |
| [Vertical multi selector center] | |
| [Command dials] | |
| [Shutter-release button] | |
| [Lens Fn2 button] | |
| [Lens Fn button] | |
| [Lens control ring] | |
| [Lens Fn ring (clockwise)] | |
| [Lens Fn ring (counterclockwise)] | |
| [Lens memory set button] |
The roles that can be assigned to these controls are listed below.
| [Preset focus point] | ― | ― | ― | ― | ― | ✔ | ― | ✔ | ✔ | ― | ― | ✔ | ✔ | ― | ― | ✔ | ✔ | ― | ✔ | ✔ | ✔ | |
|---|---|---|---|---|---|---|---|---|---|---|---|---|---|---|---|---|---|---|---|---|---|---|
| [Select center focus point] | ― | ― | ― | ― | ― | ✔ | ― | ✔ | ✔ | ― | ― | ✔ | ✔ | ― | ― | ― | ― | ― | ― | ― | ― | |
| [Save focus position] | ✔ | ✔ | ✔ | ― | ― | ✔ | ― | ― | ✔ | ― | ― | ✔ | ✔ | ― | ― | ✔ | ✔ | ― | ✔ | ✔ | ✔ | |
| [Recall focus position] | ✔ | ✔ | ✔ | ― | ― | ✔ | ― | ― | ✔ | ― | ― | ✔ | ✔ | ― | ― | ✔ | ✔ | ― | ✔ | ✔ | ✔ | |
| [AF-ON] | ― | ― | ― | ― | ― | ✔ | ― | ― | ✔ | ― | ― | ✔ | ✔ | ― | ― | ✔ | ✔ | ― | ✔ | ✔ | ✔ | |
| [Fast AF-ON] | ― | ― | ― | ― | ― | ✔ | ― | ― | ✔ | ― | ― | ✔ | ✔ | ― | ― | ✔ | ✔ | ― | ✔ | ✔ | ✔ | |
| [AF lock only] | ― | ― | ― | ― | ― | ✔ | ― | ― | ✔ | ― | ― | ✔ | ✔ | ― | ― | ✔ | ✔ | ― | ✔ | ✔ | ✔ | |
| [AE lock (Hold)] | ― | ― | ― | ✔ | ― | ✔ | ― | ― | ✔ | ― | ― | ✔ | ✔ | ― | ― | ✔ | ✔ | ― | ✔ | ✔ | ✔ | |
| [AWB lock (Hold)] | ― | ― | ― | ✔ | ― | ✔ | ― | ― | ✔ | ― | ― | ✔ | ✔ | ― | ― | ✔ | ✔ | ― | ✔ | ✔ | ✔ | |
| [AE/AWB lock (hold)] | ― | ― | ― | ✔ | ― | ✔ | ― | ― | ✔ | ― | ― | ✔ | ✔ | ― | ― | ✔ | ✔ | ― | ✔ | ✔ | ✔ | |
| [AE lock only] | ― | ― | ― | ― | ― | ✔ | ― | ― | ✔ | ― | ― | ✔ | ✔ | ― | ― | ✔ | ✔ | ― | ✔ | ✔ | ✔ | |
| [AE/AF lock] | ― | ― | ― | ― | ― | ✔ | ― | ― | ✔ | ― | ― | ✔ | ✔ | ― | ― | ✔ | ✔ | ― | ✔ | ✔ | ✔ | |
| [Silent mode] | ✔ | ✔ | ✔ | ― | ― | ― | ― | ― | ✔ | ― | ― | ― | ✔ | ― | ― | ✔ | ✔ | ― | ✔ | ✔ | ✔ | |
| [Live view info display off] | ✔ | ✔ | ✔ | ✔ | ― | ✔ | ― | ― | ✔ | ― | ― | ✔ | ✔ | ― | ― | ✔ | ✔ | ― | ✔ | ✔ | ✔ | |
| [Framing grid] | ✔ | ✔ | ✔ | ✔ | ― | ― | ― | ― | ✔ | ― | ― | ― | ✔ | ― | ― | ✔ | ✔ | ― | ✔ | ✔ | ✔ | |
| [Zoom on/off] | ✔ | ✔ | ✔ | ✔ | ― | ✔ | ― | ✔ | ✔ | ― | ― | ✔ | ✔ | ― | ― | ✔ | ✔ | ― | ✔ | ✔ | ✔ | |
| [Virtual horizon] | ✔ | ✔ | ✔ | ✔ | ― | ― | ― | ― | ✔ | ― | ― | ― | ✔ | ― | ― | ✔ | ✔ | ― | ✔ | ✔ | ✔ | |
| [Focus peaking display] | ✔ | ✔ | ✔ | ― | ― | ― | ― | ― | ✔ | ― | ― | ― | ✔ | ― | ― | ✔ | ✔ | ― | ✔ | ✔ | ✔ | |
| [MY MENU] | ✔ | ✔ | ✔ | ✔ | ― | ― | ✔ | ― | ― | ― | ― | ― | ― | ― | ― | ✔ | ✔ | ― | ✔ | ✔ | ✔ | |
| [Access top item in MY MENU] | ✔ | ✔ | ✔ | ✔ | ― | ― | ✔ | ― | ― | ― | ― | ― | ― | ― | ― | ✔ | ✔ | ― | ✔ | ✔ | ✔ | |
| [Playback] | ✔ | ✔ | ✔ | ✔ | ― | ― | ✔ | ― | ― | ― | ― | ― | ― | ― | ― | ✔ | ✔ | ― | ✔ | ✔ | ✔ | |
| [Filtered playback] | ✔ | ✔ | ✔ | ✔ | ― | ― | ✔ | ― | ― | ― | ― | ― | ― | ― | ― | ✔ | ✔ | ― | ✔ | ✔ | ✔ | |
| [Power aperture (open)] | ✔ | ― | ― | ― | ― | ― | ― | ― | ― | ― | ― | ― | ― | ― | ― | ― | ― | ― | ― | ✔ | ― | |
| [Power aperture (close)] | ― | ✔ | ― | ― | ― | ― | ― | ― | ― | ― | ― | ― | ― | ― | ― | ― | ― | ― | ✔ | ― | ― | |
| [Exposure compensation +] | ✔ | ― | ― | ― | ― | ― | ― | ― | ― | ― | ― | ― | ― | ― | ― | ― | ― | ― | ✔ | ― | ― | |
| [Exposure compensation -] | ― | ✔ | ― | ― | ― | ― | ― | ― | ― | ― | ― | ― | ― | ― | ― | ― | ― | ― | ― | ✔ | ― | |
| [ISO sensitivity (increase)] | ― | ― | ― | ― | ― | ― | ― | ― | ― | ― | ― | ― | ― | ― | ― | ― | ― | ― | ✔ | ― | ― | |
| [ISO sensitivity (decrease)] | ― | ― | ― | ― | ― | ― | ― | ― | ― | ― | ― | ― | ― | ― | ― | ― | ― | ― | ― | ✔ | ― | |
| [Pattern tone range] | ✔ | ✔ | ✔ | ― | ― | ― | ― | ― | ✔ | ― | ― | ― | ✔ | ― | ― | ✔ | ✔ | ― | ✔ | ✔ | ✔ | |
| [Record videos] | ― | ― | ― | ― | ✔ | ✔ | ― | ✔ | ✔ | ― | ― | ✔ | ✔ | ― | ✔ | ― | ― | ― | ― | ― | ― | |
| [Same as AF-ON button] | ― | ― | ― | ― | ― | ― | ― | ― | ― | ― | ― | ✔ | ― | ― | ― | ― | ― | ― | ― | ― | ― | |
| [Shooting menu bank] | ✔ | ✔ | ✔ | ✔ | ― | ― | ✔ | ― | ― | ✔ | ✔ | ― | ― | ― | ― | ― | ― | ― | ― | ― | ― | |
| [Shooting mode] | ― | ― | ― | ✔ | ― | ― | ― | ― | ― | ― | ― | ― | ― | ― | ― | ― | ― | ― | ― | ― | ― | |
| [Choose image area] | ✔ | ✔ | ✔ | ✔ | ― | ― | ✔ | ― | ― | ✔ | ✔ | ― | ― | ― | ― | ― | ― | ― | ― | ― | ― | |
| [Set Picture Control] | ✔ | ✔ | ✔ | ✔ | ― | ― | ✔ | ― | ― | ✔ | ✔ | ― | ― | ― | ― | ― | ― | ― | ― | ― | ― | |
| [Active D-Lighting] | ✔ | ✔ | ✔ | ✔ | ― | ― | ✔ | ― | ― | ✔ | ✔ | ― | ― | ― | ― | ― | ― | ― | ― | ― | ― | |
| [Metering] | ✔ | ✔ | ✔ | ✔ | ― | ― | ✔ | ― | ― | ✔ | ✔ | ― | ― | ― | ― | ― | ― | ― | ― | ― | ― | |
| [Focus mode/AF-area mode] | ✔ | ✔ | ✔ | ✔ | ✔ | ― | ✔ | ― | ― | ✔ | ✔ | ― | ― | ― | ― | ― | ― | ― | ― | ― | ― | |
| [Control lock] | ✔ | ✔ | ✔ | ✔ | ― | ― | ✔ | ― | ― | ✔ | ✔ | ― | ― | ― | ― | ― | ― | ― | ― | ― | ― | |
| [Microphone sensitivity] | ✔ | ✔ | ✔ | ✔ | ― | ― | ✔ | ― | ― | ✔ | ✔ | ― | ― | ― | ― | ― | ― | ― | ― | ― | ― | |
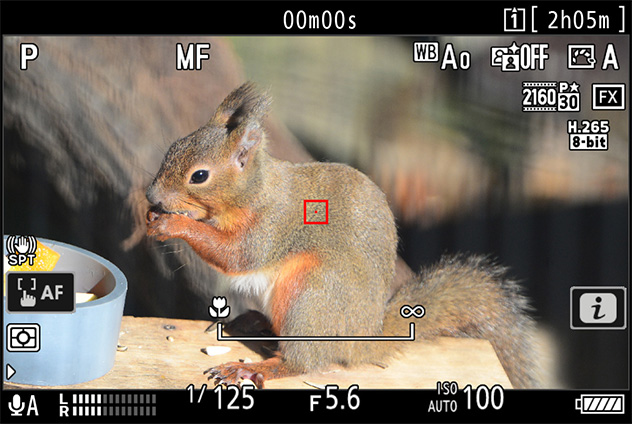
| [Focus (M/A)] | ― | ― | ― | ― | ― | ― | ― | ― | ― | ― | ― | ― | ― | ― | ― | ― | ― | ✔ | ― | ― | ― | |
| [Power aperture] | ― | ― | ― | ― | ― | ― | ― | ― | ― | ― | ― | ― | ― | ― | ― | ― | ― | ✔ | ― | ― | ― | |
| [Exposure compensation] | ― | ― | ― | ✔ | ― | ― | ― | ― | ― | ― | ― | ― | ― | ― | ― | ― | ― | ✔ | ― | ― | ― | |
| [ISO sensitivity] | ― | ― | ― | ― | ― | ― | ― | ― | ― | ― | ― | ― | ― | ― | ― | ― | ― | ✔ | ― | ― | ― | |
| [Exposure setting] | ― | ― | ― | ― | ― | ― | ― | ― | ― | ― | ― | ― | ― | ✔ | ― | ― | ― | ― | ― | ― | ― | |
| [Focus/AF-area mode selection] | ― | ― | ― | ― | ― | ― | ― | ― | ― | ― | ― | ― | ― | ✔ | ― | ― | ― | ― | ― | ― | ― | |
| [Sub-command dial zoom role] | ― | ― | ― | ― | ― | ― | ― | ― | ― | ― | ― | ― | ― | ✔ | ― | ― | ― | ― | ― | ― | ― | |
| [None] | ✔ | ✔ | ✔ | ✔ | ― | ✔ | ✔ | ✔ | ✔ | ✔ | ✔ | ✔ | ✔ | ― | ✔ | ✔ | ✔ | ✔ | ✔ | ✔ | ✔ | |
Click here for the image optimized for small screens. (JPG 324KB).
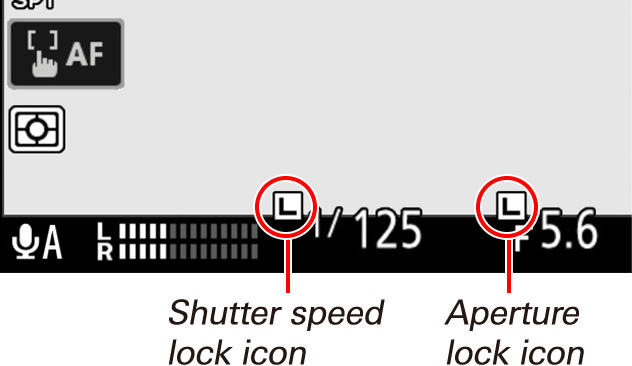
Lock exposure settings or focus-point selection during filming.
Settings can be adjusted using Custom Setting g3 [Control lock].
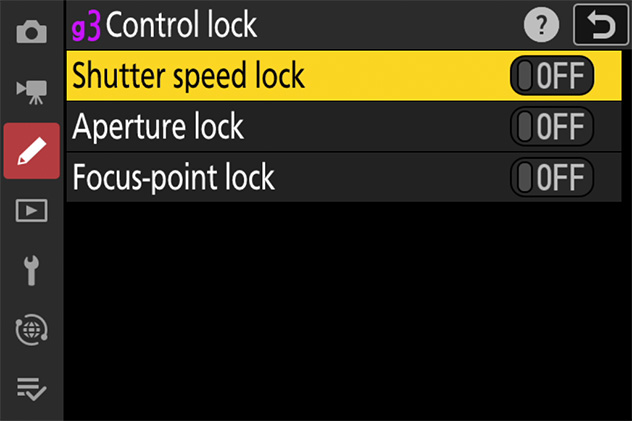
| [Shutter speed lock] | Select [ON] to lock shutter speed at its current value in mode M.
|
|---|---|
| [Aperture lock] | Select [ON] to lock aperture at its current value in modes A and M.
|
| [Focus-point lock] | Select [ON] to lock focus-point selection on the currently-selected focus point.
|
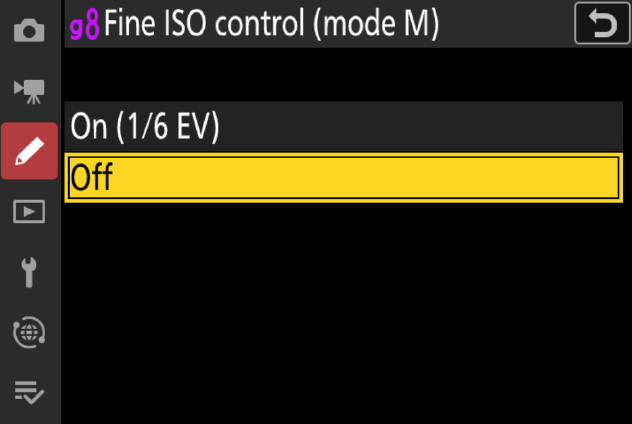
Choose the increments used for adjustments to ISO sensitivity during video recording in mode M.
Settings can be adjusted using Custom Setting g8 [Fine ISO control (mode M)]. Selecting [On (1/6 EV)] allows ISO sensitivity for videos to be adjusted in increments of 1/6 EV.
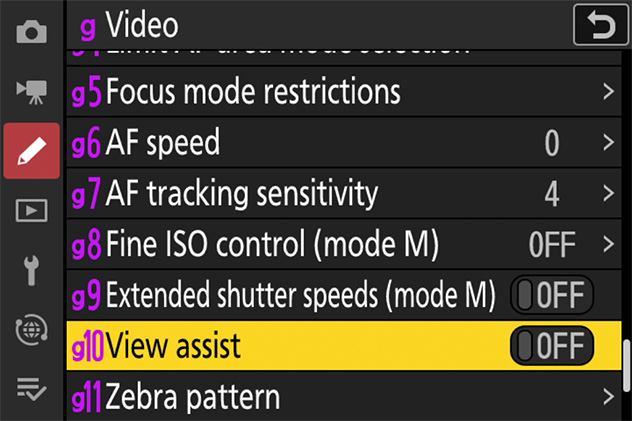
Preview the effects of the [HLG] and [N-Log] tone modes during recording using simplified colors for enhanced contrast.
Settings can be adjusted using Custom Setting g10 [View assist]. Select [ON] to preview the effect using simplified colors.
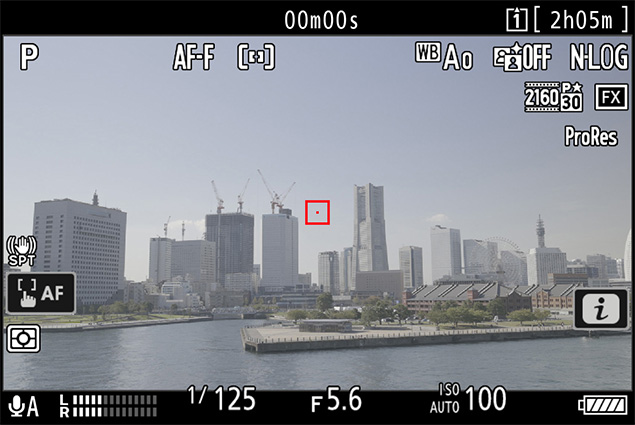
View assist off
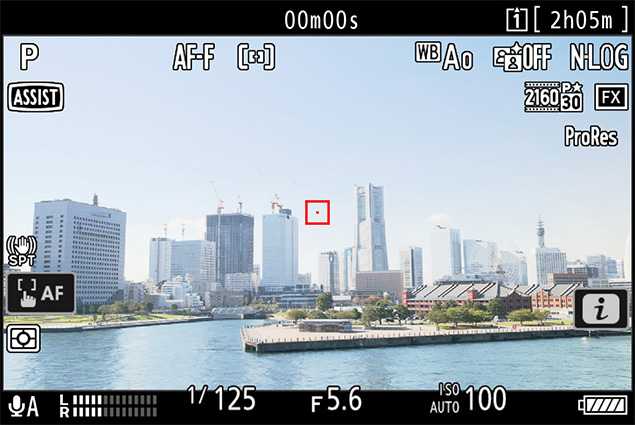
View assist on
Choose whether a zebra pattern is used to indicate selected tone ranges.
Settings can be adjusted using Custom Setting g11 [Zebra pattern].
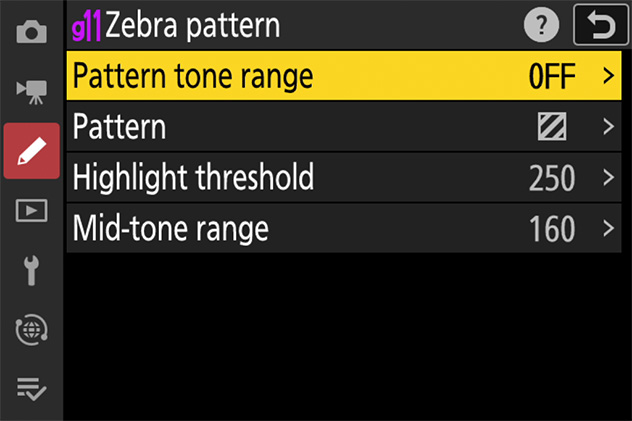
| [Pattern tone range] | Choose the tone range shown by the zebra pattern.
|
|---|---|
| [Pattern] | Choose a zebra stripe pattern ([Pattern 1] or [Pattern 2]). 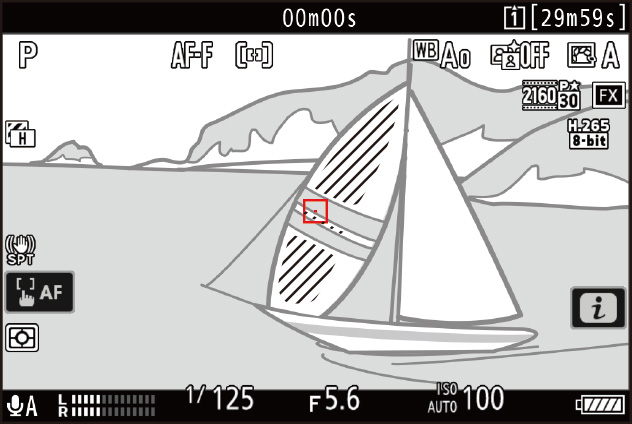
Pattern 1 
Pattern 2 |
| [Highlight threshold] | Choose the brightness needed to trigger the zebra display when [Highlights] is selected for [Pattern tone range].
|
| [Mid-tone range] | Choose the brightness needed to trigger the zebra display when [Mid-tones] is selected for [Pattern tone range].
|
Click here for the image optimized for small screens. (JPG 187KB).
If both the zebra display and focus peaking are enabled in manual focus mode, only focus peaking will take effect. To view the zebra display in manual focus mode, select [OFF] for Custom Setting a13 [Focus peaking] > [Focus peaking display].
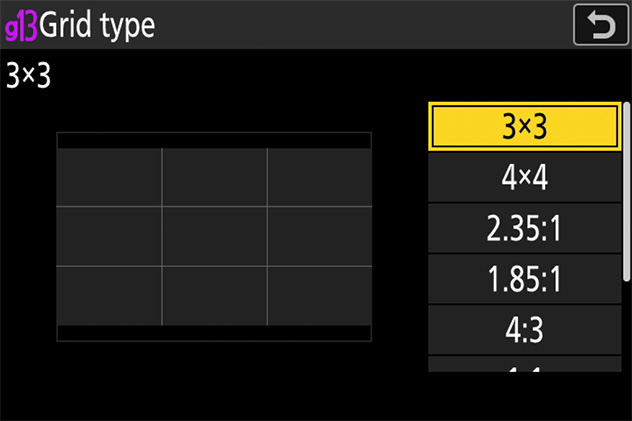
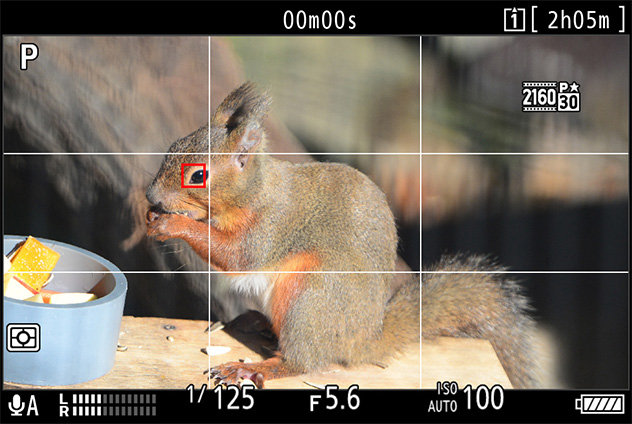
Choose a framing grid for video mode.
The grid can be selected using Custom Setting g13 [Grid type]. It is displayed either by:
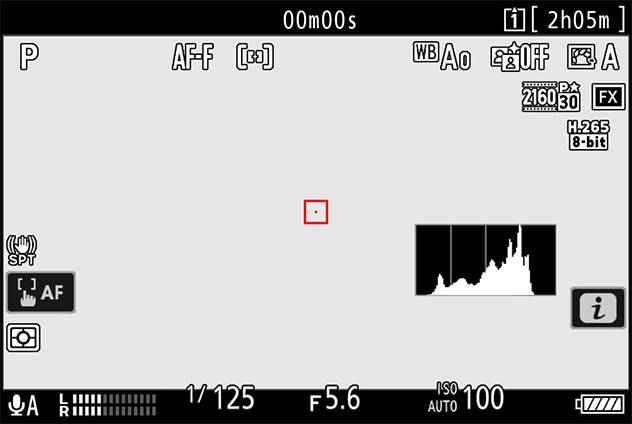
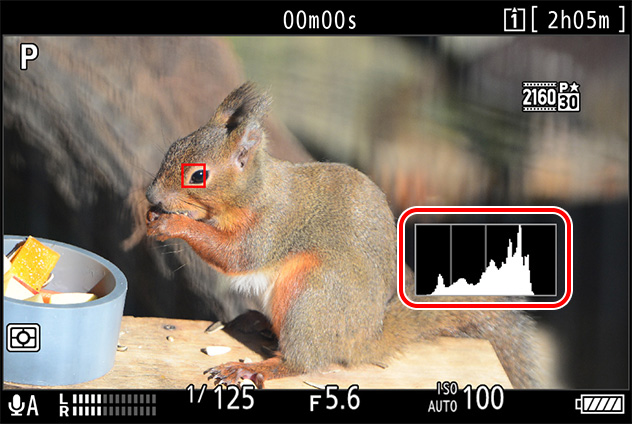
Choose how the camera displays brightness information in video mode.
Settings can be adjusted using Custom Setting g14 [Brightness information display]. Brightness information is displayed when (brightness information) is selected () for Custom Setting g15 [Custom monitor shooting display] or g16 [Custom viewfinder shooting display].
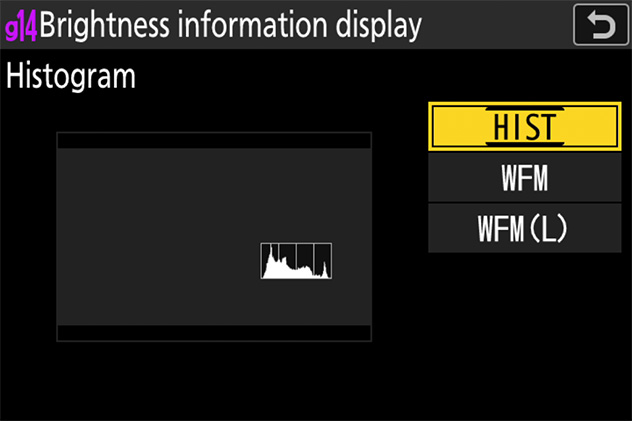
| [Histogram] | Brightness information is displayed as an RGB histogram. |
 |
|---|---|---|
| [Wave-form monitor] | Brightness information is displayed as a wave-form monitor. The monitor can be displayed at either of two different sizes. |
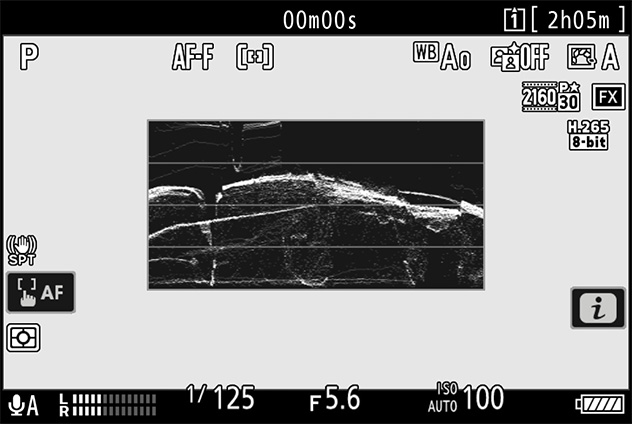 |
| [Wave-form monitor (large)] |
Click here for the image optimized for small screens. (JPG 67.6KB).
Choose the shooting displays accessible by pressing the DISP button in video mode. The displays can be tailored to different conditions.
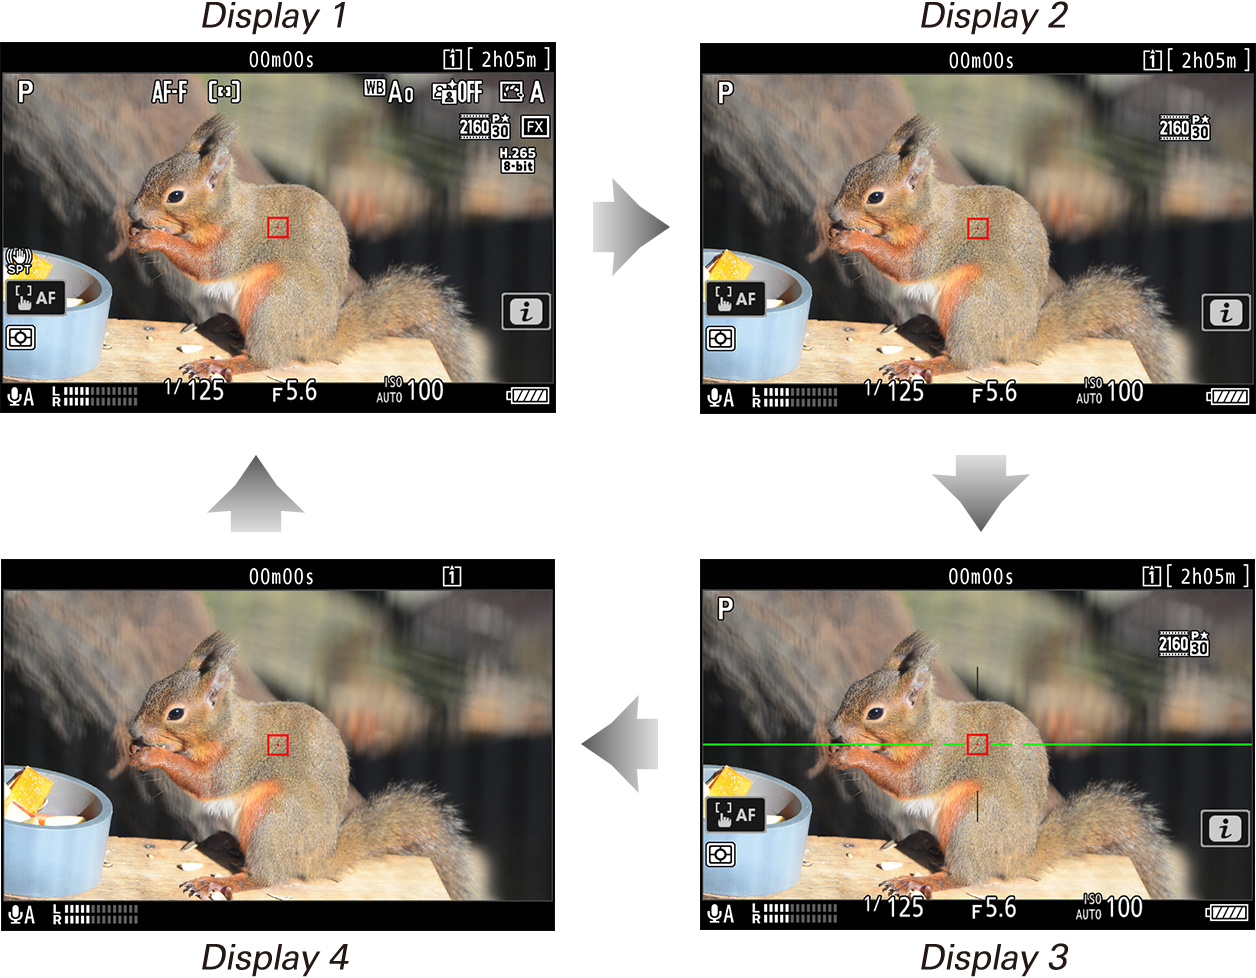
The monitor and viewfinder displays can be customized using Custom Settings g15 [Custom monitor shooting display] and g16 [Custom viewfinder shooting display], respectively.
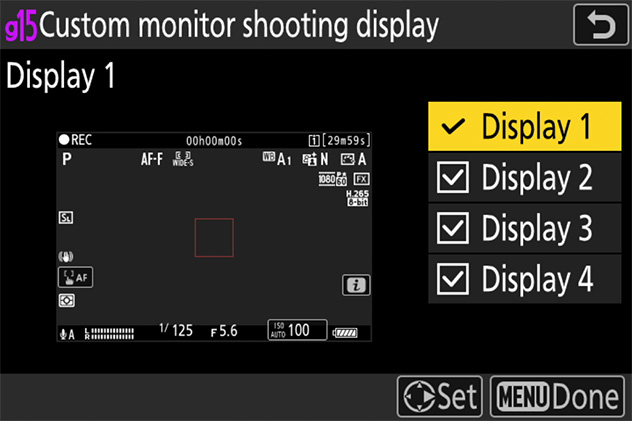
To choose indicators that appear in displays [Display 1] through [Display 4] (or in the case of Custom Setting g16, [Display 1] through [Display 3]), highlight the corresponding option and press . You can then highlight options and press to select () or deselect ().
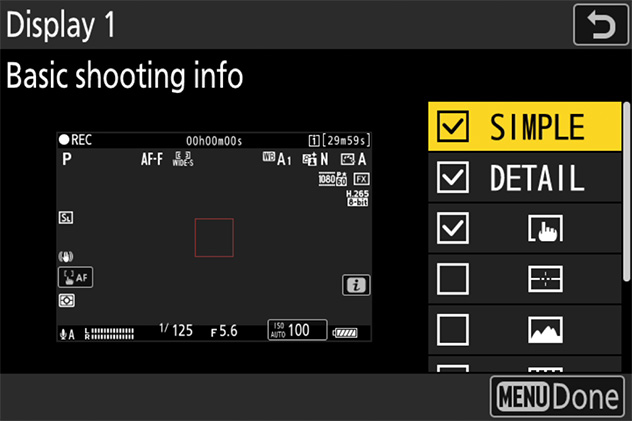
| SIMPLE | [Basic shooting info] | View the shooting mode, shutter speed, aperture, and other basic shooting info. |
|---|---|---|
| DETAIL | [Detailed shooting info] | View the focus mode, AF-area mode, white balance, and other detailed shooting info. |
| [Touch controls] | View options that can be accessed via touch controls, including touch AF and the menu.
|
|
| [Virtual horizon] | Enable the virtual horizon. The display type can be selected using Custom Setting d17 [Virtual horizon type]. | |
| [Brightness information] | View an RGB histogram or wave-form monitor. | |
| [Framing grid] | Enable the framing grid. | |
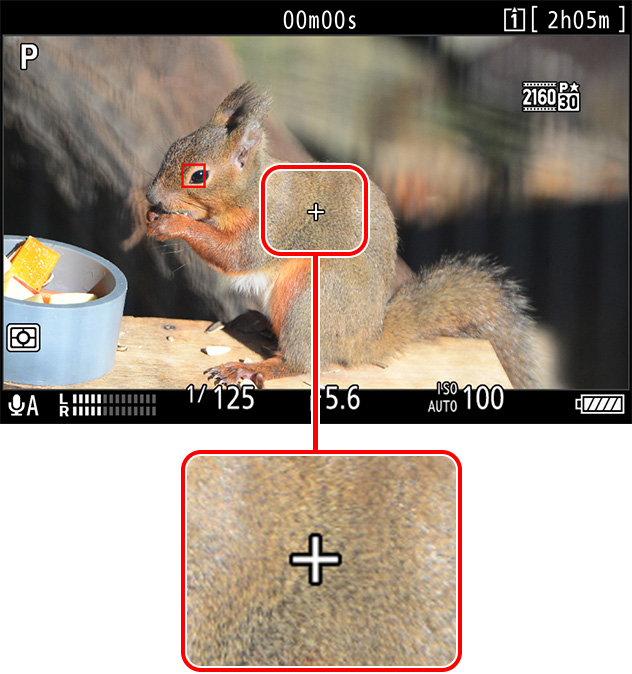
| [Center indicator] | Display crosshairs at the center of the frame. |
Click here for the image optimized for small screens. (JPG 103KB).
Selecting () [Brightness information] displays brightness information. The display type can be selected using Custom Setting g14 [Brightness information display] (see this section).
Selecting () [Framing grid] displays a framing grid. The type of grid can be selected using Custom Setting g13 [Grid type] (see this section).
Selecting () [Center indicator] displays crosshairs at the center of the frame.
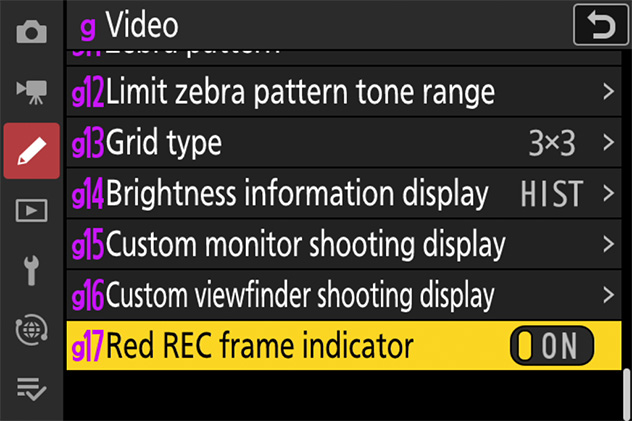
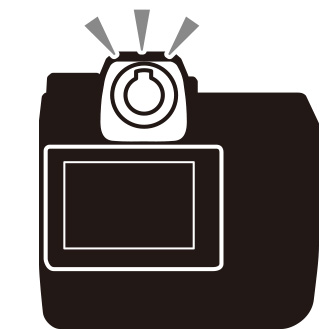
Choose whether a red border appears around the shooting display while video recording is in progress.
Settings can be adjusted using Custom Setting g17 [Red REC frame indicator]. When [ON] is selected, a red border will appear around the shooting display while video recording is in progress, helping prevent missed shots by alerting you when recording is in progress.
The level at which the camera will turn off automatically as its internal temperature rises can be selected from [Standard] and [High].
Settings can be adjusted using [Auto temperature cutout] in the setup menu.
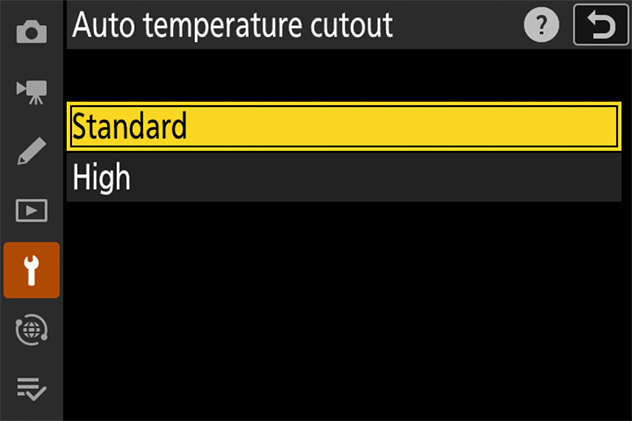
Although selecting [High] gives you more time before the camera shuts down, the camera may become hot to the touch. We recommend using a tripod or other equipment to reduce the time spent touching the camera.
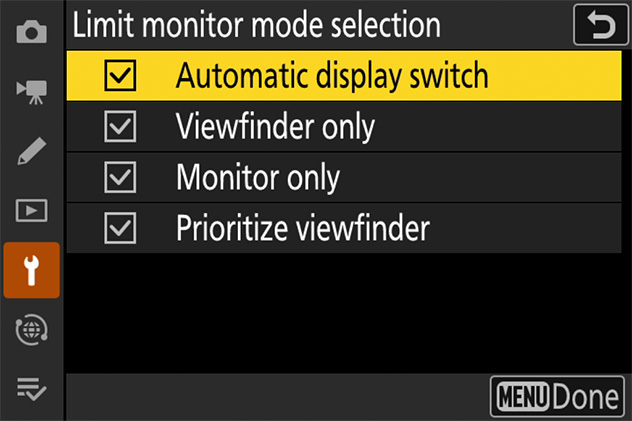
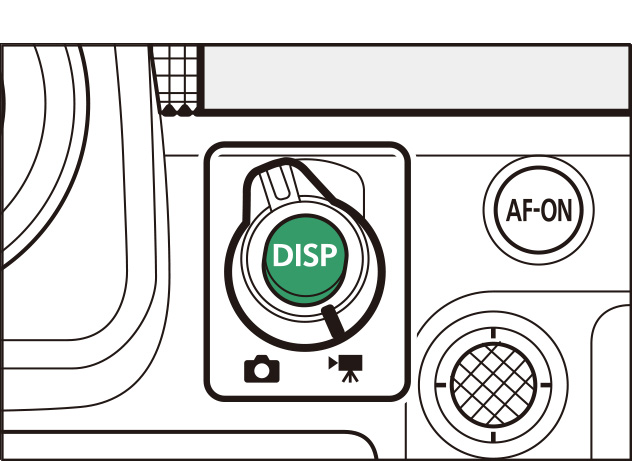
Press the (monitor mode) button to cycle between viewfinder and monitor displays. The choice of modes can be restricted if desired.
Press the button to cycle through the displays as follows.
[Automatic display switch]: The camera automatically switches between the viewfinder and monitor displays based on information from the eye sensor.
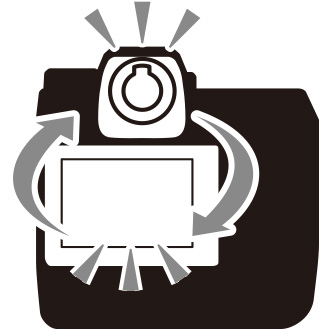
[Viewfinder only]: The monitor remains blank. The viewfinder is used for shooting, menus, and playback.
[Monitor only]: The monitor is used for shooting, menus, and playback. The viewfinder display will remain blank even if you put your eye to the viewfinder.
[Prioritize viewfinder]: In photo mode, placing your eye to the viewfinder turns the viewfinder on; the monitor remains off after you take your eye away. In video mode, this option functions in the same way as [Automatic display switch].
You can limit the choice of monitor modes available using the [Limit monitor mode selection] item in the setup menu. Highlight options and press or to select () or deselect (). Options marked with a check () can be selected via the monitor mode button.