The settings covered in this section control video picture quality.
Choose the video frame size (in pixels) and frame rate.
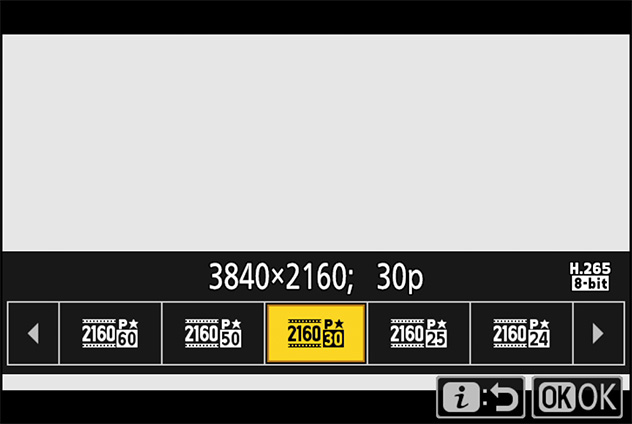
1 With the camera in video mode, press the button and then highlight [Frame size/frame rate] and press .

2 Press or to highlight the desired option and press to select.
Consult the table below for information on the [Frame size/frame rate] options available when [N‑RAW 12‑bit (NEV)] or [ProRes RAW HQ 12‑bit (MOV)] is selected.
| Option | Video file type | |
|---|---|---|
| N‑RAW 12‑bit | ProRes RAW HQ 12‑bit | |
| [[FX] 8256×4644; 60p] | — | |
| [[FX] 8256×4644; 50p] | — | |
| [[FX] 8256×4644; 30p] | — | |
| [[FX] 8256×4644; 25p] | — | |
| [[FX] 8256×4644; 24p] | — | |
| [[FX] 4128×2322; 120p] | — | |
| [[FX] 4128×2322; 100p] | — | |
| [[FX] 4128×2322; 60p] | ||
| [[FX] 4128×2322; 50p] | ||
| [[FX] 4128×2322; 30p] | ||
| [[FX] 4128×2322; 25p] | ||
| [[FX] 4128×2322; 24p] | ||
| [[DX] 5392×3032; 60p] | — | |
| [[DX] 5392×3032; 50p] | — | |
| [[DX] 5392×3032; 30p] | ||
| [[DX] 5392×3032; 25p] | ||
| [[DX] 5392×3032; 24p] | ||
| [[2.3×] 3840×2160; 120p] | — | |
| [[2.3×] 3840×2160; 100p] | — | |
| [[2.3×] 3840×2160; 60p] | — | |
| [[2.3×] 3840×2160; 50p] | — | |
Click here for the image optimized for small screens. (JPG 123KB).
Consult the table below for information on the [Frame size/frame rate] options available when [ProRes 422 HQ 10‑bit (MOV)], [H.265 10‑bit (MOV)], [H.265 8‑bit (MOV)], or [H.264 8‑bit (MP4)] is selected.
| Option1 | Video file type | |||
|---|---|---|---|---|
| ProRes 422 HQ 10-bit | H.265 10-bit | H.265 8-bit | H.264 8-bit | |
| [7680×4320; 30p]2, 3 | — | — | ||
| [7680×4320; 25p]2, 3 | — | — | ||
| [7680×4320; 24p]2, 3 | — | — | ||
| [3840×2160; 120p]2, 4 | — | — | ||
| [3840×2160; 100p]2, 4 | — | — | ||
| [3840×2160; 60p]4 | — | |||
| [3840×2160; 50p]4 | — | |||
| [3840×2160; 30p]4 | — | |||
| [3840×2160; 25p]4 | — | |||
| [3840×2160; 24p]4 | — | |||
| [1920×1080; 120p]2 | — | |||
| [1920×1080; 100p]2 | — | |||
| [1920×1080; 60p] | ||||
| [1920×1080; 50p] | ||||
| [1920×1080; 30p] | — | |||
| [1920×1080; 25p] | — | |||
| [1920×1080; 24p] | — | |||
Click here for the image optimized for small screens. (JPG 102KB).
Choose a video quality option when filming footage with [N‑RAW 12‑bit (NEV)] selected for [Video file type] in the video recording menu.
Settings can be adjusted using [Video quality (N‑RAW)] in the video recording menu. Choose from [High quality] and [Normal].
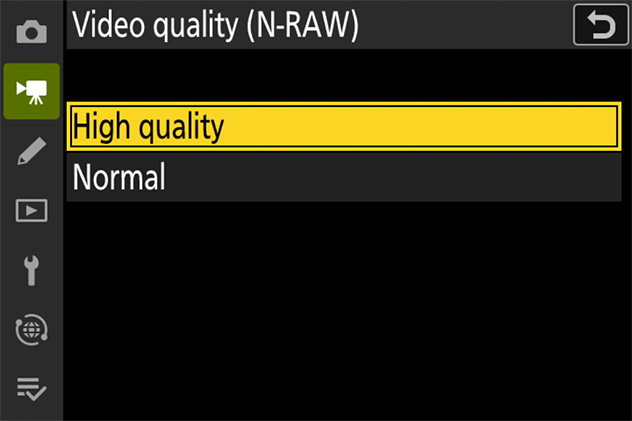
[High quality] features a bit rate approximately 1.6 to 2 times higher than [Normal], resulting in larger files. [Normal] is recommended when recording to memory cards with slow transfer speeds, as the higher bit rate for [High quality] necessitates higher transfer speeds.
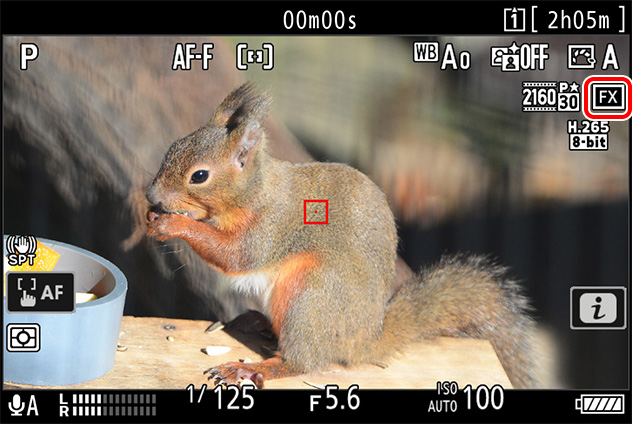
Choose the image area. Select [FX] to shoot videos in what is referred to as "FX-based video format", [DX] to shoot in "DX-based video format".
The illustration shows the crops used for filming videos. Regardless of the option selected, the aspect ratio is 16:9.
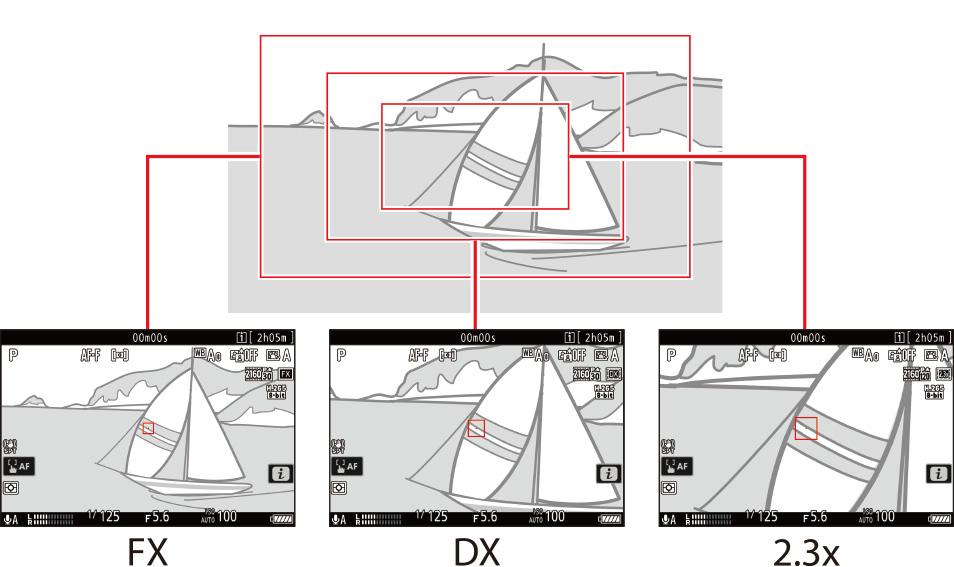
The sizes of the different crops are as follows.
| Format | Size |
|---|---|
| FX-based video format | Approx. 35.9 × 20.2 mm |
| DX-based video format | Approx. 23.5 × 13.2 mm |
| 2.3× | Approx. 16.7 × 9.4 mm |
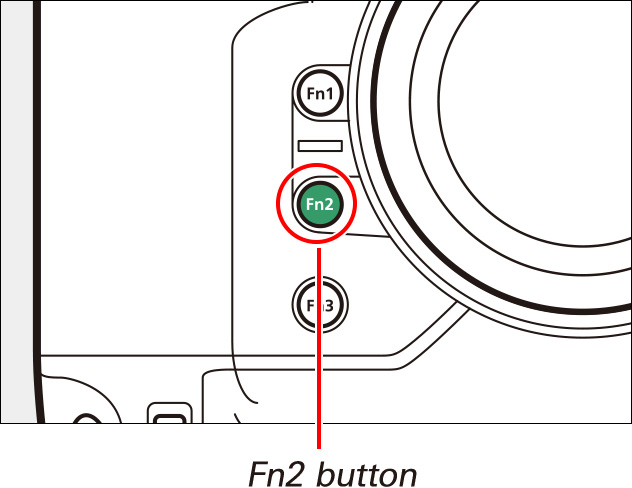
The image area can be selected by holding the Fn2 button and rotating a command dial.
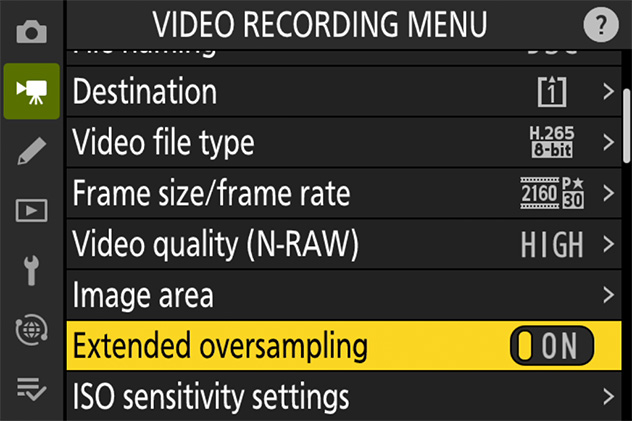
Selecting [ON] optimizes image readout for improved image quality when [3840×2160; 60p] or [3840×2160; 50p] is chosen for [Frame size/frame rate] in the video recording menu.
Settings can be adjusted using [Extended oversampling] in the video recording menu.
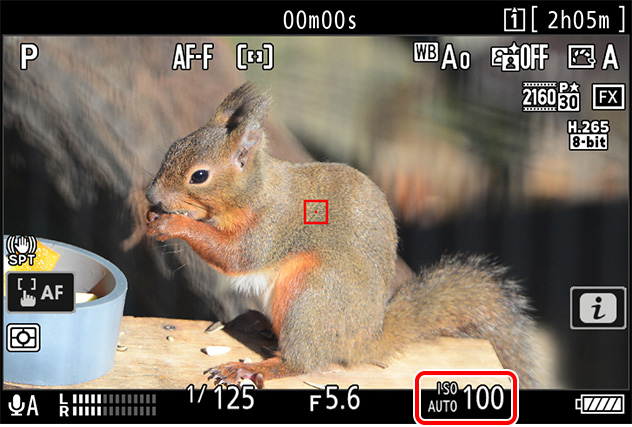
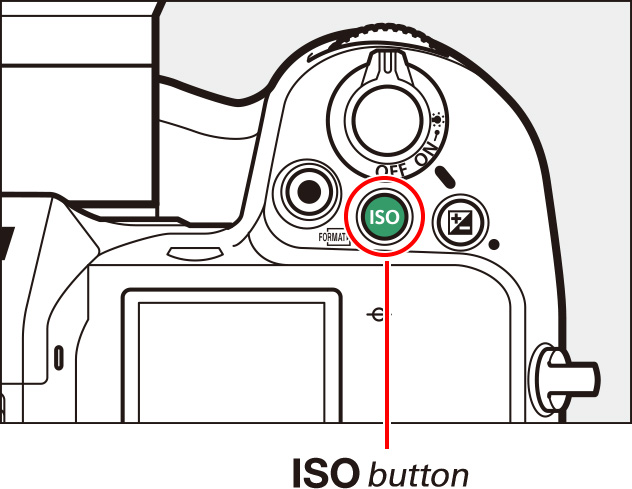
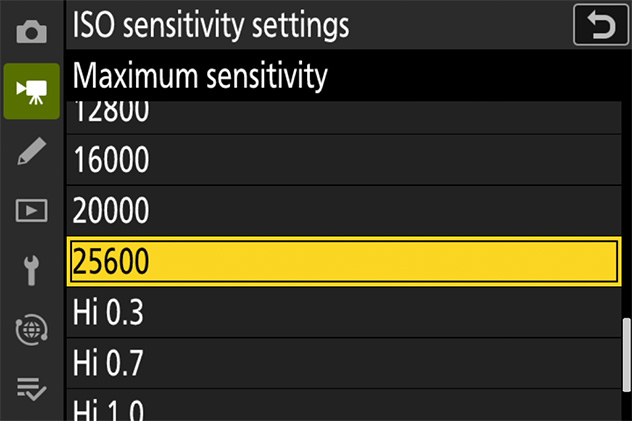
Videos recorded in modes P, S, and A are shot using auto ISO sensitivity (ISO AUTO). You can, however, select an upper limit to prevent the camera choosing too high a value. In mode M, you also have the option of adjusting ISO sensitivity manually.
Adjust white balance according to lighting conditions.
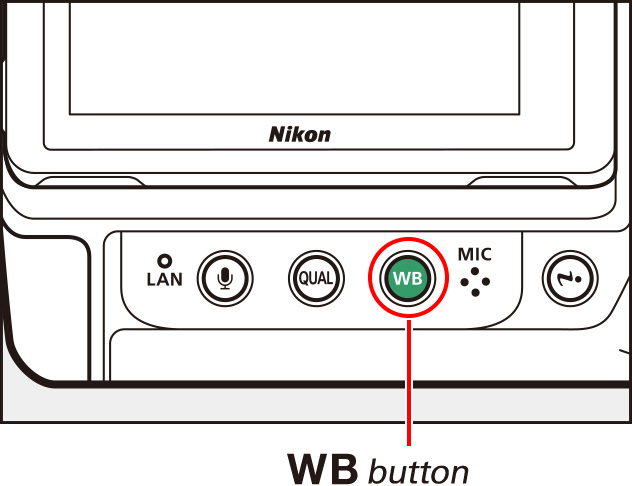
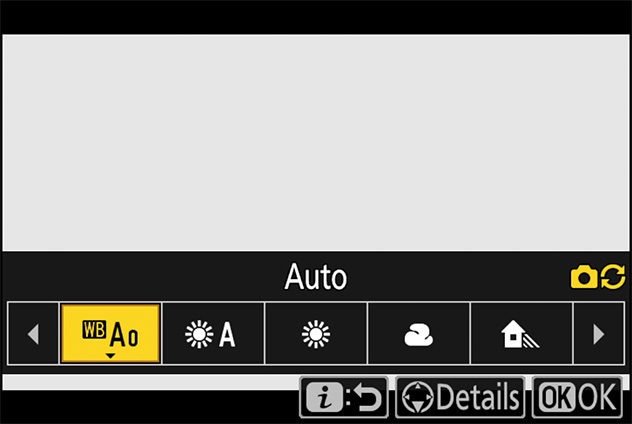
To use the option currently selected for photos, choose [Same as photo settings] for [White balance] in the video recording menu.
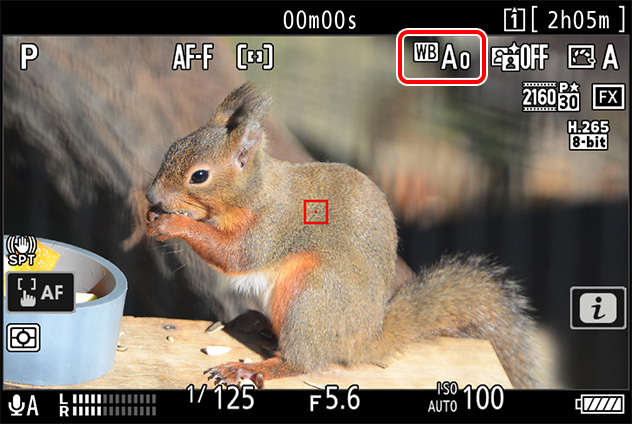
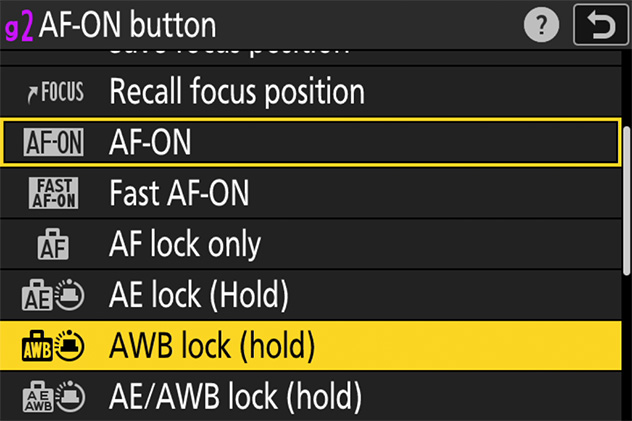
You can temporarily lock auto white balance when shooting in [Auto] and [Natural light auto] modes. This can, for example, be used to prevent colors changing when you zoom in on subjects wearing reds, greens, or other bright colors.
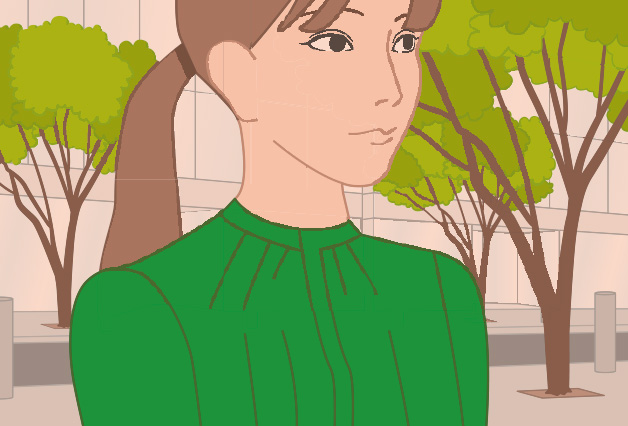
White balance in close shot is adjusted to reflect colors of objects visible in frame, potentially lending shot a color cast.
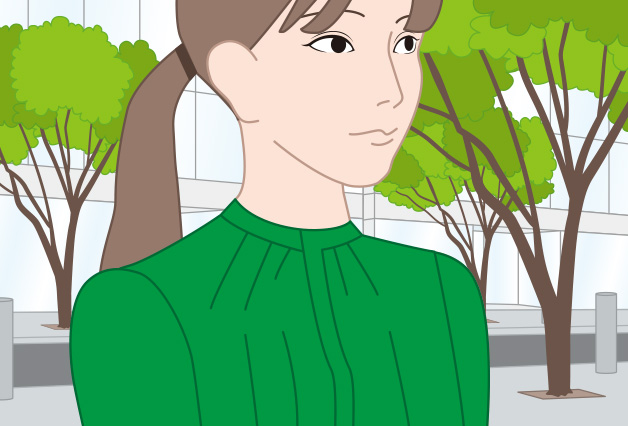
Using auto white-balance lock (AWB-L) to lock auto white balance before starting close shot eliminates color cast.
Use preset manual white balance to measure a custom white balance value for the current light source and save it for later recall.
1 Hold the WB button and rotate the main command dial to select PRE.
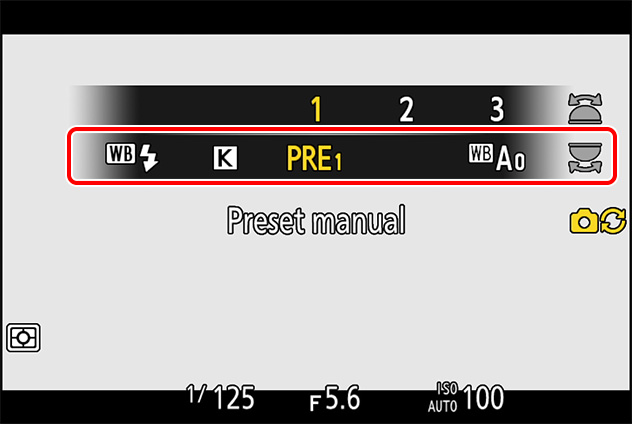
2 Hold the WB button and rotate the sub-command dial until the destination preset is displayed.
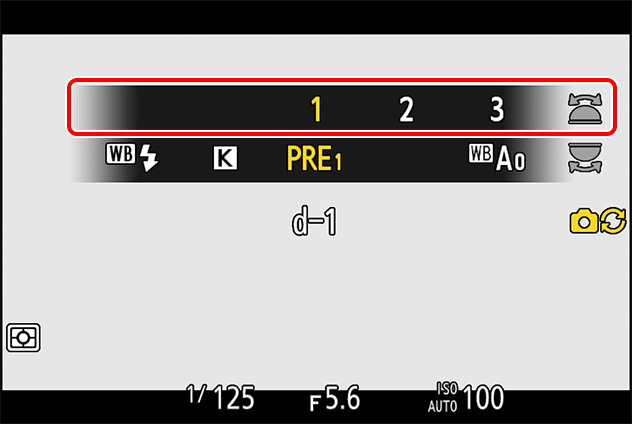
3 Release the WB button briefly and then press it again to select direct measurement mode.
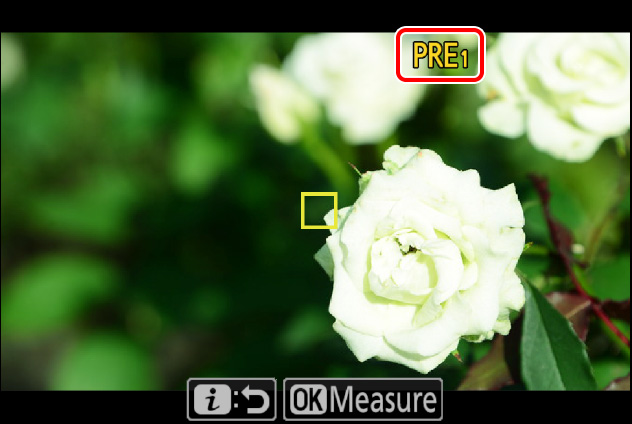
4 While PRE flashes in the display, use the multi selector to position the over a white or gray area of the subject.
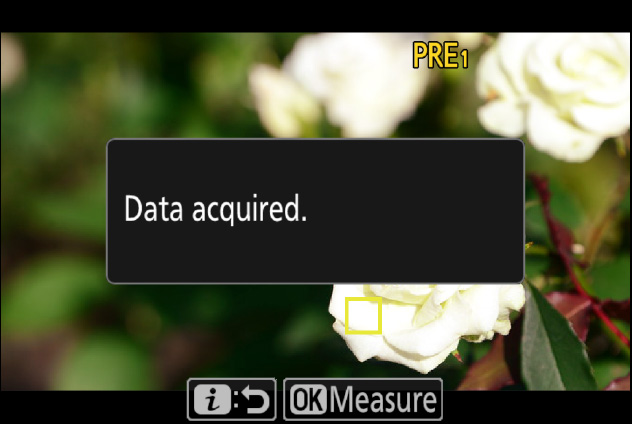
5 Press the button to exit direct measurement mode.
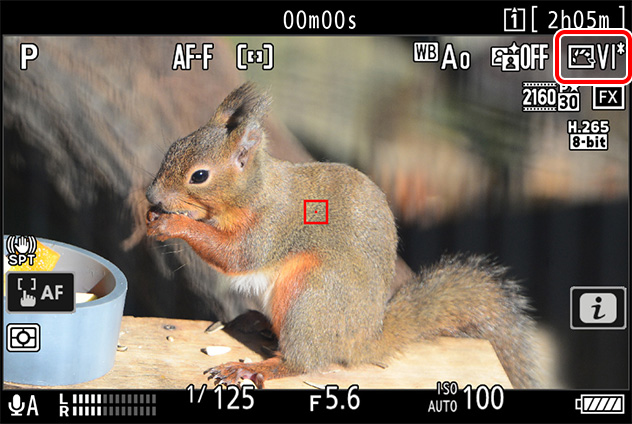
Choose a Picture Control according to the subject or type of scene. Choose [Same as photo settings] to use the option currently selected for photos. [Flat] preserves details over a wide tone range, from highlights to shadows, making it a good choice for footage that will be tweaked in post-production. Combining this option with highlight-weighted metering minimizes loss of detail in highlights.
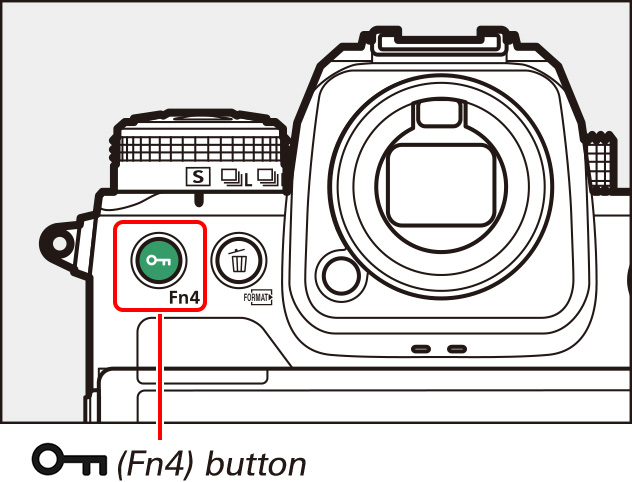
Hold the (Fn4) button and rotate the main command dial to choose a Picture Control.
| [Auto] | The camera automatically adjusts settings based on the [Neutral] Picture Control to optimize contrast and outlines for videos.
|
|
|---|---|---|
| [Standard] | Choose for results that give more priority to resolution than does [Auto]. | |
| [Neutral] | Minimal processing for natural results.
|
|
| [Vivid] | Pictures are enhanced for a vivid, photoprint effect.
|
|
| [Monochrome] | Take monochrome photographs. | |
| [Portrait] | Smooth complexions for natural-looking portraits. | |
| [Landscape] | Shoot vibrant landscapes and cityscapes. | |
| [Flat] | Details are preserved over a wide tone range, from highlights to shadows.
|
|
| – |
[Creative Picture Control] | Creative Picture Controls offer unique combinations of hue, tone, saturation, and other settings tuned for particular effects.
|
Click here for the image optimized for small screens. (JPG 142KB).

Picture Controls that have been modified from default settings are indicated by an asterisk ("").
| [Effect level] | Mute or heighten the effect of Creative Picture Controls. | |
|---|---|---|
| [Quick sharp] | Use [Quick sharp] to quickly adjust levels for balanced [Sharpening], [Mid-range sharpening], and [Clarity]. These parameters can also be adjusted individually. | |
| Manual adjustments |
[Sharpening] | Control the sharpness of details and outlines. |
| [Mid-range sharpening] | Adjust the sharpness of patterns and lines in the range between [Sharpening] and [Clarity]. | |
| [Clarity] | Adjust overall sharpness and the sharpness of thicker outlines without affecting brightness or dynamic range. | |
| [Contrast] | Adjust contrast. | |
| [Brightness] | Raise or lower brightness without loss of detail in highlights or shadows. | |
| [Saturation] | Control the vividness of colors. | |
| [Hue] | Adjust hue. | |
| [Filter effects] | Simulate the effect of color filters on monochrome pictures. | |
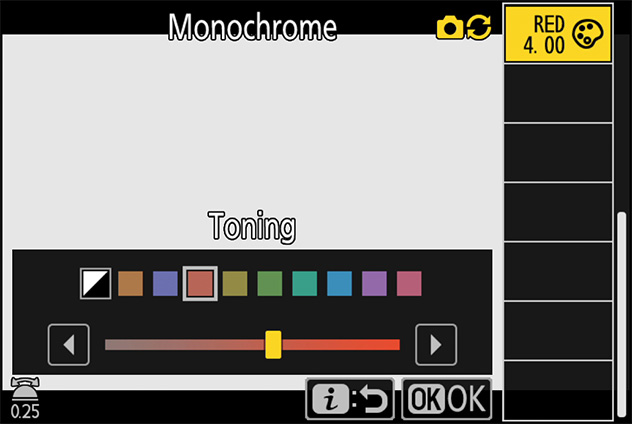
| [Toning] | Choose the tint used in monochrome pictures. | |
| [Toning] (Creative Picture Control) | Choose the shade of color used for Creative Picture Controls. | |
Click here for the image optimized for small screens. (JPG 132KB).
Settings can be adjusted in the range [A−2] to [A+2].
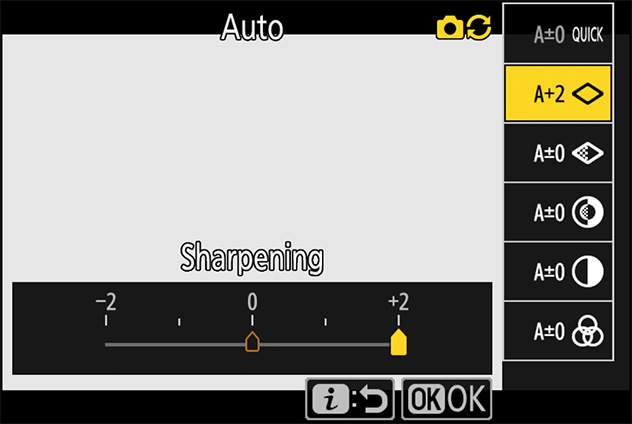
The indicator under the value display in the Picture Control setting menu indicates the previous value for the setting. You'll find that this comes in handy when making adjustments with reference to the previous value.

Choose from the following [Filter effects]:
| [Y] (yellow) * | These options enhance contrast and can be used to tone down the brightness of the sky in landscape photographs. Orange [O] produces more contrast than yellow [Y], red [R] more contrast than orange. |
|---|---|
| [O] (orange) * | |
| [R] (red) * | |
| [G] (green) * | Green softens skin tones. Use for portraits and the like. |
* The term in parentheses is the name of the corresponding third-party color filter for black-and-white photography.
Pressing when an option other than [B&W] (black-and-white) is selected for [Toning] displays saturation options. Press or to adjust saturation.
Adjust HLG video image processing options for use when [HLG] is chosen for tone mode.
HLG quality can be adjusted using [HLG quality] in the video recording menu.
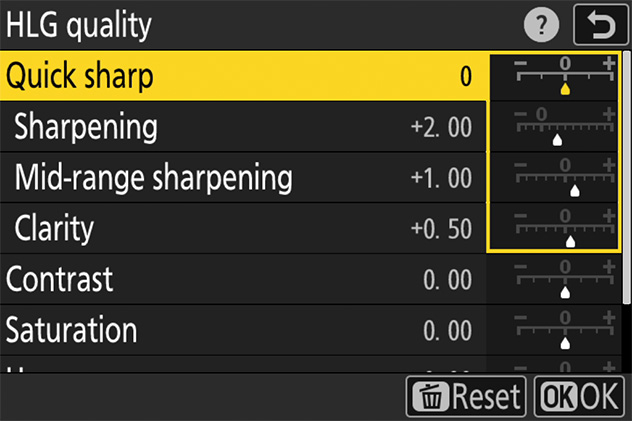
| [Quick sharp] | Use [Quick sharp] to quickly adjust levels for balanced [Sharpening], [Mid-range sharpening], and [Clarity]. These parameters can also be adjusted individually. | |
|---|---|---|
| Manual adjustments |
[Sharpening] | Control the sharpness of details and outlines. |
| [Mid-range sharpening] | Adjust the sharpness of patterns and lines in the range between [Sharpening] and [Clarity]. | |
| [Clarity] | Adjust overall sharpness and the sharpness of thicker outlines without affecting brightness or dynamic range. | |
| [Contrast] | Adjust contrast. | |
| [Saturation] | Control the vividness of colors. | |
| [Hue] | Adjust hue. | |
Click here for the image optimized for small screens. (JPG 85.7KB).
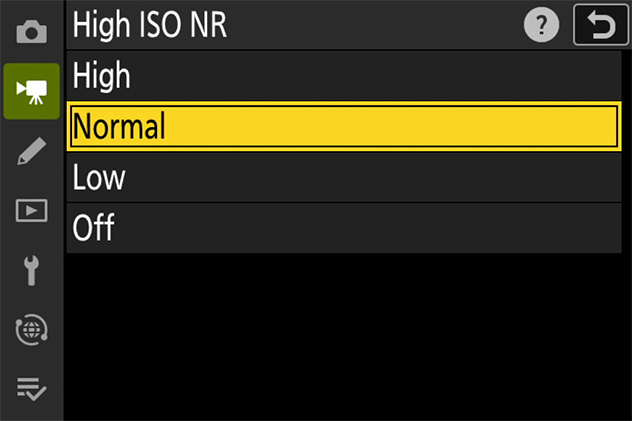
Reduce "noise" (randomly-spaced bright pixels) in videos recorded at high ISO sensitivities.
Choose a setting using the [High ISO NR] item in the video recording menu.
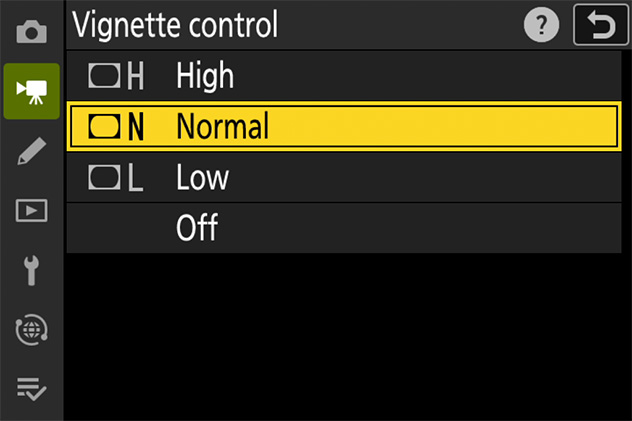
Vignette control reduces "vignetting"—a drop in brightness at the edges of the frame—by an amount that varies from lens to lens. Its effects are most noticeable at maximum aperture.
[Vignette control] is available in both the photo shooting and video recording menus. Changes to one apply to the other.
Select [ON] to reduce diffraction at small apertures (high f-numbers).
[Diffraction compensation] is available in both the photo shooting and video recording menus. Changes to one apply to the other.
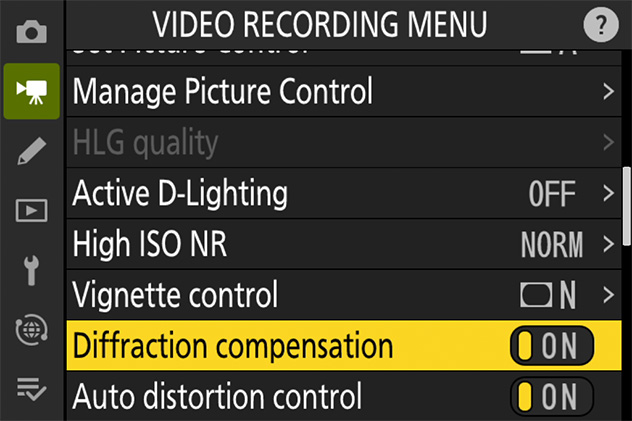
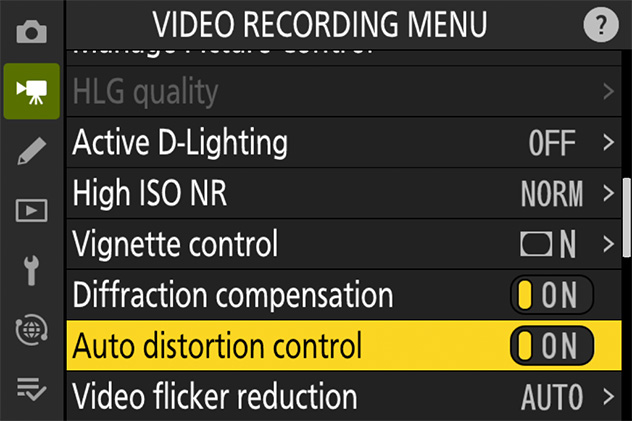
Select [ON] to reduce barrel distortion when shooting with wide-angle lenses and pin-cushion distortion when shooting with long lenses.
[Auto distortion control] is available in both the photo shooting and video recording menus. Changes to one apply to the other.
Choose whether to enable vibration reduction.
1 With the camera in video mode, press the button and then highlight [Vibration reduction] and press .
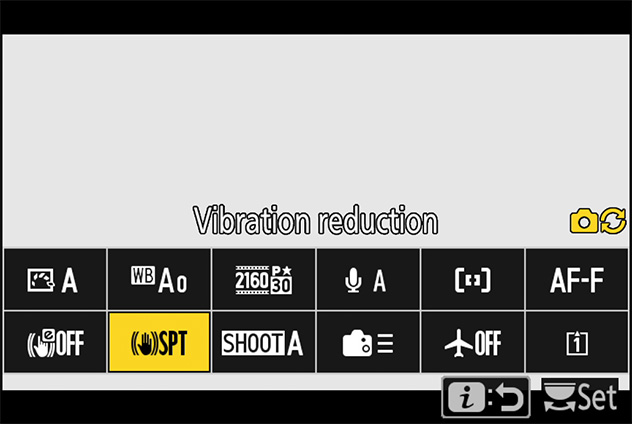
2 Press or to highlight the desired option and press to select.
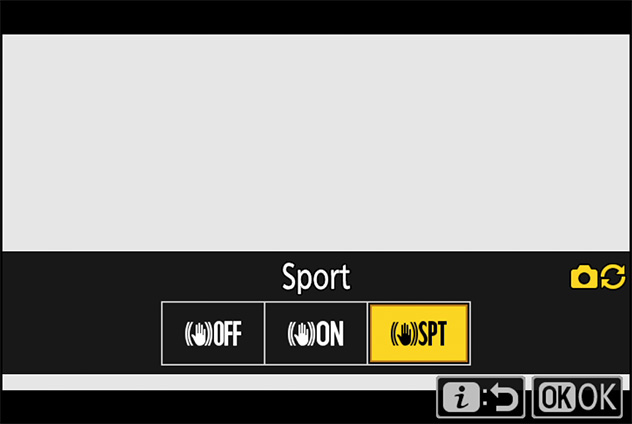
| [Normal] | Choose for enhanced vibration reduction when photographing static subjects. |
|---|---|
| [Sport] | Choose when photographing athletes and other subjects that are moving rapidly and unpredictably. [Sport] is recommended for videos. Selecting [Sport] eliminates choppiness during recording. |
| [Off] | Vibration reduction is disabled. |
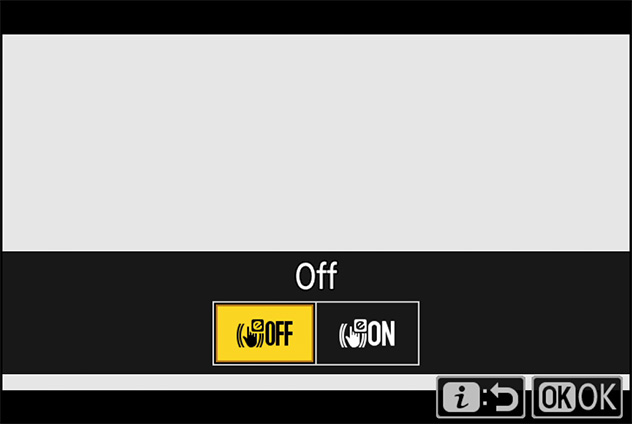
Choose whether to enable electronic vibration reduction in video mode.
1 With the camera in video mode, press the button and then highlight [Electronic VR] and press .
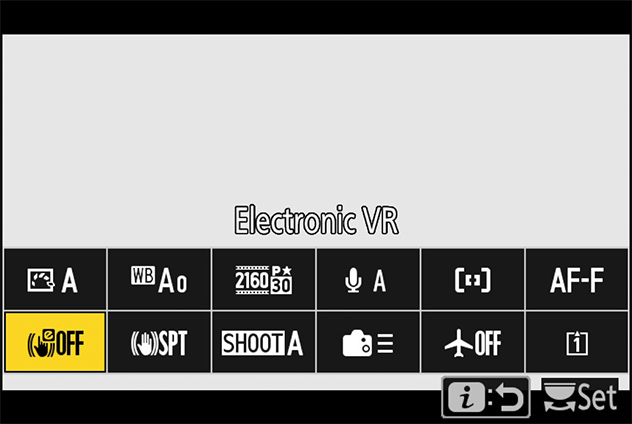
2 Press or to highlight the desired option and press to select.