The settings covered in this section control movie picture quality.
To choose a movie quality option and a frame size and rate for movie recording:
1 Select the desired item.
With the camera in movie mode, press the button to display the -button menu. Press or to highlight Frame size/frame rate or Movie quality and press to view options for the highlighted item.
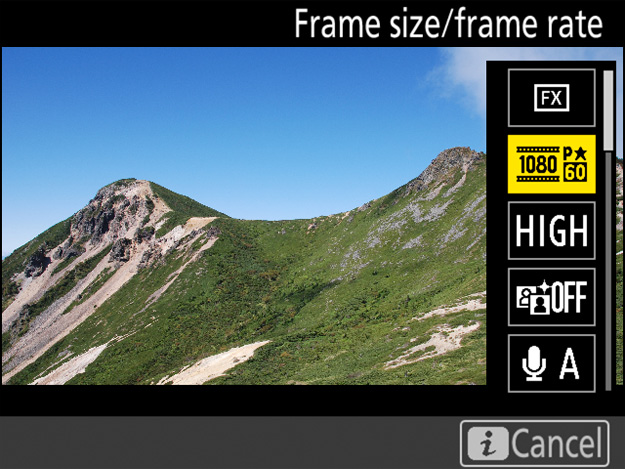
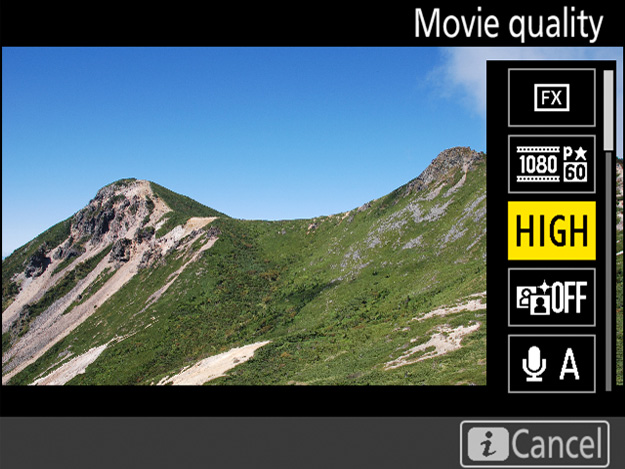
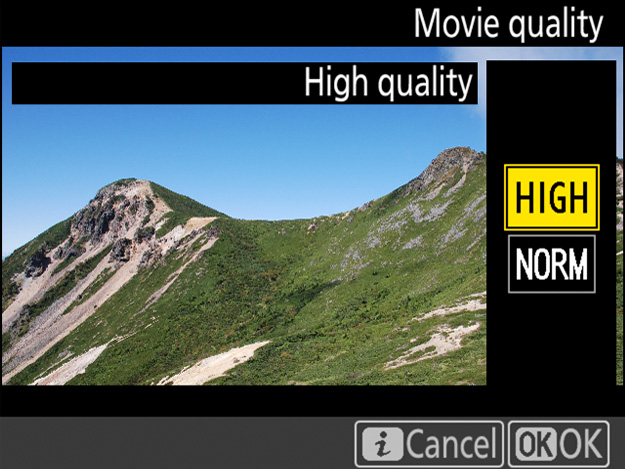
2 Select the desired option.
Press or to highlight the desired option and press to select (frame size and rate options are listed below; the options available for Movie quality are “high” and “normal”). Press the button to exit to the shooting display when settings are complete.
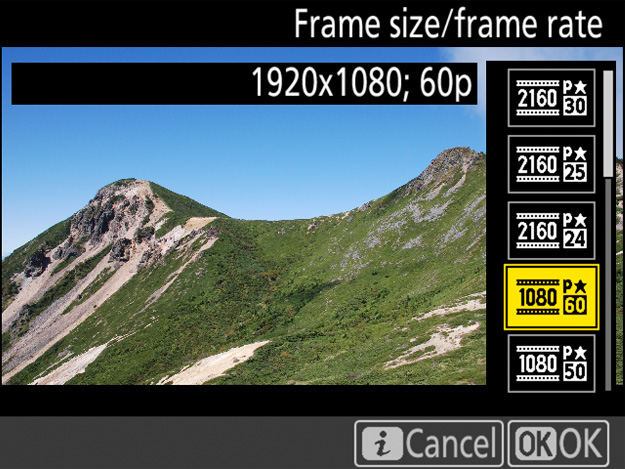
Together, Frame size/frame rate and Movie quality determine the maximum bit rate and maximum length, as shown in the following table.
| Frame size/frame rate1 | Maximum bit rate (Mbps) | Maximum length | ||
|---|---|---|---|---|
| Movie quality: ★ high | Movie quality: normal | |||
| 3840 × 2160 (4K UHD); 30p | 144 | — 2 | 29 min. 59 s3 | |
| 3840 × 2160 (4K UHD); 25p | ||||
| 3840 × 2160 (4K UHD); 24p | ||||
| 1920 × 1080; 60p | 48 | 24 | ||
| 1920 × 1080; 50p | ||||
| 1920 × 1080; 30p | 24 | 12 | ||
| 1920 × 1080; 25p | ||||
| 1920 × 1080; 24p | ||||
| 1280 × 720; 60p | ||||
| 1280 × 720; 50p | ||||
| 1920 × 1080; 30p ×4 (slow-mo) | — 4 | 36 | Recording: 3 min. Playback: 12 min. |
|
| 1920 × 1080; 25p ×4 (slow-mo) | ||||
| 1920 × 1080; 24p ×5 (slow-mo) | — 4 | 29 | Recording: 3 min. Playback: 15 min. |
|
Click here for the image optimized for small screens. (JPG 158KB).
When exposure mode P, S, or A is selected in movie mode, the camera adjusts ISO sensitivity automatically. You can, however, choose the upper limit to prevent the camera choosing too high a value. In exposure mode M, you also have the option of adjusting ISO sensitivity manually.
The camera adjusts ISO sensitivity automatically in response to shooting conditions, choosing from values of from ISO 64 to (at default settings) Hi 2. The current value is displayed in the monitor and control panel.
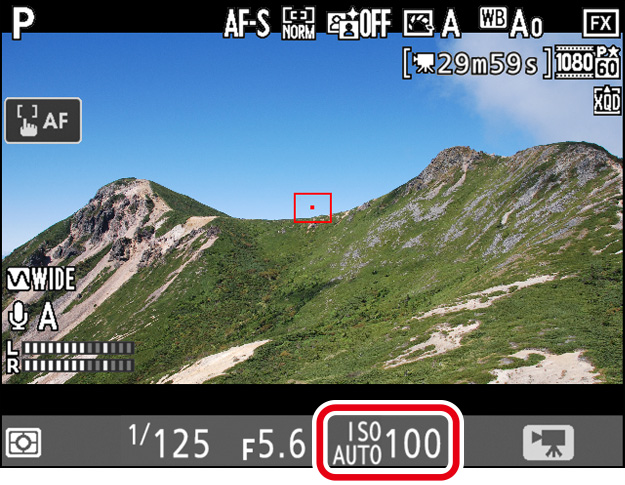
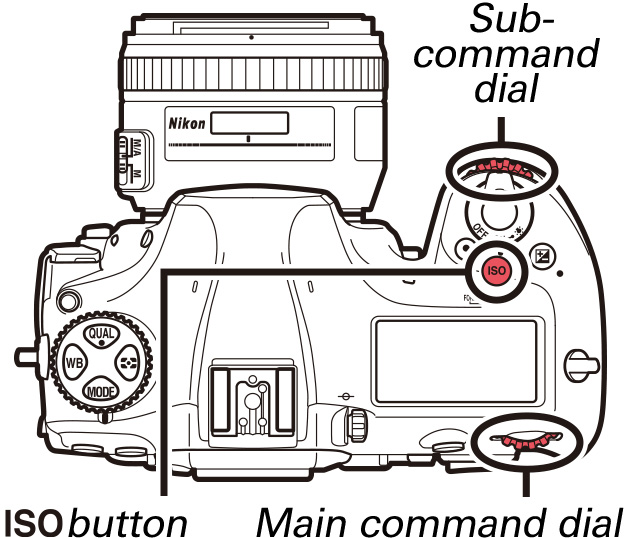
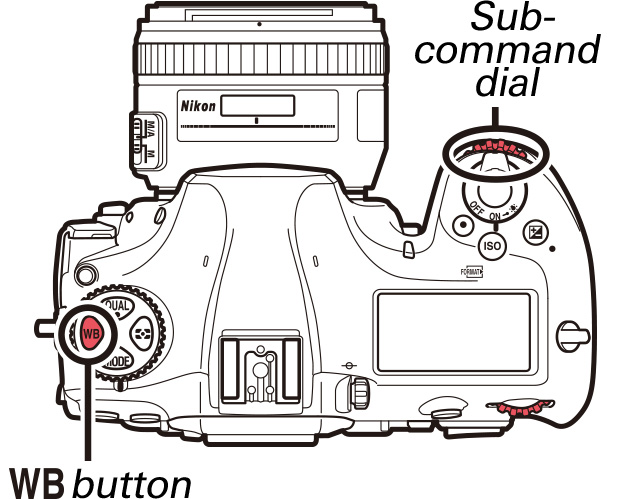
When the camera is in movie mode, you can enable or disable auto ISO sensitivity control by keeping the button pressed and rotating the sub-command dial; the display shows ISO AUTO when auto ISO sensitivity control is enabled and ISO when it is disabled. When auto ISO sensitivity control is disabled, ISO sensitivity can be manually set to values between ISO 64 and Hi 2 by keeping the button pressed while rotating the main command dial. Current ISO sensitivity settings are displayed in the monitor and control panel.
ISO sensitivity can also be adjusted using the ISO sensitivity settings item in the movie shooting menu. Use Auto ISO control (mode M) to enable or disable auto ISO sensitivity control and ISO sensitivity (mode M) to choose the value used when auto ISO sensitivity control is disabled.
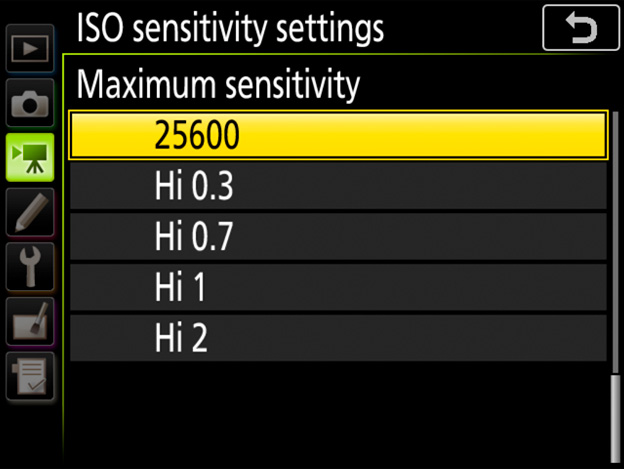
To prevent auto ISO sensitivity control setting ISO sensitivity too high, you can use the ISO sensitivity settings > Maximum sensitivity option in the movie shooting menu to select an upper limit. Choose from values between ISO 200 and Hi 2. The selected setting applies in modes P, S, and A and when auto ISO sensitivity control is enabled in mode M.
At high ISO sensitivities, the camera may have difficulty focusing and noise (randomly-spaced bright pixels, fog, or lines) may increase. This can be prevented by choosing a lower value for ISO sensitivity settings > Maximum sensitivity in the movie shooting menu.
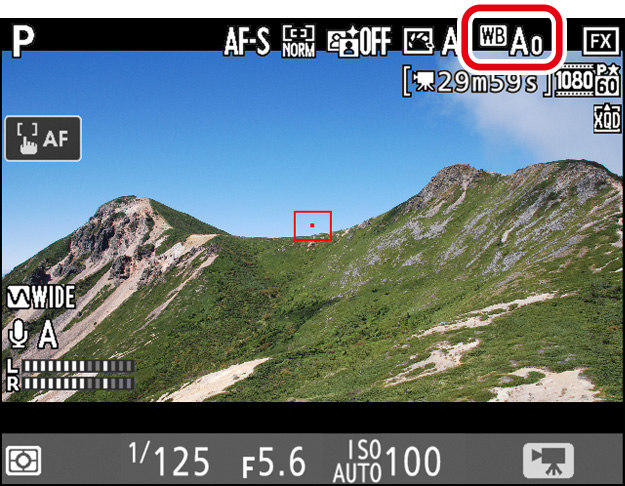
Adjust white balance according to lighting conditions.
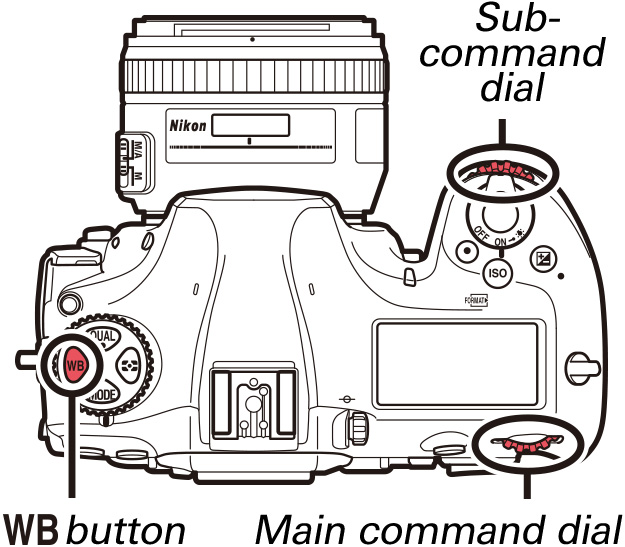
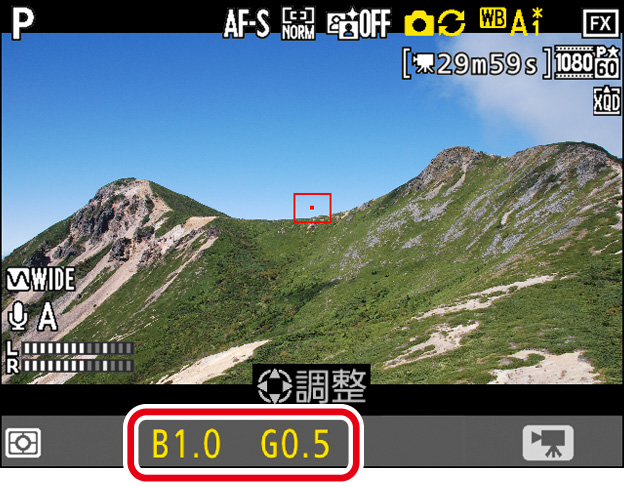
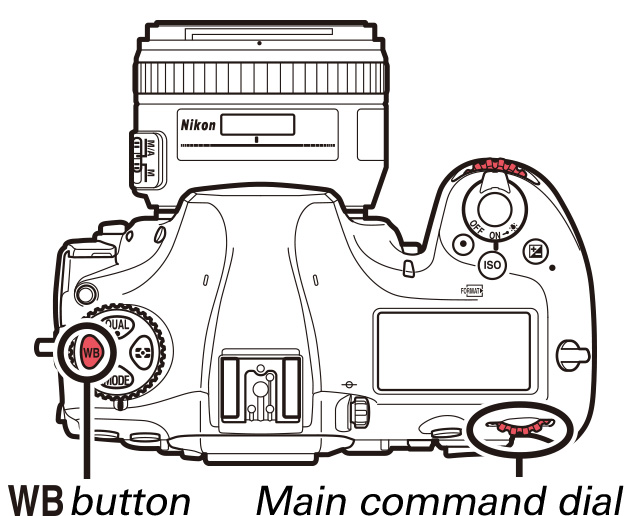
To select a white balance option without exiting movie mode, press the button and rotate the main command dial. The results of the new setting can be previewed in the monitor. When (Auto), (Fluorescent), (Preset manual), or (Choose color temp.) is selected, you can choose a sub-option, white balance preset, or color temperature by pressing the button and rotating the sub-command dial.
The current white balance setting is displayed in the monitor and control panel.
To fine-tune white balance in live view, hold the button while using the multi selector. Press or to fine-tune white balance on the amber (A)–blue (B) axis and or to fine-tune on the green (G)–magenta (M) axis. When (Choose color temp.) is selected, the button can be used to select the color temperature, although only for the amber (A)–blue (B) axis: keeping the the button pressed, press or to highlight a digit and press or to change. To fine-tune preset manual white balance or to fine-tune color temperature on the green (G)–magenta (M) axis, use the White balance option in the movie shooting menu.

Choose Same as photo settings to use the white balance settings currently selected in the photo shooting menu.
Use preset manual white balance to measure a custom white balance value for the current light source and save it for later recall.
1 Set white balance to (Preset manual).
Press the button and rotate the main command dial until is displayed in the monitor.
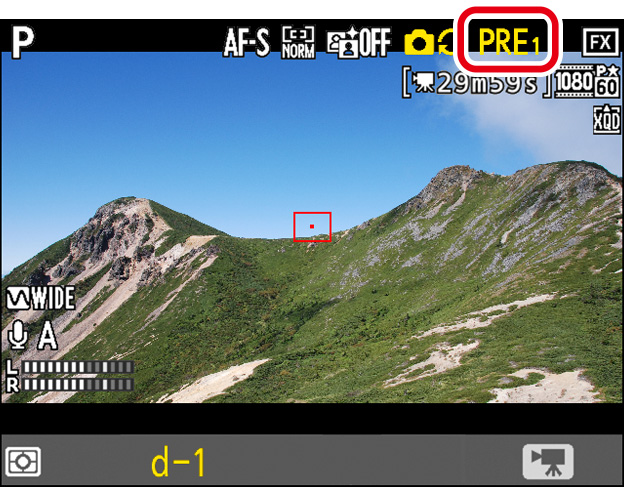
2 Select a preset.
Press the button and rotate the subcommand dial until the desired white balance preset (d-1 to d-6) is displayed in the monitor.
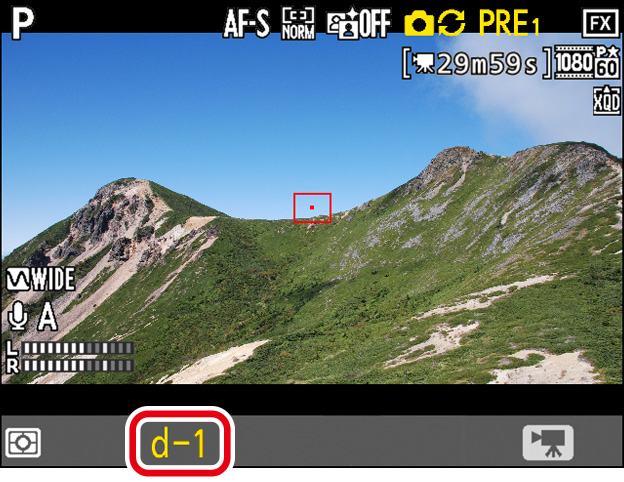
3 Select direct measurement mode.
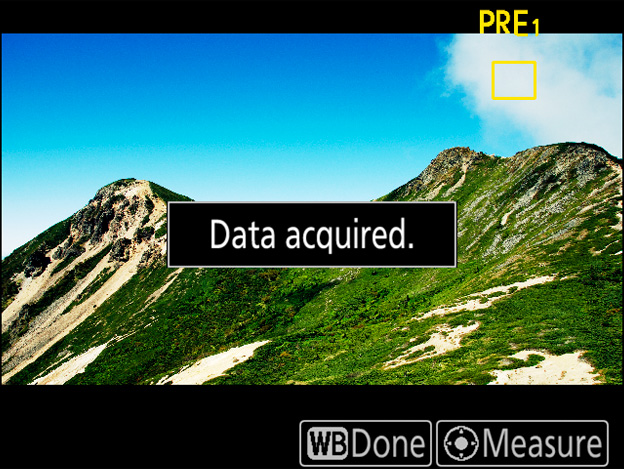
Release the button briefly and then press the button until the icon in the monitor starts to flash. A spot white balance target () will be displayed in yellow at the selected focus point.
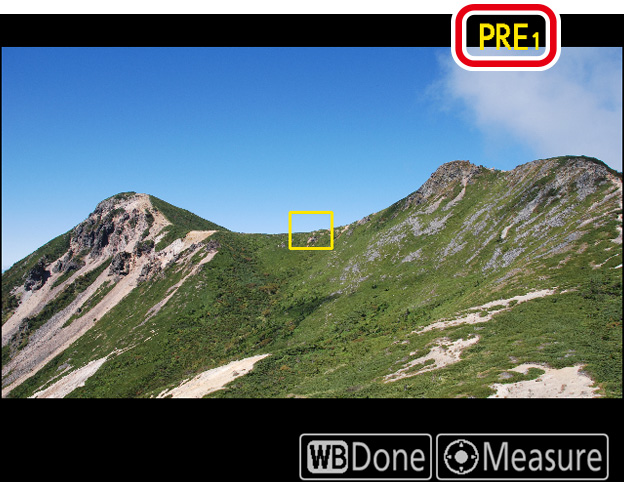
4 Position the target over a white or grey area.
While flashes in the display, use the multi selector to position the over a white or grey area of the subject. To zoom in on the area around the target for more precise positioning, press the button. You can also measure white balance anywhere in the frame by tapping your subject in the monitor, in which case you can skip Step 5.
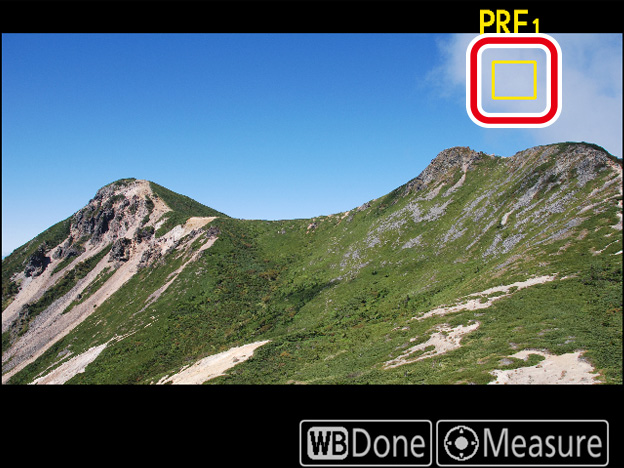
5 Measure white balance.
Press the center of the multi selector or press the shutter-release button all the way down to measure white balance.
6 Exit direct measurement mode.
Press the button to exit direct measurement mode.
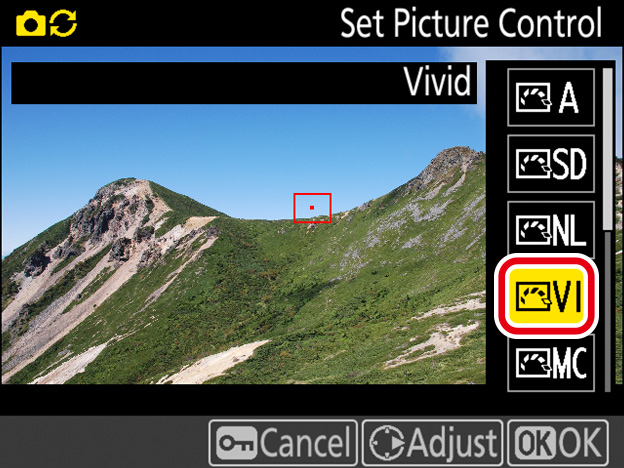
Choose a Picture Control according to the subject or type of scene. Choose Same as photo settings to use the Picture Control settings currently selected in the photo shooting menu, or select Flat to preserve details over a wide tone range, from highlights to shadows, maximizing the potential for tweaking in post-production. Using Flat with highlightweighted metering minimizes loss of detail in highlights.
To choose a Picture Control without exiting live view:
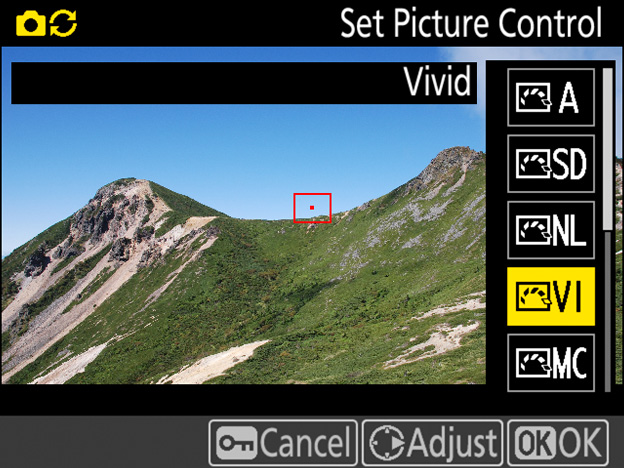
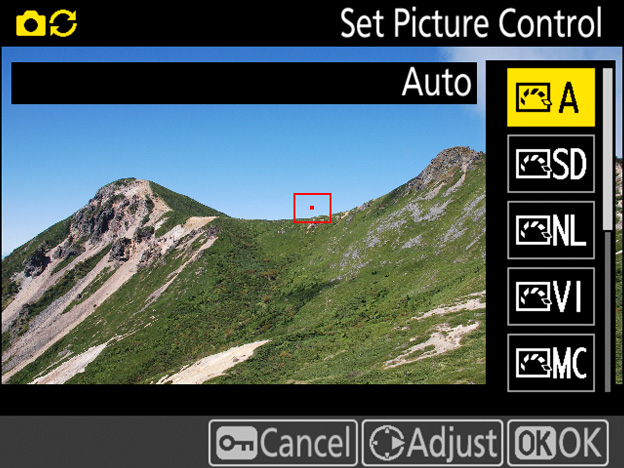
1 Display the Picture Control list.
In movie mode, press the (/) button to view a list of Picture Controls.

2 Select a Picture Control.
Press or to highlight one of the options listed below and press to select the highlighted item and return to the shooting display. The display will immediately be updated to show the effects of the selected Picture Control.
|
Auto |
The camera automatically adjusts hues and tones based on the Standard Picture Control. The complexions of portrait subjects will appear softer, and such elements as the foliage and sky in outdoor shots more vivid, than in pictures taken with the Standard Picture Control. |
|---|---|
|
Standard |
Standard processing for balanced results. Recommended for most situations. |
|
Neutral |
Minimal processing for natural results. Choose for footage that you intend to process in post-production. |
|
Vivid |
Footage is enhanced for a vivid, photoprint effect with emphasis on primary colors. |
|
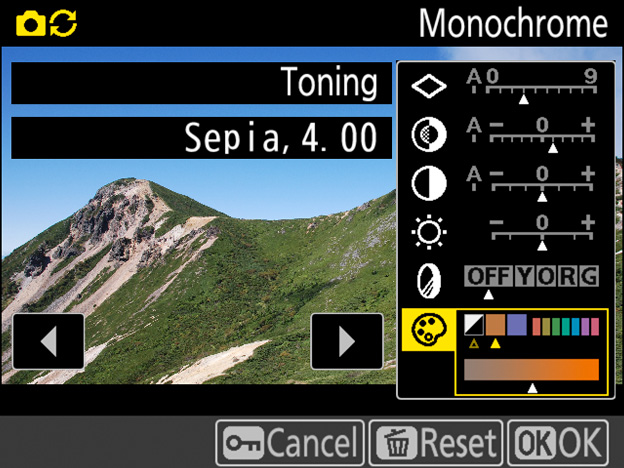
Monochrome |
Record monochrome footage. |
|
Portrait |
Footage of portrait subjects is processed to give skin a natural texture and rounded feel. |
|
Landscape |
Choose for vibrant landscapes and cityscapes. |
|
Flat |
Details are preserved over a wide tone range, from highlights to shadows. Choose for footage that will later be extensively processed or retouched |
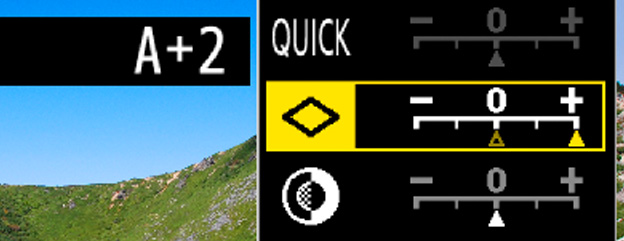
Individual Picture Control parameters can be fine-tuned without leaving live view.
1 Display the Picture Control list.
In movie mode, press the (/) button to view a list of Picture Controls.
2 Select a Picture Control.
Highlight the desired Picture Control and press .

3 Adjust settings.
Press or to highlight a setting (see below), then press or or tap or in the monitor to choose a value in increments of 1, or rotate the sub-command dial or tap or to choose a value in increments of 0.25 (the options available vary with the Picture Control selected). Repeat this step until all settings have been adjusted, or select a preset combination of settings using Quick adjust. Default settings can be restored by pressing the () button.
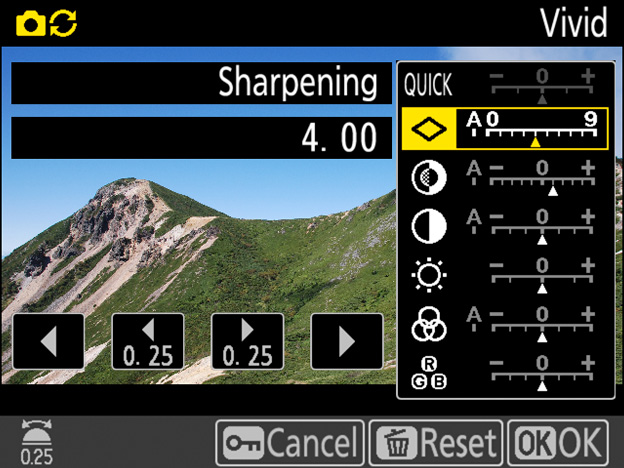
| Quick adjust | Mute or heighten the effect of the selected Picture Control. |
|---|---|
| Manual adjustments: Sharpening | Control the sharpness of outlines. Select A to adjust sharpening automatically according to the type of scene. |
| Manual adjustments: Contrast | Adjust contrast manually or select A to let the camera adjust contrast automatically. |
| Manual adjustments: Brightness | Raise or lower brightness without loss of detail in highlights or shadows. |
| Manual adjustments: Saturation | Control the vividness of colors. Select A to adjust sharpening automatically according to the type of scene. |
| Manual adjustments: Hue | Adjust hue. |
| Manual adjustments: Filter effects | Simulate the effect of color filters on monochrome footage. |
| Manual adjustments: Toning | Choose the tint used in monochrome footage. |
4 Save changes.
Press to save changes.
Picture Controls that have been modified from default settings are shown by an asterisk (“*”).
If Auto is selected for Set Picture Control, settings can be adjusted in the range A−2 to A+2. Rotating the sub-command dial has no effect.
Results for auto sharpening, contrast, and saturation vary with exposure and the position of the subject in the frame. Use a type G, E, or D lens for best results.
The Clarity Picture Control setting does not apply to movies.
The indicator under the value display in the Picture Control setting menu indicates the previous value for the setting. Use this as a reference when adjusting settings.

The options in this menu simulate the effect of color filters on monochrome footage. The following filter effects are available:
| Y (yellow) | Enhances contrast. Can be used to tone down the brightness of the sky in landscape photographs. Orange produces more contrast than yellow, red more contrast than orange. |
|---|---|
| O (orange) | Enhances contrast. Can be used to tone down the brightness of the sky in landscape photographs. Orange produces more contrast than yellow, red more contrast than orange. |
| R (red) | Enhances contrast. Can be used to tone down the brightness of the sky in landscape photographs. Orange produces more contrast than yellow, red more contrast than orange. |
| G (green) | Softens skin tones. Can be used for portraits. |
Pressing when Toning is selected displays saturation options. Press or to adjust saturation. Saturation control is not available when B&W (black-and-white) is selected.
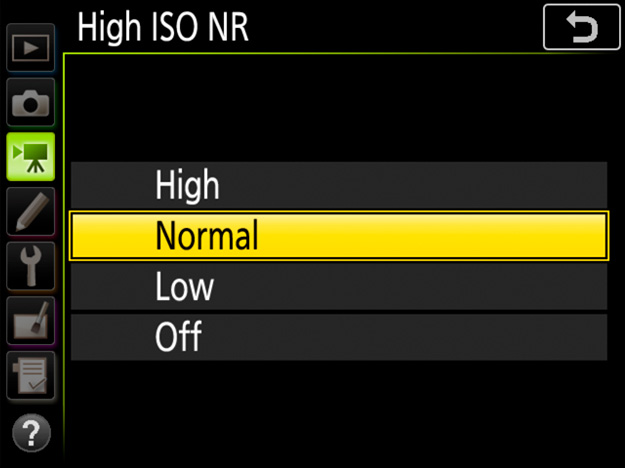
Selecting an option other than Off for High ISO NR in the movie shooting menu reduces noise (randomly-spaced bright pixels), particularly in movies shot at high ISO sensitivities. Choose the amount of noise reduction performed from High, Normal, and Low, but note that edges may soften and the picture may lose definition at higher settings. If Off is selected, noise reduction will be performed only as required and never at an amount as high as when Low is selected.
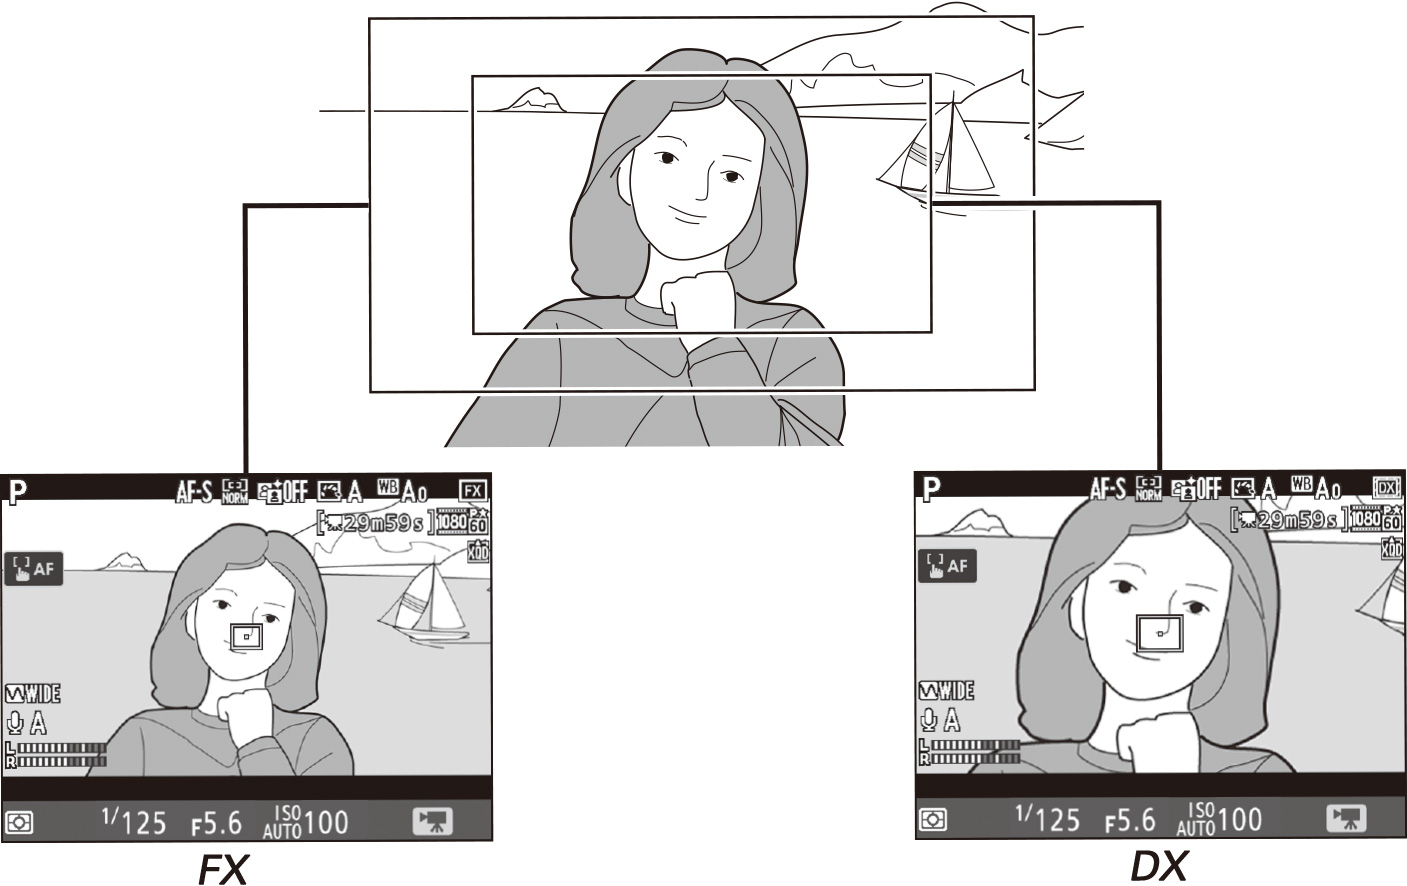
Choose the size of the area on the image sensor used to record movies. Select FX to shoot movies in what is referred to as “FX-based movie format”, DX to shoot in “DX-based movie format”.
The differences between the two formats are shown in the illustration. The sizes of the areas recorded are approximately 35.9 × 20.2 mm (FX-based movie format) and 23.5 × 13.2 mm (DX-based movie format). Movies shot with a DX-format lens and On selected for Image area > Auto DX crop in the movie shooting menu are recorded in DX-based movie format, as are all movies (regardless of the lens used or the option selected for Image area > Choose image area) with a frame size of 1920 × 1080 (slow-mo).
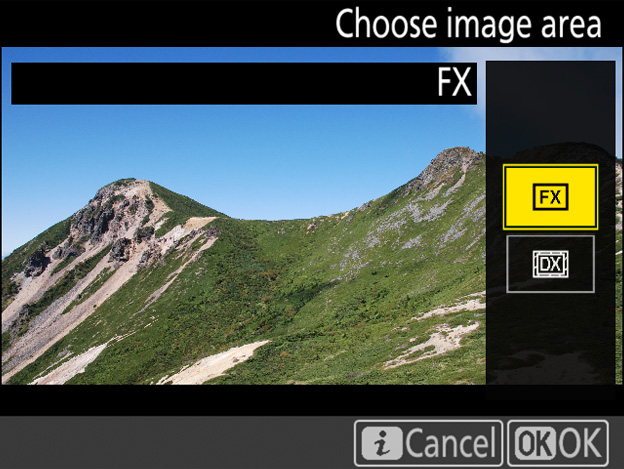
To choose the image area without leaving live view:
1 Select Choose image area in the -button menu.
With the camera in movie mode, press the button to display the -button menu. Press or to highlight Choose image area and press to view options.
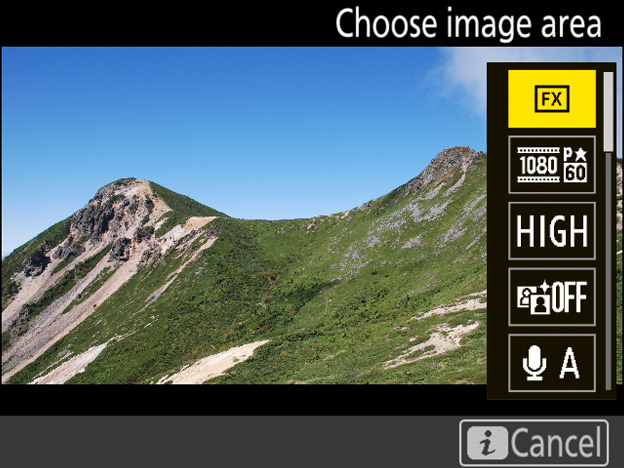
2 Select the desired option.
Press or to highlight the desired option and press to select. Press the button to exit to the shooting display when settings are complete.
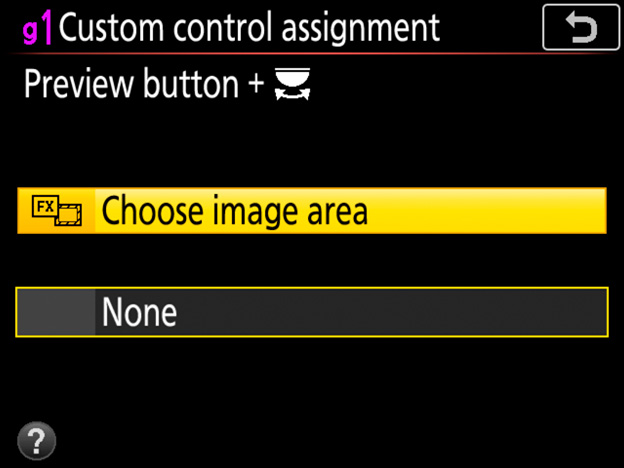
If Choose image area has been assigned to a control using Custom Setting g1 (Custom control assignment see this section), you can also select the image area by pressing the control and rotating a command dial.
To choose whether to enable electronic vibration reduction in movie mode:
1 Select Electronic VR in the -button menu.
With the camera in movie mode, press the button to display the -button menu. Press or to highlight Electronic VR and press 2 to view options.
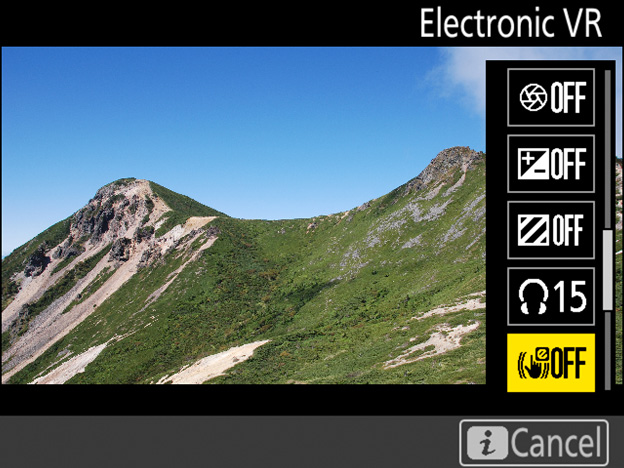
2 Select the desired option.
Press or to highlight the desired option and press to select. Press the button to exit to the shooting display when settings are complete.
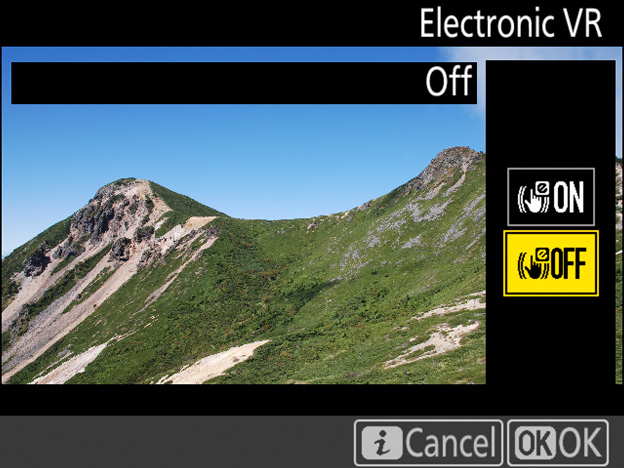
Electronic vibration reduction cannot be used with focus peaking (see this section) or at a frame size (see this section) of 1920 × 1080 (slow-mo) or 3840 × 2160. Enabling electronic vibration reduction: