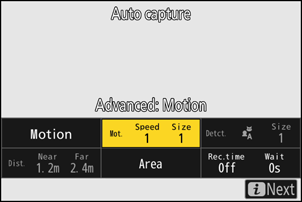
“Capture Criteria” > “Motion”
To view the motion settings display, highlight [Advanced: Motion] in the auto capture settings display and press J. This is where you’ll choose the direction of motion, speed, and apparent size of subjects that will trigger auto capture.
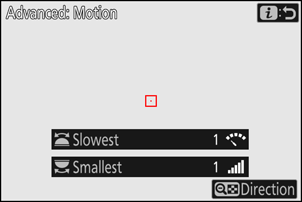
Choosing the Direction of Motion
Choose one or more directions; a subject moving in any of the selected directions will trigger auto capture. Press W (Q) to display options. Highlight directions and press J to select (M) or deselect (U). Subjects moving in directions that are disabled (U) will be ignored.

- Press X to save changes and return to the motion settings display.
- To exit to the motion settings display without saving changes, press i.
Choosing the Subject Speed and Size
Choose the speed and apparent size of subjects that will trigger auto capture.
Rotate the main command dial to choose a [Slowest] of [1] to [5]. Choose lower values to include subjects moving at slower speeds, higher values to restrict subject detection to faster-moving subjects.
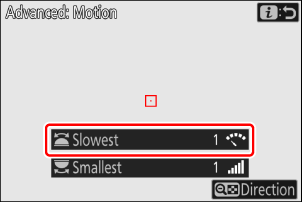
Speed is measured as the time taken for the subject to cross the frame horizontally. The approximate time for each value is listed below.
- [1]: Approximately 5 s or less
- [2]: Approximately 4 s or less
- [3]: Approximately 3 s or less
- [4]: Approximately 2 s or less
- [5]: Approximately 1 s or less
Rotate the sub-command dial to choose a [Smallest] of [1] to [5]. Choose lower values to include smaller subjects, higher values to restrict subject detection to larger subjects.
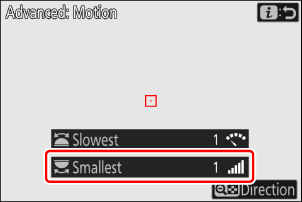
The apparent subject size (approximate size in points) for each setting is listed below.
- [1]: 4 points or larger
- [2]: 8 points or larger
- [3]: 14 points or larger
- [4]: 24 points or larger
- [5]: 34 points or larger

Subject detected in 14 points
- Press i to save changes and return to the auto capture settings display.
- Subjects that meet the criteria for [Smallest] and [Slowest] are shown by green boxes in the motion settings display.
- Selecting [1] for both [Smallest] and [Slowest] makes it easier for the camera to detect subjects of a variety of sizes moving at a variety of speeds. We recommend that you begin from low values and then gradually raise them while checking the display of green boxes in the motion settings display or taking test pictures until subject detection functions as desired.
- Even when [Slowest] and [Smallest] are set to the same value, how the camera detects subjects will differ depending on the camera settings. Reset the values for [Slowest] and [Smallest] after:
- switching photo mode to video mode or vice versa,
- selecting a different release mode, or
- changing video frame rate settings.
If both [Motion] and [Subject detection] are chosen for [Capture criteria], the [Smallest] chosen for the former will have no effect on the [Smallest] chosen for the latter. Changing the [Smallest] selected in the subject detection display has no effect on the [Smallest] selected in the motion settings display. The two conditions will be assessed separately, but only subjects that meet the criteria for both will trigger auto capture.
Focusing
Before initiating auto capture, we recommend that you focus at the distance you anticipate the subject will be. The focus distance can be set by positioning the focus-point target over your subject and pressing the AF-ON button or pressing the shutter-release button halfway. Once auto capture is initiated, the camera will stay focused at this distance while standing by, helping it focus quickly when the subject is detected.

Focus-point target