Athletics
100 Metres (Head On)
Take finish-line photos with the camera positioned behind the finish line.

| Camera settings | ||
|---|---|---|
| Focus mode | AF‑C | |
| AF-area mode | [Wide-area AF (C1)] | |
| Auto capture settings | ||
| [Capture criteria] | [Distance] | |
| [Advanced: Distance] |
|
|
- Target a camera bag or other object positioned in the anticipated subject location to choose the approximate focus distances for [Nearest] and [Farthest], and then fine-tune the focus distances using the command dials.
Size the AF area so that it crosses the track. Positioning it slightly above the track surface helps prevent shooting accidentally being triggered by the ground.

100 Metres (from Behind and to One Side of the Finish Line)
Take finish-line photos with the camera positioned behind and to one side of the finish line. Your subjects will be moving through the frame, meaning that you’ll want to use a [Motion] trigger.

| Camera settings | ||
|---|---|---|
| Focus mode | AF‑C | |
| AF-area mode | [Auto-area AF] | |
| Auto capture settings | ||
| [Capture criteria] | [Motion] | |
| [Advanced: Motion] |
|
|
- The options listed for [Direction] assume that the subjects will be crossing the frame from left to right. Specifying the direction prevents shooting being triggered by people moving in the opposite direction in the background.
- Taking [3] as your reference point, adjust [Slowest] and [Smallest] according to subject speed and size relative to the frame. Users of wide-angle lenses, in particular, will need to choose smaller sizes to reflect the subjects’ smaller apparent size.
- If you are using a wide-angle lens, we recommend that you choose manual focus and shoot at a fixed focus distance.
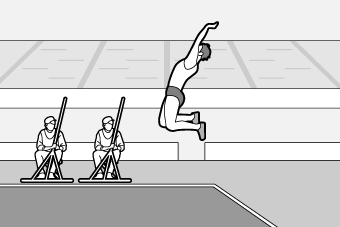
Long Jump (Side Shot)
Place the camera beside the sand pit to capture athletes in mid-jump.
| Camera settings | ||
|---|---|---|
| Focus mode | AF‑C | |
| AF-area mode | [Auto-area AF] | |
| Auto capture settings | ||
| [Capture criteria] | [Motion] | |
| [Advanced: Motion] |
|
|
- The options listed for [Direction] assume that the subjects will be crossing the frame from right to left. Specifying the direction prevents shooting being triggered by people in the frame moving in the opposite direction.
- Taking [3] as your reference point, adjust [Slowest] and [Smallest] according to subject speed and size relative to the frame. Users of wide-angle lenses, in particular, will need to choose smaller sizes to reflect the subjects’ smaller apparent size.
- The camera may detect that the subject has stopped moving and end shooting at the top of the jump or at the landing. This can be prevented by choosing a shooting time using [Timing options] > [Recording time selection].